
:max_bytes(150000):strip_icc():format(webp)/001_best-movies-on-hulu-right-now-5025149-3c80b5664f6541b4a0698333fc447251.jpg)
Updated Bringing Your Memories to Life A Guide to Creating Video Slideshows in Final Cut Pro
Bringing Your Memories to Life: A Guide to Creating Video Slideshows in Final Cut Pro
Complete Guide on How to Create a Video Slideshow with Final Cut Pro

Liza Brown
Mar 27, 2024• Proven solutions
A video slideshow is video footage produced by presenting a series of still images in a prearranged sequence. In the context of computer-based visualization, the term slideshow refers to turning existing images into upbeat, attention-grabbing videos.
Final Cut Pro is advanced video-editing software used by professional video editors and filmmakers to create impressive videos and animations. Its high-tech features allow users to add various kinds of effects to their videos to make them look worth watching. You can also create video slideshows with FCP and give your still images a new look.
Read this article section to learn how to make video slideshows with FCP and Wondershare Filmora.
- Part 1: How to Create a Video Slideshow in Final Cut Pro?
- Part 2: Where to Find FCP Video Slideshow Templates for Free?
- Part 3: How to Adopt Templates in Final Cut Pro?
- Part 4: How to Add Music and Text in a Video Slideshow with Final Cut Pro?
- Part 5: How to Make a Slideshow in an Easier yet Better Way?
- Part 6: How to make a simple Slideshow Free & Online?
Part 1: How to Create a Video Slideshow in Final Cut Pro?
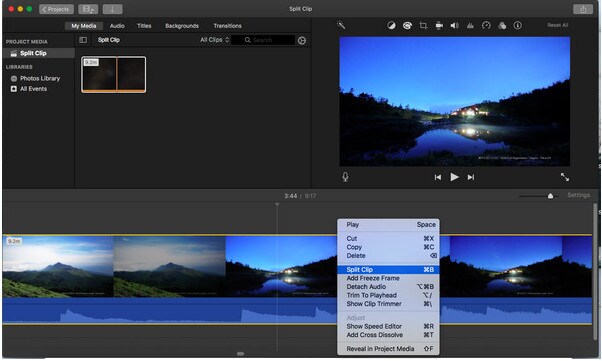
Final Cut Pro is an amazing software that makes slideshow creation as simple as ABC. You need not use any template; instead, you can sequence images on the timeline and add a few transitions and audio effects to create a video slideshow. Here’s how you can do this:
- Open Final Cut Pro, go to File, and click on New Project;
- Now, it’s time to import the still images you want to use to Final Cut Pro. For this purpose, tap File > Import > Files and select all photos from your computer, and click Import. Keep selecting until all images have been imported.
- Go to the Browser pane and drag your photos to the Timeline of Final Cut Pro. Make sure you follow the order in which you want these images to appear in the slideshow. You can also drag each image individually and drop it to your desired place before or after other images. The video slideshow will display images in the order they are placed in the Timeline.
- To add various transitions between your images, take the cursor to the target location in the timeline, go to the Menu and click Effects and Video Transitions. Now select the type of transition you want to add such as Wipe or Fade. You can also open other transitions from the submenu. This way, your desired effect will appear at your selected location in the Timeline.
- You can also add audio effects to your video slideshow. For this purpose, click File > Import > Files. Now, select your favorite audio file from the FCP’s library or your computer and click Once the audio file has been imported to the Browser pan of FCP, drag that file to the Timeline.
- To add opening or closing credits, click Effects > Video Generators. Now, double-click Text and Text From the newly opened window, click Controls and type your desired text to be displayed in your video slideshow. Now, click Video and drag the video box into the Timeline to your desired location where it should appear.
- To export your video slideshow, click File > Export > QuickTime Movie. Based on your requirement, select your desired video quality and click OK.
Part 2: Where to Find Video Slideshow Templates for Free?
Templates make it easier for you to design unique slideshow videos with Final Cut Pro. Both premium and free templates are available online with different styles such as product showcases, wedding albums, social media promos, and corporate events, etc.
Given below are some websites where you can find some of the best slideshow templates and create amazing video slideshows without effort.
Motion Array
Motion array is famous for providing both free and paid templates and plugins for FCPX. Get all the things you need for your FCPX here.

As a resource library built for Filmora, FilmStock provides tons of media and effects for you to choose from. You can adopt different styles in one video, or make a video collection with a consistent tone by applying packages in FilmStock.

Design Shack
Download thousands of free and premium FCP slideshow templates for product showcases, corporate events, weddings, and much more.

For more slideshow templates please refer to this article: 10 Best Sites to Download Free Slideshow Templates .
Part 3: How to Adopt Templates in Final Cut Pro?
Adopting templates to create amazing video slideshows with Final Cut Pro is very easy. Follow these steps to download and use templates with FCP:
- Download your favorite template online. Once downloaded, go to the folder containing the folder, unzip it, and locate the installable file.

- Copy and paste the folder where FCP can find it. If you don’t have Apple Motion, right-click on the FCP icon and select Show Package Contents from the dropdown menu. Now, navigate to the Titles or Generators folder.
- Open FCP and go to Titles and Generators sidebar.
- Search for the Title or Generator you installed under each label.
- Or use the search bar to find your installed Title or Generator.
- Drag the template to the FCP timeline.
- Use the Published Parameters panel to edit the template. Check all parameters to see editing options available.


Part 4: How to Add Music and Text in a Video Slideshow with Final Cut Pro?
You can add your favorite music or audio effects and text to your video slideshow with FCP. A variety of jingles and sound effects are available in Final Cut Pro that can be used in your video slideshow for free. If the build-in sound effects do not seem interesting, record your own audio and create your audio effects. FCP also allows users to import music files from their computers and add them to video slideshows.
To add music, click File > Import > Files. Now, either select the music file to be added from the FCP library or your computer and click Import. Finally, drag the imported file to the Timeline. It will be added to your video slideshow.
To add text, go to the Browser window, select Effects, click Video Generators, and double-click Text and Text again. Now, click Controls and enter the text you want to add to your video slideshow. Finally, click Video and drag your video box with the text into the desired location in the Final Cut Pro Timeline.
Click here to learn more about how to make a slideshow with music.
Part 5: How to Make a Slideshow in an Easier yet Better Way?
Do you want to create an amazing video slideshow conveniently? Try Wondershare Filmora X, a user-friendly and high-performance video-editing software that allows you to create unique video slideshows without advanced skills. Simply choose your favorite music, adjust photos’ duration, and add transitions and effects.


Follow these steps to make a slideshow with Wondershare Filmora X:
- Open Wondershare Filmora, add multiple photos into the applications. Adding multiple folders would make it easy for you to sort the images.
- Adjust the duration for each photo to your desired length.
- Add background music and royalty-free sound. For enhanced user experience, use the media library.
- Drag and drop all images you want to add to the timeline and set their hue, aspect ratio, saturation, contrast, and brightness.
- Add transitions between images.
- Use filters and overlays to improve your slideshow’s appearance. Since this is a core step, make sure you spend ample time on it.
- Export your video slideshow to your desired format and quality.


Don’t worry if you are a beginner and don’t have the advanced skills to create a video slideshow. There are multiple websites like Canva where you build amazing slideshows for free and impress your family and friends. Given below are simple steps to create video slideshows online.
Part 6: How to make a simple Slideshow Free & Online?
- First of all, log in to your Canva account using Gmail or Facebook and open a new page. Search for your desired Slideshow design.
- Find your favorite template by using the search tool. Select a template you want to add to your video slideshow and move to the next step.
- Go to the Canva’s library where you can find a variety of charts, images, photos, icons, and illustrations. To add any of these graphics to your page, use the Drag and Drop tool. For clear images, use the photo effects tool.
- Now, select all the images and illustrations you want and customize your slideshow using background, sound effects, font style, animations, color scheme, and animated sticker GIFs.
- Once you have finished the customization, preview your slideshow and make sure everything looks perfect. If you are happy with the result, download the slideshow in MP4, PPT JPEG, PDF, PNG, or any other format as per your requirement. For live telecast, press the Present button or share the link on your Facebook or Instagram account.
Conclusion
If you want to impress your family and friends with your video-editing skills, there’s no better option than creating an impressive video slideshow. You can give a pleasant surprise to your siblings or astonish your loved ones by making a video slideshow of their memorable images.
Several video-editing tools are available where you can design, edit, and recreate innovative video slideshows. The two best software are Final Cut Pro and Wondershare Filmora X, both of which are user-friendly and offer amazing features. You just have to simply import all images, arrange them in proper order, choose your favorite theme or template, and add transitions and audio effects, and download the slideshow in your desired format.
You can also use online tools like Canva to create amazing video slideshows online for free. Try Wondershare Filmora X if you are looking for quality, simplicity, and pricing flexibility.
For more slideshow-making tutorials with other editors, see this article: How to Create Amazing Showreel or Slideshow?
Liza Brown
Liza Brown is a writer and a lover of all things video.
Follow @Liza Brown
Liza Brown
Mar 27, 2024• Proven solutions
A video slideshow is video footage produced by presenting a series of still images in a prearranged sequence. In the context of computer-based visualization, the term slideshow refers to turning existing images into upbeat, attention-grabbing videos.
Final Cut Pro is advanced video-editing software used by professional video editors and filmmakers to create impressive videos and animations. Its high-tech features allow users to add various kinds of effects to their videos to make them look worth watching. You can also create video slideshows with FCP and give your still images a new look.
Read this article section to learn how to make video slideshows with FCP and Wondershare Filmora.
- Part 1: How to Create a Video Slideshow in Final Cut Pro?
- Part 2: Where to Find FCP Video Slideshow Templates for Free?
- Part 3: How to Adopt Templates in Final Cut Pro?
- Part 4: How to Add Music and Text in a Video Slideshow with Final Cut Pro?
- Part 5: How to Make a Slideshow in an Easier yet Better Way?
- Part 6: How to make a simple Slideshow Free & Online?
Part 1: How to Create a Video Slideshow in Final Cut Pro?
Final Cut Pro is an amazing software that makes slideshow creation as simple as ABC. You need not use any template; instead, you can sequence images on the timeline and add a few transitions and audio effects to create a video slideshow. Here’s how you can do this:
- Open Final Cut Pro, go to File, and click on New Project;
- Now, it’s time to import the still images you want to use to Final Cut Pro. For this purpose, tap File > Import > Files and select all photos from your computer, and click Import. Keep selecting until all images have been imported.
- Go to the Browser pane and drag your photos to the Timeline of Final Cut Pro. Make sure you follow the order in which you want these images to appear in the slideshow. You can also drag each image individually and drop it to your desired place before or after other images. The video slideshow will display images in the order they are placed in the Timeline.
- To add various transitions between your images, take the cursor to the target location in the timeline, go to the Menu and click Effects and Video Transitions. Now select the type of transition you want to add such as Wipe or Fade. You can also open other transitions from the submenu. This way, your desired effect will appear at your selected location in the Timeline.
- You can also add audio effects to your video slideshow. For this purpose, click File > Import > Files. Now, select your favorite audio file from the FCP’s library or your computer and click Once the audio file has been imported to the Browser pan of FCP, drag that file to the Timeline.
- To add opening or closing credits, click Effects > Video Generators. Now, double-click Text and Text From the newly opened window, click Controls and type your desired text to be displayed in your video slideshow. Now, click Video and drag the video box into the Timeline to your desired location where it should appear.
- To export your video slideshow, click File > Export > QuickTime Movie. Based on your requirement, select your desired video quality and click OK.
Part 2: Where to Find Video Slideshow Templates for Free?
Templates make it easier for you to design unique slideshow videos with Final Cut Pro. Both premium and free templates are available online with different styles such as product showcases, wedding albums, social media promos, and corporate events, etc.
Given below are some websites where you can find some of the best slideshow templates and create amazing video slideshows without effort.
Motion Array
Motion array is famous for providing both free and paid templates and plugins for FCPX. Get all the things you need for your FCPX here.
As a resource library built for Filmora, FilmStock provides tons of media and effects for you to choose from. You can adopt different styles in one video, or make a video collection with a consistent tone by applying packages in FilmStock.
Design Shack
Download thousands of free and premium FCP slideshow templates for product showcases, corporate events, weddings, and much more.
For more slideshow templates please refer to this article: 10 Best Sites to Download Free Slideshow Templates .
Part 3: How to Adopt Templates in Final Cut Pro?
Adopting templates to create amazing video slideshows with Final Cut Pro is very easy. Follow these steps to download and use templates with FCP:
- Download your favorite template online. Once downloaded, go to the folder containing the folder, unzip it, and locate the installable file.
- Copy and paste the folder where FCP can find it. If you don’t have Apple Motion, right-click on the FCP icon and select Show Package Contents from the dropdown menu. Now, navigate to the Titles or Generators folder.
- Open FCP and go to Titles and Generators sidebar.
- Search for the Title or Generator you installed under each label.
- Or use the search bar to find your installed Title or Generator.
- Drag the template to the FCP timeline.
- Use the Published Parameters panel to edit the template. Check all parameters to see editing options available.
Part 4: How to Add Music and Text in a Video Slideshow with Final Cut Pro?
You can add your favorite music or audio effects and text to your video slideshow with FCP. A variety of jingles and sound effects are available in Final Cut Pro that can be used in your video slideshow for free. If the build-in sound effects do not seem interesting, record your own audio and create your audio effects. FCP also allows users to import music files from their computers and add them to video slideshows.
To add music, click File > Import > Files. Now, either select the music file to be added from the FCP library or your computer and click Import. Finally, drag the imported file to the Timeline. It will be added to your video slideshow.
To add text, go to the Browser window, select Effects, click Video Generators, and double-click Text and Text again. Now, click Controls and enter the text you want to add to your video slideshow. Finally, click Video and drag your video box with the text into the desired location in the Final Cut Pro Timeline.
Click here to learn more about how to make a slideshow with music.
Part 5: How to Make a Slideshow in an Easier yet Better Way?
Do you want to create an amazing video slideshow conveniently? Try Wondershare Filmora X, a user-friendly and high-performance video-editing software that allows you to create unique video slideshows without advanced skills. Simply choose your favorite music, adjust photos’ duration, and add transitions and effects.
Follow these steps to make a slideshow with Wondershare Filmora X:
- Open Wondershare Filmora, add multiple photos into the applications. Adding multiple folders would make it easy for you to sort the images.
- Adjust the duration for each photo to your desired length.
- Add background music and royalty-free sound. For enhanced user experience, use the media library.
- Drag and drop all images you want to add to the timeline and set their hue, aspect ratio, saturation, contrast, and brightness.
- Add transitions between images.
- Use filters and overlays to improve your slideshow’s appearance. Since this is a core step, make sure you spend ample time on it.
- Export your video slideshow to your desired format and quality.
Don’t worry if you are a beginner and don’t have the advanced skills to create a video slideshow. There are multiple websites like Canva where you build amazing slideshows for free and impress your family and friends. Given below are simple steps to create video slideshows online.
Part 6: How to make a simple Slideshow Free & Online?
- First of all, log in to your Canva account using Gmail or Facebook and open a new page. Search for your desired Slideshow design.
- Find your favorite template by using the search tool. Select a template you want to add to your video slideshow and move to the next step.
- Go to the Canva’s library where you can find a variety of charts, images, photos, icons, and illustrations. To add any of these graphics to your page, use the Drag and Drop tool. For clear images, use the photo effects tool.
- Now, select all the images and illustrations you want and customize your slideshow using background, sound effects, font style, animations, color scheme, and animated sticker GIFs.
- Once you have finished the customization, preview your slideshow and make sure everything looks perfect. If you are happy with the result, download the slideshow in MP4, PPT JPEG, PDF, PNG, or any other format as per your requirement. For live telecast, press the Present button or share the link on your Facebook or Instagram account.
Conclusion
If you want to impress your family and friends with your video-editing skills, there’s no better option than creating an impressive video slideshow. You can give a pleasant surprise to your siblings or astonish your loved ones by making a video slideshow of their memorable images.
Several video-editing tools are available where you can design, edit, and recreate innovative video slideshows. The two best software are Final Cut Pro and Wondershare Filmora X, both of which are user-friendly and offer amazing features. You just have to simply import all images, arrange them in proper order, choose your favorite theme or template, and add transitions and audio effects, and download the slideshow in your desired format.
You can also use online tools like Canva to create amazing video slideshows online for free. Try Wondershare Filmora X if you are looking for quality, simplicity, and pricing flexibility.
For more slideshow-making tutorials with other editors, see this article: How to Create Amazing Showreel or Slideshow?
Liza Brown
Liza Brown is a writer and a lover of all things video.
Follow @Liza Brown
AVI Video Cutter Reviews: Top 16 Options for Windows, MAC, and Android Devices
With the growing fame of video-sharing and social media applications like Twitter, Instagram, and TikTok, the demand for simple and fast video cutting and trimming tools has dramatically increased. Nowadays, you don’t have to play with complex video editing tools to produce high-quality videos.
Thanks to several user-friendly editing software to make things easy for everybody. However, finding the right programs to trim/cut videos is still challenging, especially in AVI format.
But, guess what? These top 16 AVI video cutters for Windows, MAC, Android, iPhone, and online will make video cutting and trimming fun, especially when you learn to do it using Filmora.
In this Article
Part 1: Best AVI Video Cutter to Trim/Cut AVI Video on Windows and MAC – Filmora Video Cutter [with steps}
Part 2: Top 3 Free AVI Video Cutter on Windows
Part 3: Top 3 Free AVI Video Cutter on MAC
Part 4: Top 3 Free AVI Video Cutter on Android
Part 5: Top 3 Free AVI Video Cutter on iPhone
Part 6: Top 3 Free AVI Video Cutter Online
Part 7: Bottom Line
Part 8: FAQs
Part 1: Best AVI Video Cutter to Trim/Cut AVI Video on Windows and MAC – Filmora Video Cutter [with steps]
Filmora by Wondershare is a star video editor with outstanding outcomes. Whether you have a MAC or Windows PC, you can download Filmora regardless of your operating system. The program best serves those who intend to make high-quality videos. The software provides editing support for all video formats, including AVI.
Although Filmora is an affordable editor with tons of audio and video editing options, you can still download the software for free and create projects if watermarks don’t bother you. Moreover, you can count this tool’s capabilities in cropping, resizing, and Chroma screen support. But that’s not the only sweet fruit.
In fact, Filmora is equipped with many jaw-dropping features, including preset templates, auto beat sync, split-screen, speed ramping, motion tracking, keyframing, creative transitions, titles, filters, and much more. And the best part is, you can learn and understand Filmora in no time. That’s why the program is loved and supported by all types of users.
So does Filmora helps cut and trim AVI videos? Yes! It does if you follow these steps correctly.
Step 1: Download Filmora Video Editor
First, download Filmora Video Editor by choosing your operating system, as seen in the screenshot below.
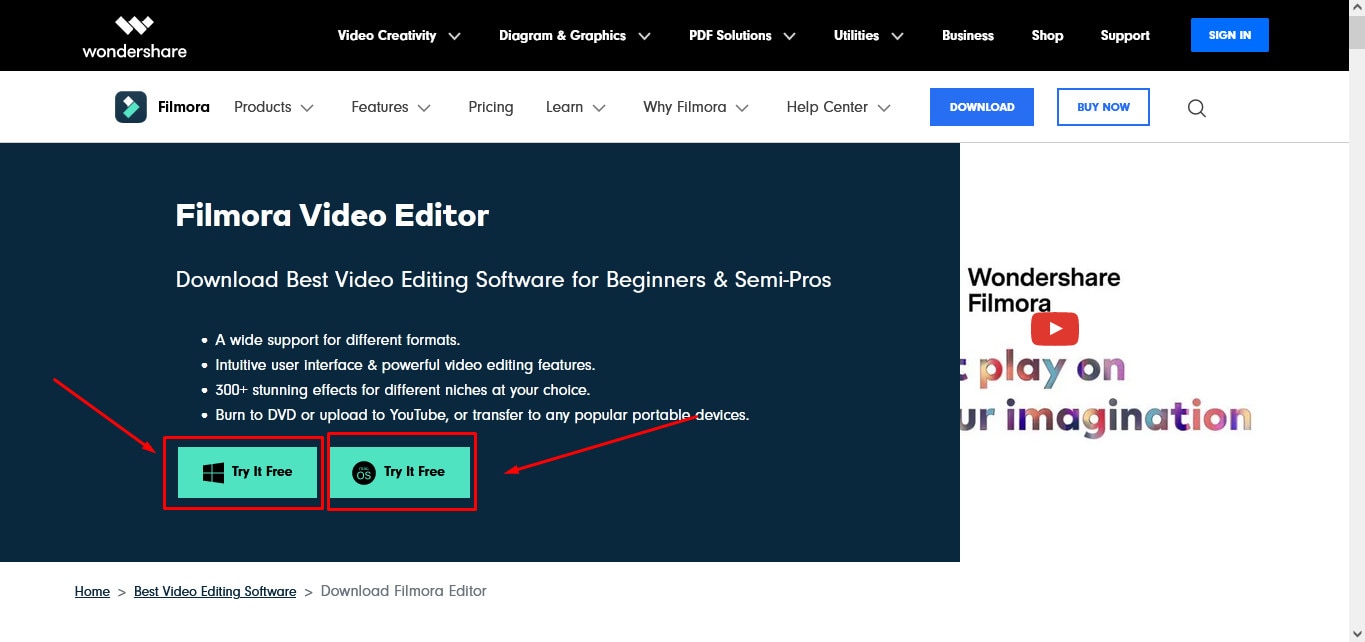
Run the setup and let it finish without any pause or break.
Step 2: Import Your Video to Filmora Video Editor
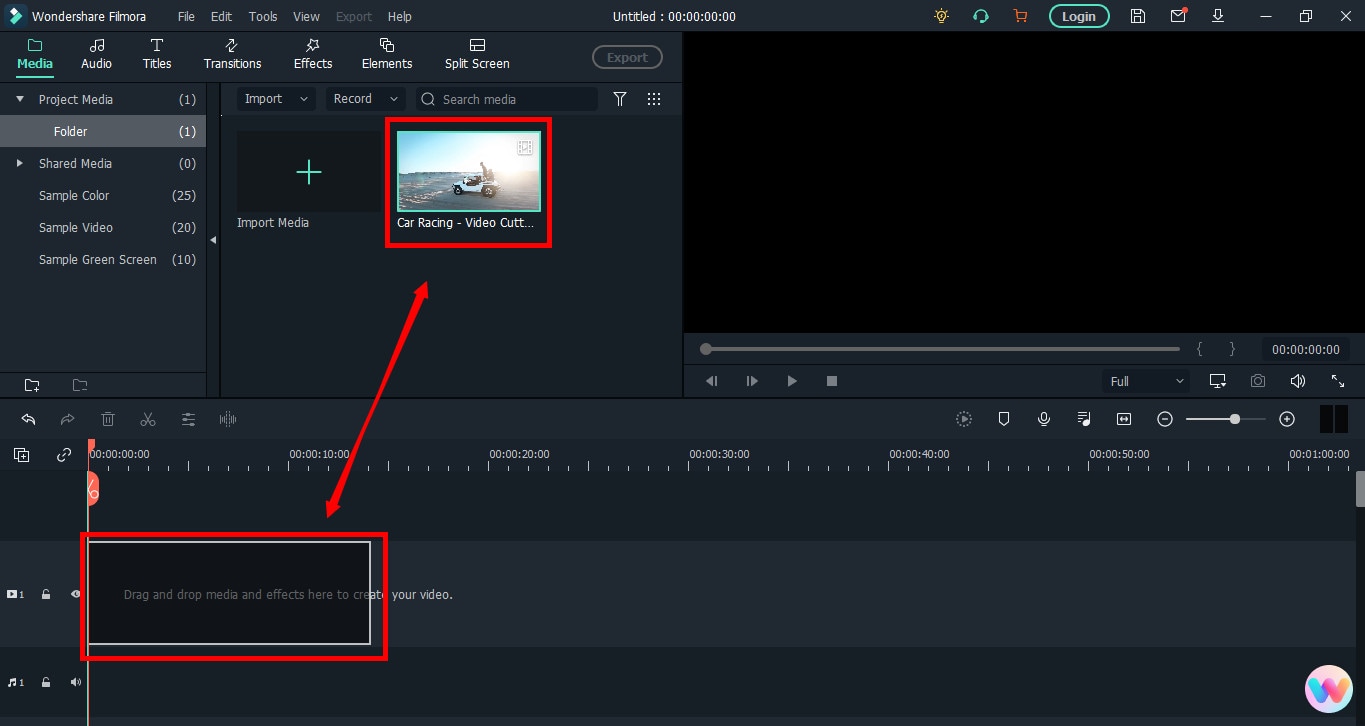
Importing your AVI video is a very simple process. Just click on the “Film Clip” icon.
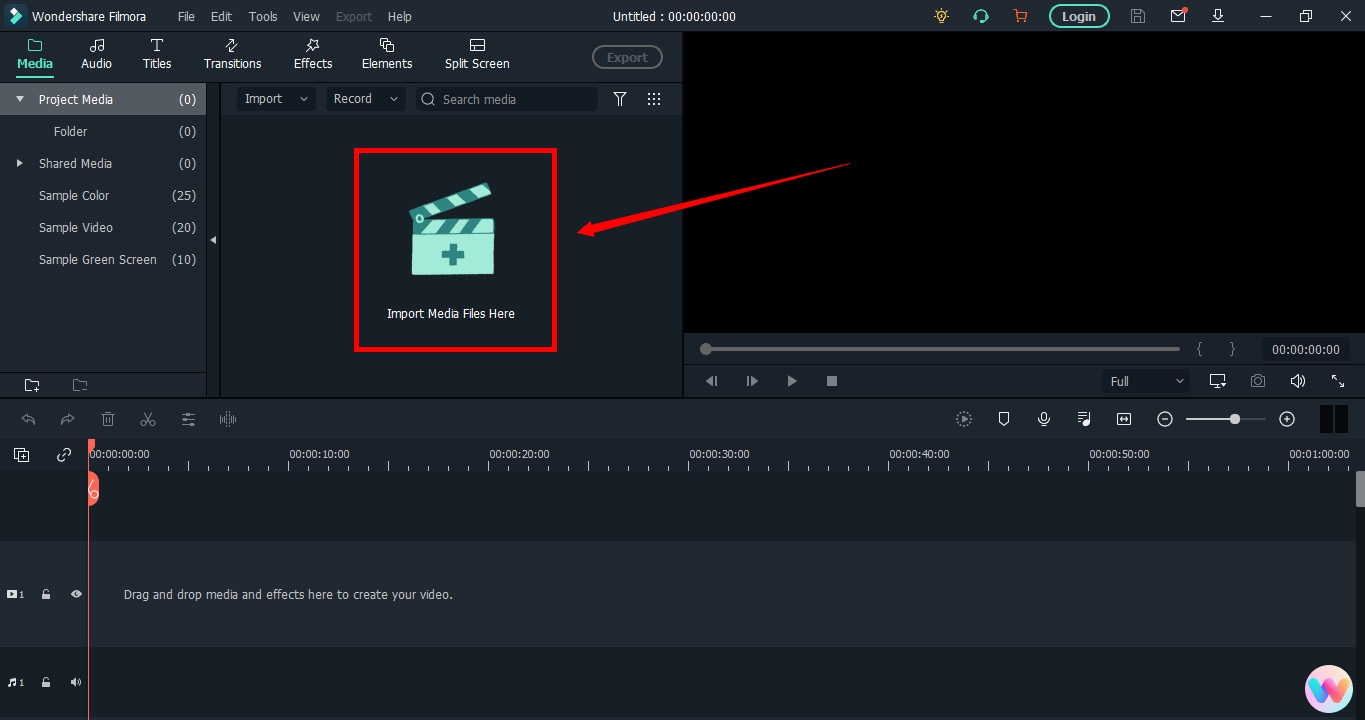
It will open a new window screen on your computer to select the video from the directory. Find the clip you want to import and cut. Use your mouse to select it and click the “Open” button.
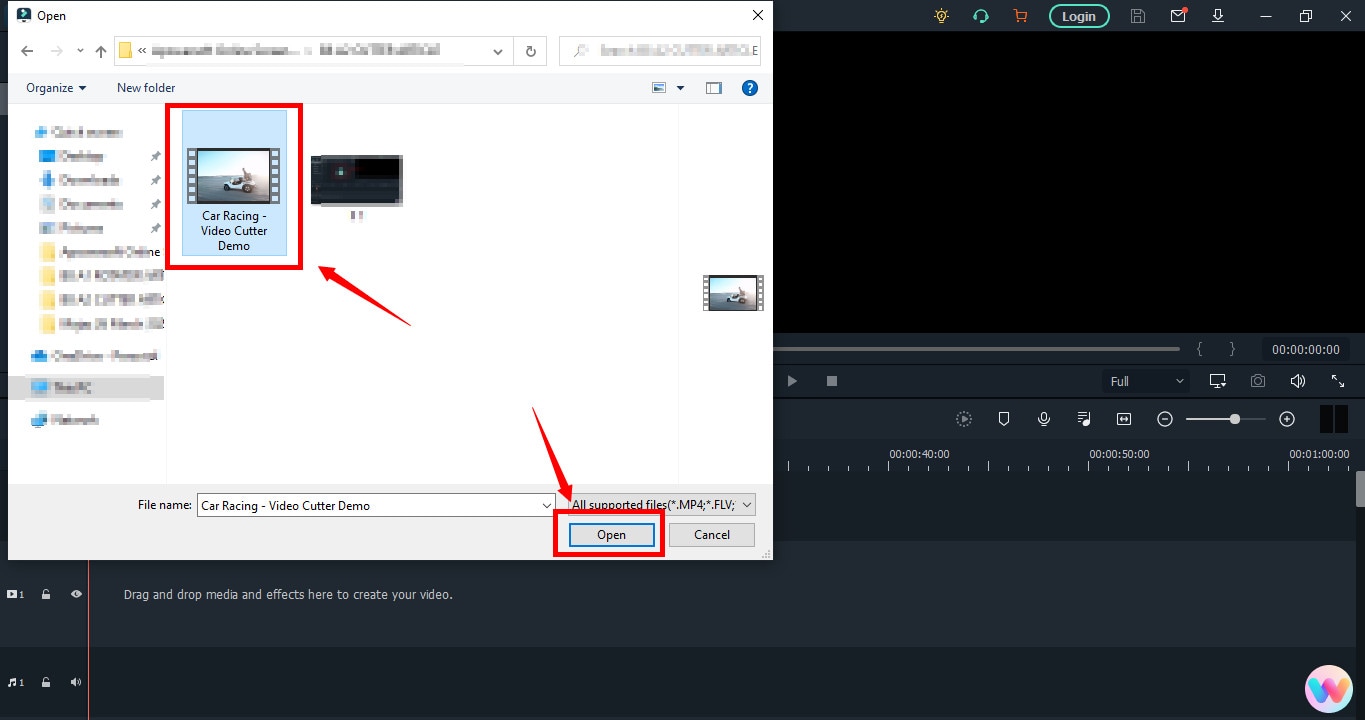
The video will be loaded in the “Media” folder of Filmora. The clip’s thumbnail should be visible to assure you have done everything correctly.
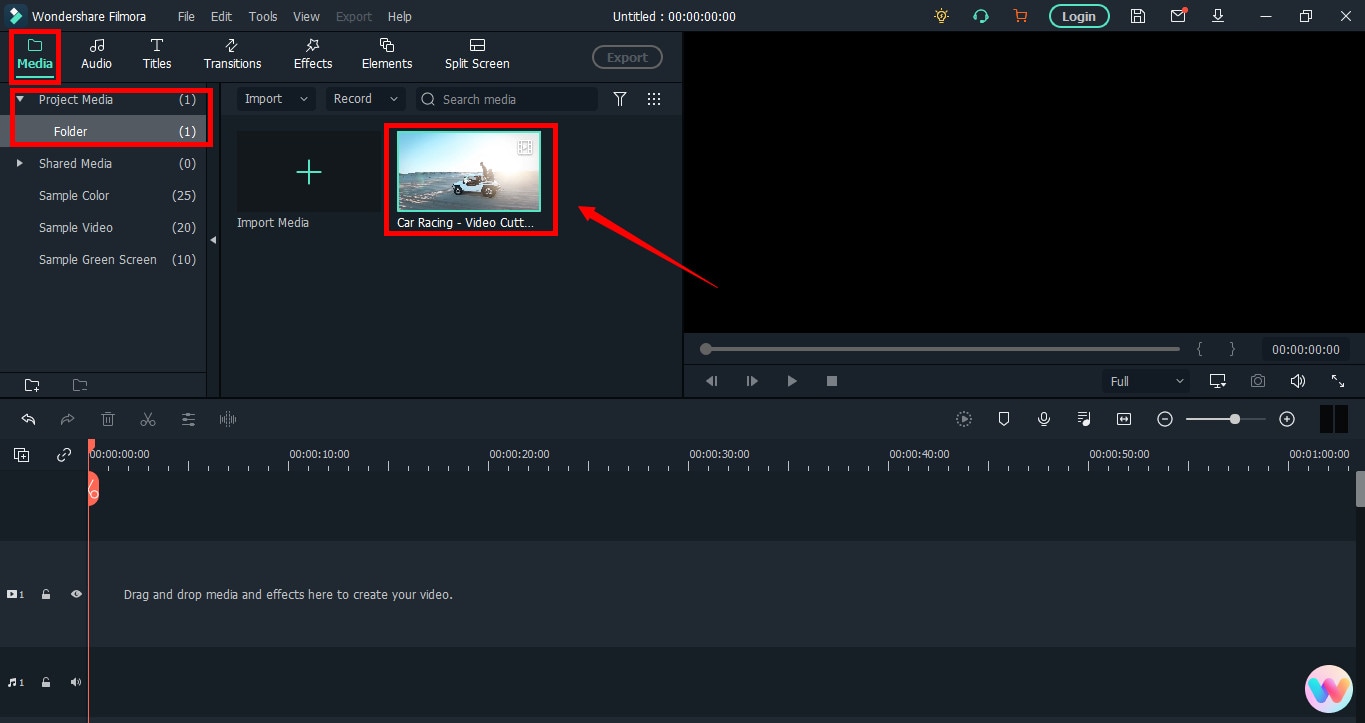
If you can see that, let’s go to the next step.
Step 3: Drag and Drop Video to Filmora’s Timeline
Select the video in the media folder by clicking over it once. Now, without leaving the hold of the left button of your mouse, slide the video down to the track in the timeline.
After that, a message will pop up, asking about your preference for the project settings. It is recommended to choose the “Match to Media” option unless you’re an experienced video editor who knows how to play with the resolution and frame rates.
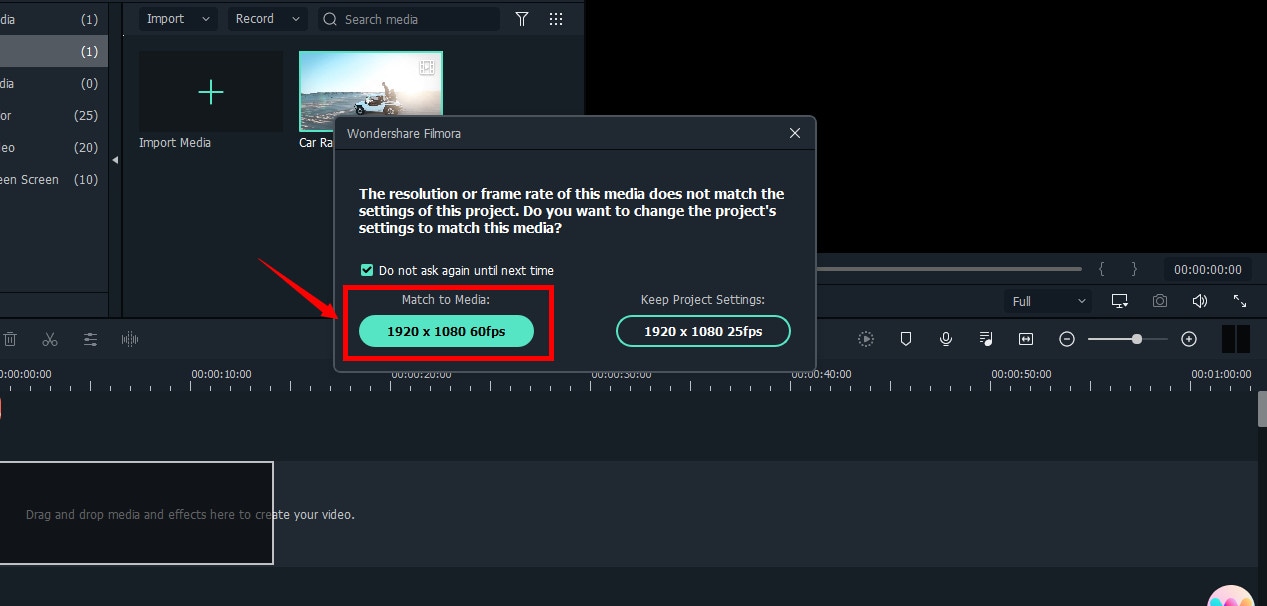
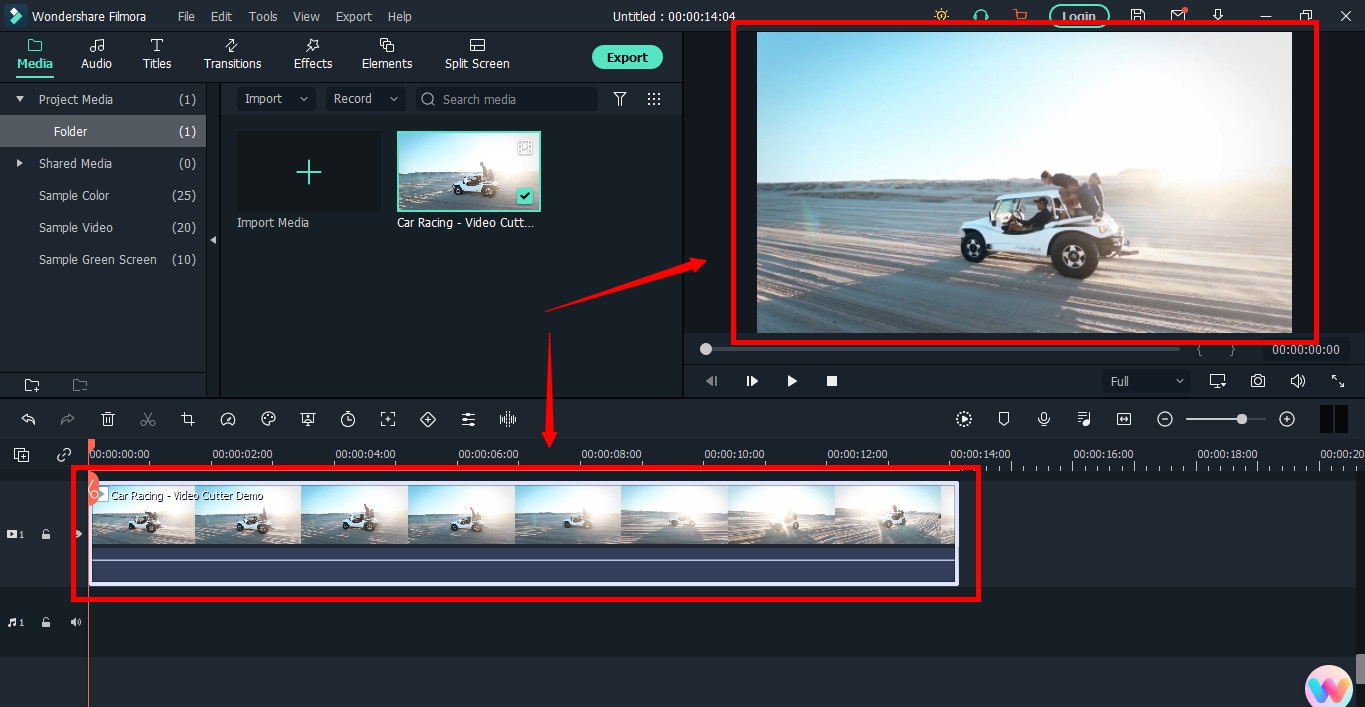
You will see the video on the timeline with its preview on the “Preview Screen” on the right side of the interface.
Step 4: Cutting Your Video in Filmora
Here comes the core step you have been waiting for. But before you go any further, you need to know about the “Playhead.”
Playhead is an orange-reddish marker you can find on the timeline.
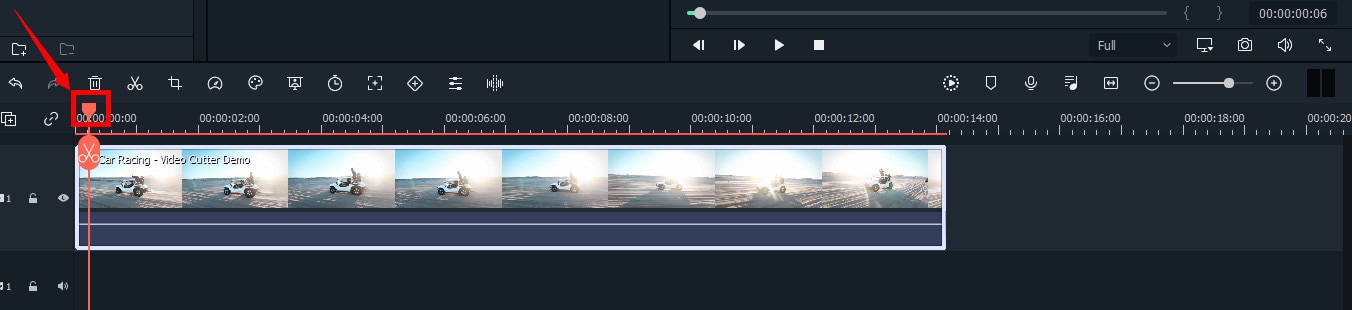
It has an important role in cutting your videos.
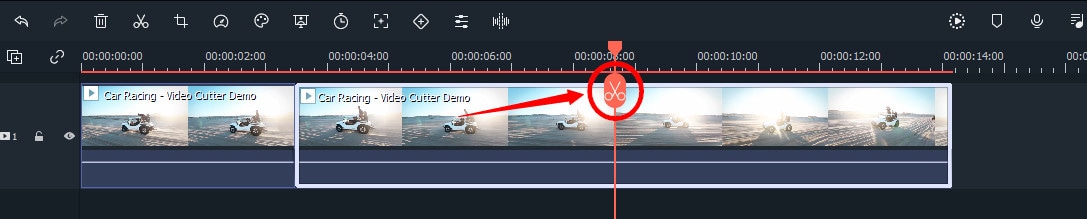
So, move the playhead to your desired frame and click on the “scissor” icon to make the “starting” cut.
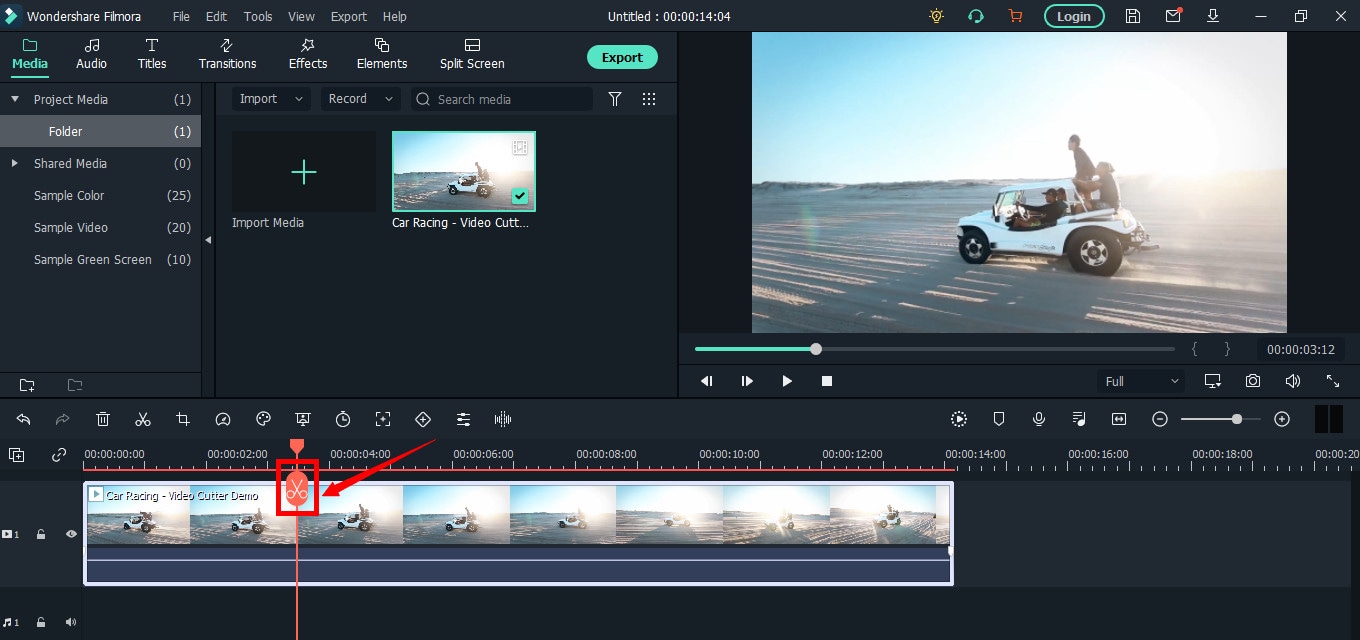
As soon as you do it, you will see that the single clip is now divided into two parts similar to this image.
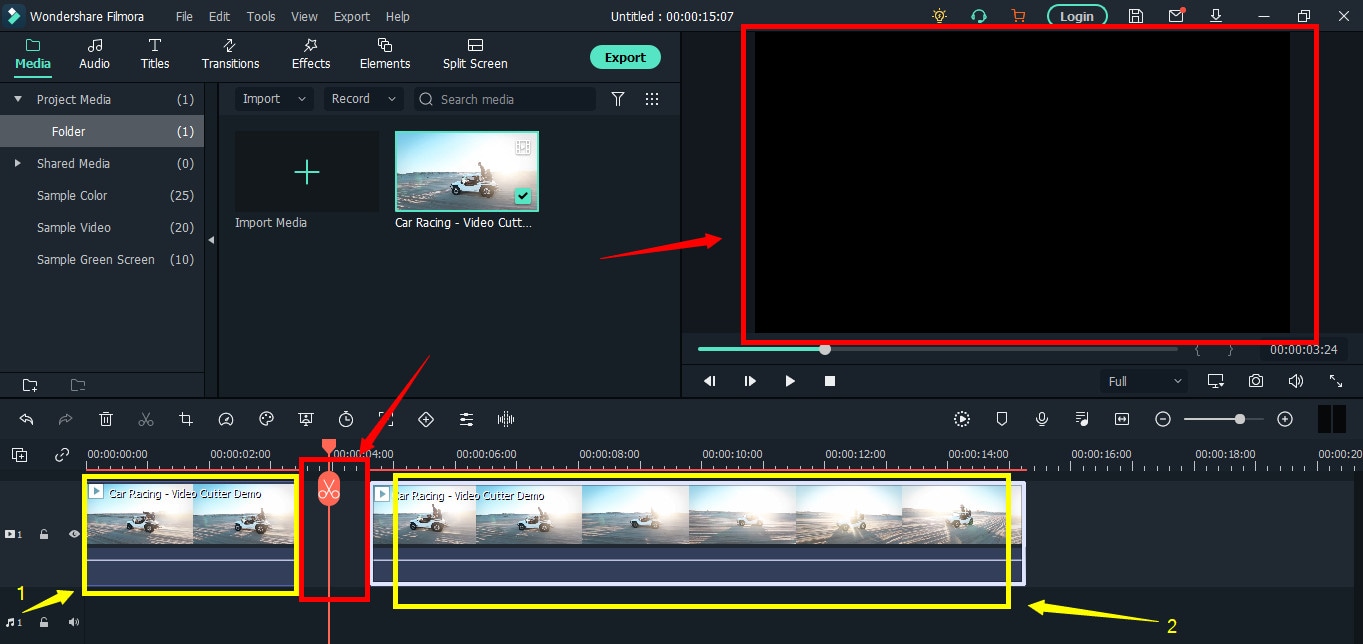
The “Red” marked area in the above screenshot ensures a gap between the clips on the timeline. The “Yellow” arrows confirm two separate clips of the same video.
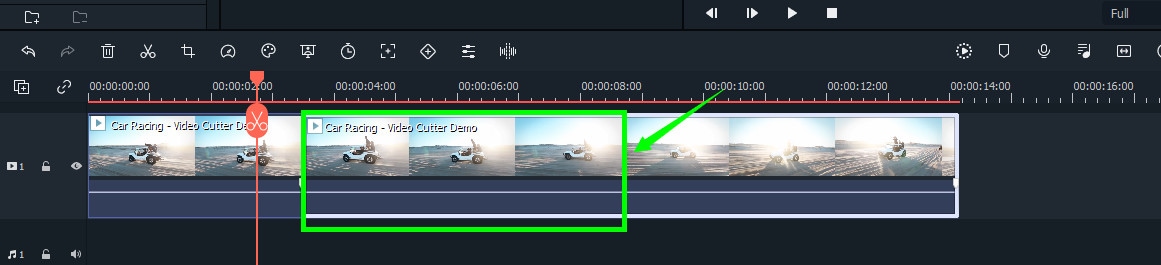
Place the two clips together as seen in this “Green” area.
And place the playhead anywhere on the clip. And click on the “scissor” icon once again to make the “ending” cut (second cut).
If done correctly, there should be three clips now of the same video, as you can observe in this screenshot.
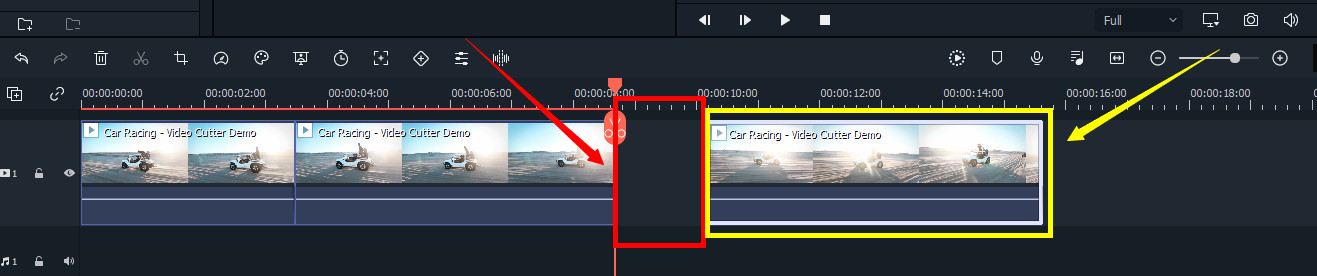
Again, the “Red” area in the above photo indicates the gap, and the “Yellow” area ensures a third segment of the video.
Note: The gaps you can see in the divided clips are made intentionally for understanding. Practically, Filmora doesn’t move the clip or make gaps in between after you have made the cuts.
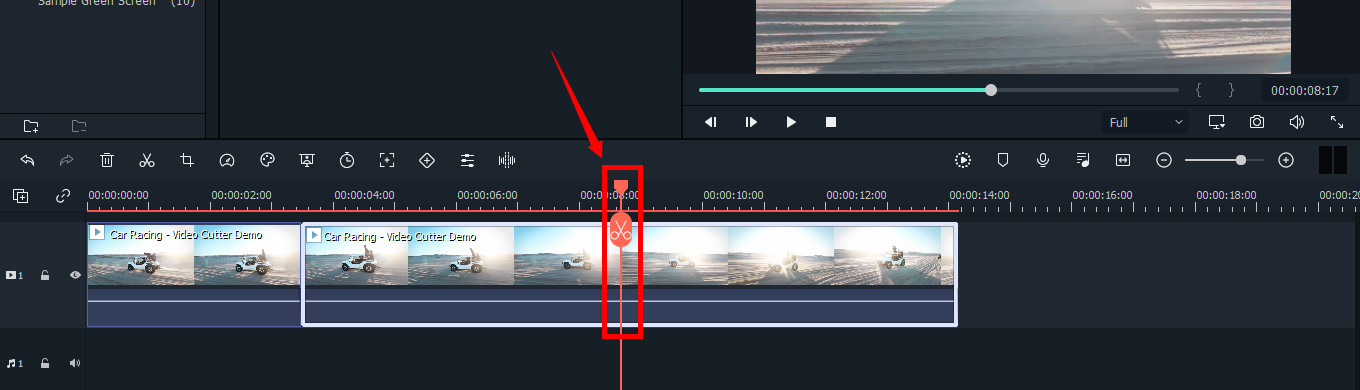
Keep in mind that there are three clips on the timeline. Now, if you want to remove the second clip from the video, you need to select that portion first by clicking on it.
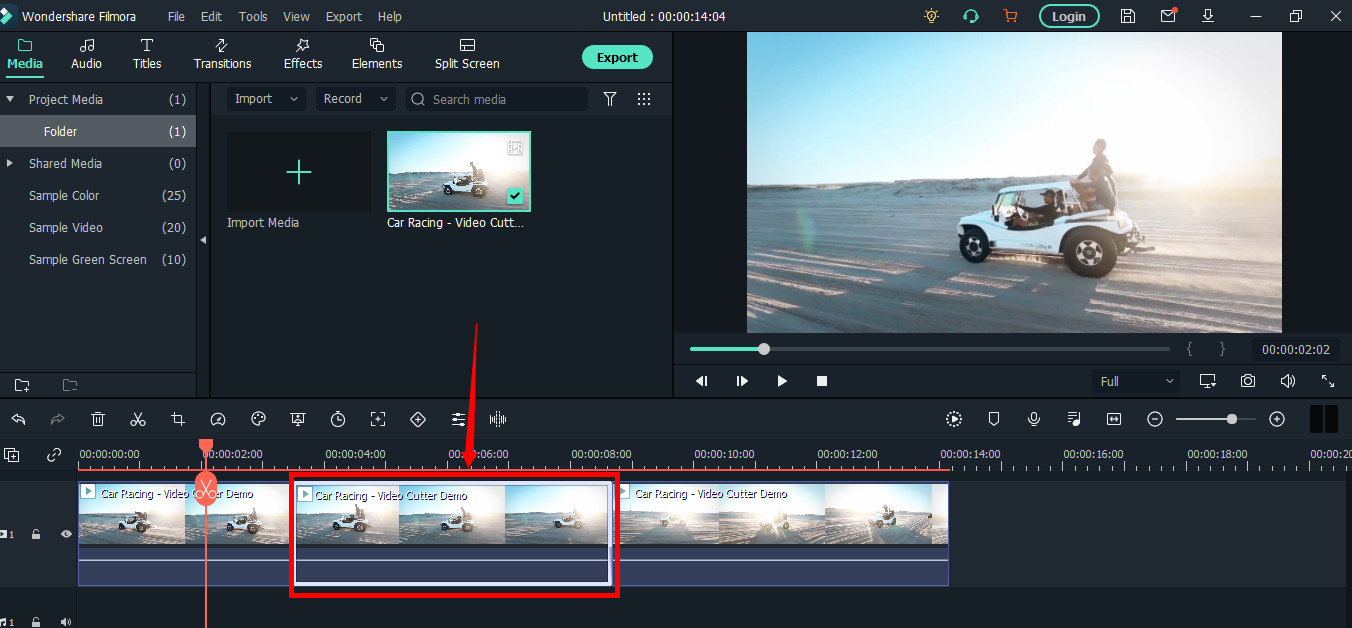
Then, right-click on the mouse and choose “Cut” from the menu.
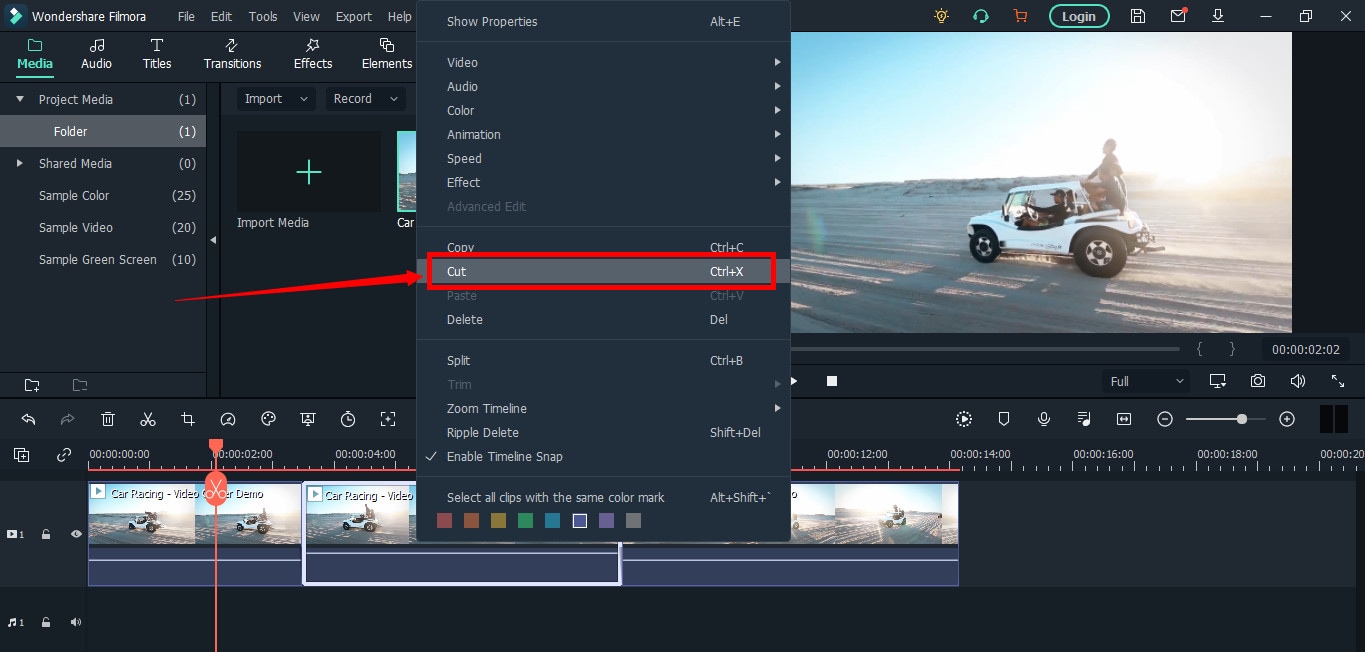
Within a semi-second, the selected portion will be removed from the timeline. And you will be able to see the remaining parts of the video. Now, pull the second clip using your mouse and place it at the end of the first clip without leaving a gap in between.
Then, click the “Play” button under the preview screen to see the results.
You can see in the above two screenshots that there’s a jump between the scenes due to cuts, confirming that video has been cut significantly.
Step 5: Trimming Your Video in Filmora
Remember that cutting and trimming in Filmora are two different things. Trimming allows you to remove a particular video part from visibility without deleting the portion.
So feel free to skip this step if you’re happy learning the cutting technique. But if you’re interested in trimming, here’s how you do it.
Take your mouse cursor at the beginning or end of the clip you want to trim. Keep holding the clip’s corner and slide the mouse back or front to trim the part
Note: Since the trim tool doesn’t delete the video, the final project based on trimming will be of a larger size. Therefore, it is advised to cut videos rather than trimming for fast rendering, better results, and small video size.
Step 6: Save Project and Export Your Cut/Trimmed AVI Video
Choose “Save Project” from the “File” menu.
Select the directory to save the project, rename the new video, and click the “Save” button.

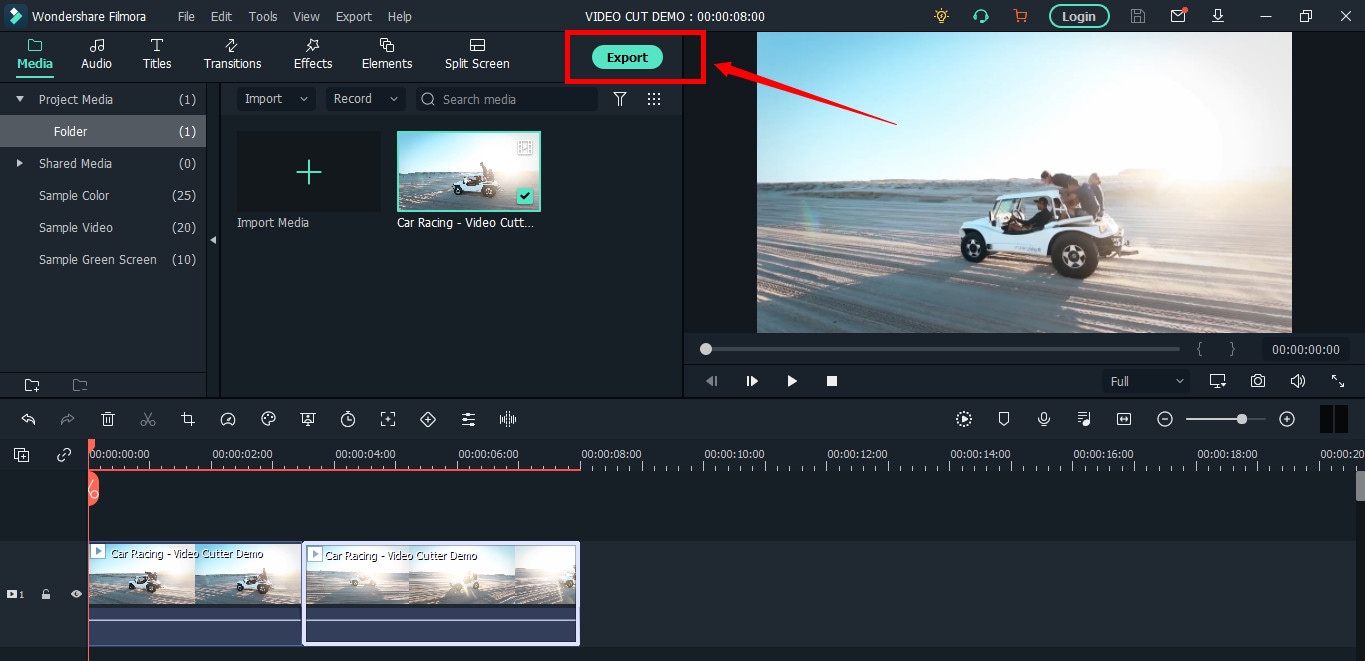
Click on the “Export” button to save the video in AVI or any other video format of your choice on your computer.
Part 2: Top 3 Free AVI Video Cutter on Windows
As a Windows user, finding an excellent video cutter is relatively easy. However, not all software permits importing AVI videos. In the same way, some video trimmers come at a price. So if you really don’t want to pay and enjoy cutting your AVI files, try using these three video cutting tools.
Microsoft Photos (Windows 10)
Microsoft Photos or Photo App is a free photo viewer and editor with your Windows 10. It offers incredible photo editing and enhancement along with different tools for organizing and editing videos in a very friendly way. Likewise, you can create drawings over the videos and add 3D effects and background music to your clips.
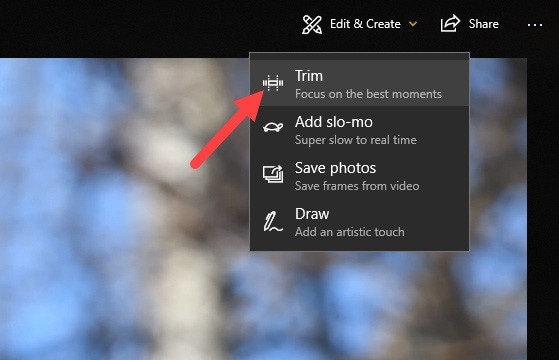
You can also trim AVI videos with Microsoft Photos quickly. All you need to do is open your clip with the Photo App, choose the “Trim” option, select a portion of the video you want to trim, and go ahead.
That’s it!
Features
- Quick video trimming
- Cool text effects
- 3D library and effects
- It has a clear interface
- You can find and tag people’s faces
- The program has 15+ filters for editing
- Motion tracking option for drawing on videos
- Allows you to view and organize your files easily
Pros
- Microsoft Photos is free for Windows users
- It automatically creates albums
- The program has a touch-friendly interface
- You can integrate your OneDrive with the software
Cons
- Lacks before and after view
- Not included in older Windows versions
- It doesn’t support selective focus or panorama stitching
Handbrake
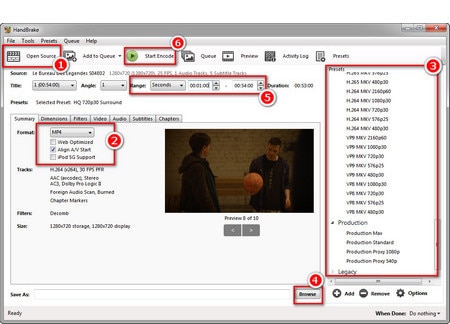
Handbrake is best-known for its video transcoding traits. Unlike typical video editors, this open-source tool includes limited options to rip Blu-rays and DVDs. Moreover, you can mix the 5.1 soundtracks and convert them to stereo to make the audio compatible with your TV speakers.
But the exciting thing about Handbrake is that you can use this software on your macOS 10.13 or later versions to cut AVI videos for free. However, it’s a bit technical process, as there’s no timeline to help you trim or make cuts on the clips directly with the help of your mouse.
You are required to mention a time range (seconds, minutes, or hours) to keep a specific part of the video while the software removes the non-ranged parts of the clip. For instance, you have a video of 10 seconds. You start the range from 5 seconds and end it at 10 seconds. So, the first four seconds of the video will be cut from the entire clip.
Features
- Video cutting, cropping, and resizing
- Low-quality and old video restoration
- Video conversion from any format to MKV or MP4
Pros
- Handbrake is free
- You can convert batch videos with ease
- It supports MAC, Windows, and Linux OS
- Allows you to import video files in all major formats
- The software comes with various video conversion presets
Cons
- Handbrake is not a user-friendly tool
- The video file output is limited to two formats (MKV and MP4) only
Gihosoft Video Cutter
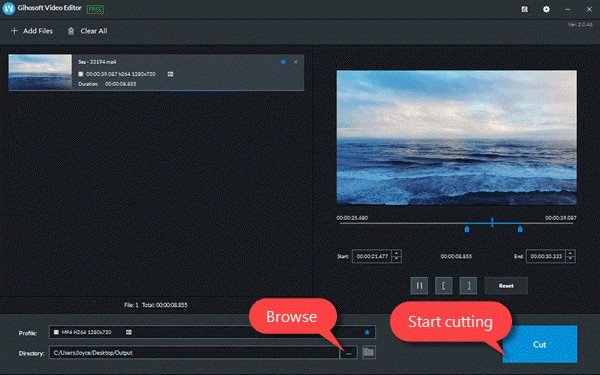
Gihosoft is a clean, free, lossless video cutter on your Windows PC. It’s a simple tool that helps you cut video files into various output formats. So be it AVI, MPEG, or any other file, with Gihosoft, everything becomes handy.
Another fascinating fact about this software is that it allows you to cut videos in three simple steps without losing the quality. So right after installing the program, you simply need to import your file, choose the start and end time, and click the “Cut” button to remove the part of the video.
Features
- Fast video and audio cutting
- Easy drag and drop audio/video files
- It supports most audio and video formats
Pros
- Free for both Windows and MAC operating systems
- The cutter saves video in original quality
Cons
- It does not include basic video editing features
Part 3: Top 3 Free AVI Video Cutter on MAC
Are you looking for a great AVI video cutter for your MAC? Sadly, you have limited product choices as compared to Windows users. But to ensure you don’t waste time looking for a suitable tool, here’s a list of three AVI video cutting programs you can use on your Macintosh.
iMovie
The first and foremost recommended software for free video cutting on MAC is Apple’s own tool, iMovie . It is a built-in program that comes with your system, so there is no need to spend extra on a video editor. iMovie allows you to browse and import most video files, including AVI, right from your computer. Also, this tool is equipped with multiple functions, such as audio editing, video quality enhancement, and much more.
This MAC’s video editor is ideal for beginners. Many home users and small business owners find this tool extremely simple, as they don’t like to be confused with complex features. So, if you want to make cuts to your video clips, start working on iMovie. And within a few clicks, you can trim or cut your videos for free.
Features
- Video cutting and trimming
- Cropping and rotation
- Effects and transitions
- Built-in themes
- HD and 4K video support
- Movie sharing
- Audio adjustments
- Chroma screen controls
- Character tracking
Pros
- Free to use for MAC users
- Clean timeline
- One-click video cutting and trimming
- Easy-to-remember keyboard shortcuts
- Direct share projects to your social media, like YouTube
Cons
- It takes a lot of time to export videos
- iMovie needs high HDD storage space
VideoPad by NCH

VideoPad by NCH is a beginner-level video editor with all the basic features. The software is specifically designed for home movie makers. That is why VideoPad is easy to understand and use.
VideoPad is entirely free of cost for non-commercial purposes, but it has limited features. On the other hand, if you want to enjoy full traits, you can purchase the tool.
VideoPad supports video files, including AVI, WMV, MPEG, MOV, MP4, ASF, and XviD. Likewise, you can also burn movies to Blu-ray, DVD, HD-DVD, or CD. And most importantly, you can easily cut or trim AVI videos on your MAC, as the software is available on both MAC and Windows systems.
Features
- Audio tools
- Video rotation
- Video sharing
- Visual effects
- Video transitions
- 3D Video editing
- Color correction
- Overlays and texts
- Video optimization
- Great plugin support
- Direct video uploading
- Multiple video resolutions
- Video cutting and trimming
- Files exportation to various devices
- Stereoscopic conversion from 2D to 3D
Pros
- You can use the basic tools for free
- Allows 360-degree video production
- It supports a wide range of video formats
- Compatible with MAC and Windows computers
Cons
- The auto speech feature performs poorly
- The free version has annoying notifications
Xilisoft Video Cutter
Xilisoft Video Cutter is the simplest tool to cut videos on MAC. This software has a straightforward option to cut the clip after importing it to the timeline. The program is fast and has a user-friendly interface.
Moreover, you can polish your videos by merging multiple clips or increasing the video quality once you’re done with the cutting process. At the same time, this video cutter allows you to import all video formats, including XviD, DivX, MOV, FLV, MP4, MPEG-4/, MKV, MPEG, WMV, and AVI.
Features
- Video joining
- Support multiple output video formats, including HD
Pros
- Easy video cutting and merging
- It doesn’t require a large storage space
- Extremely uncomplicated interface
- Real-time preview to make better cuts
- Available on both MAC and Windows systems
Cons
- The trial version is free to use but limits you from enjoying extra features
Part 4: Top 3 Free AVI Video Cutter on Android
After capturing nice videos with your Android mobile phone, you may need to cut unnecessary scenes to make your clips look professional. While there are numerous Android cutters, not all support the AVI format. So below, you will find the 3 best AVI video cutters for Android, which are free to use.
Quick – Video Editor & Maker
Quick – Video Editor & Maker is a free video editor with PRO results. Many photographers and vloggers love using this app to cut clips immediately. Furthermore, the application offers a wide range of options to assure you don’t have to look to any other tool to rotate or compress video. Quick – Video Editor & Maker lets you import videos in all major formats, including AVI, MPEG, WMA, and more.
Features
- Video cutting, fading, and rotation
- Speed control tools
- Conversion from video to GIF
Pros
- Free app
- Simple interface
Cons
- Lack of updates
- Some users complain about app crash
Funimate Video Editor & Maker
If you want to make some professional-grade video edits quickly, you are welcome to download and use Funimate Video Editor & Maker on your Android device. It’s a free tool to cut videos. It has an easy procedure, and you can cut AVI videos in a few seconds.
Plus, you can use the app to add custom animations, effects, and many other exciting elements. You can share your makes on social media like TikTok, Instagram, and other platforms. Contrarily, the app itself is a community with millions of Funimate-users who share their creations daily. You can also join or watch videos from other creators to learn more about new techniques and trends in video editing.
Features
- Video trimming and splitting
- Animation and cropping
- Filters and AI effects
- Speed adjustment
- Keyframing and video merging
Pros
- Free Android application with several editing tools
- Easy trimming, splitting, and cropping
- Aspect ratio, border, and color customization
- Direct social media sharing
Cons
- Free users cannot use templates
- The free version stamps watermarks on each project
Part 5: Top 3 Free AVI Video Cutter on iPhone
No wonder iPhone’s camera captures high-quality videos. But the problem begins when there’s no free app to cut AVI videos. So if you’re recording great spots, but deep inside, you really want to remove some parts, then these 3 free AVI video cutters will work smoothly on your iPhone.
Cut, Trim, Split Video Editor
Download Cut, Trim, Split Video Editor on your iPhone to delete/cut unwanted portions of your video clips. The tool is also best for trimming iPhone-recorded clips without messing with the frames. Or, if you just want to split the video into multiple parts for your next WhatsApp status, this iPhone app can do that job for you.
The app supports multiple video file types, including MOV, MP4, AVI, MPEG, MPEG-2, and 3GPP
Features
- Easy trimming and cutting video clips
- Splitting big-sized videos into two smaller clips
- Import video from file-sharing platforms, like iCloud, using Wi-Fi
Pros
- Free app for fast video cutting and sharing
- Simple UI interface
Cons
- The free version shows advertisements
Splice - Video Editor & Maker
Splice is an extraordinary video editor that makes it easy to make fully customized and professional videos from your iPhone. The app is also best for video cutting. Besides, it has many interesting features, which you can use from your device.
Features
- Cutting, trimming, and cropping your videos
- Exposure, saturation, and exposure adjustment
- Slow and fast motion with speed ramping option
- Video masking and overlay
- Color correction and text overlays
Pros
- Free basic features, such as video cutting
- iTunes integration
- Supports AVI video input
- User-friendly application
- Access to the music library
- Quick and simple social sharing
Cons
- Output videos require high mobile storage space
Part 6: Top 3 Free AVI Video Cutter Online
Don’t want to install video cutters on your MAC, Windows, smartphone, or any other device? No problem! You can use online video cutters and trimmers to split, cut, or trim your clips for free.
However, the problem still exists in online tools, as not all web-based editors allow importing AVI files. So to save your time and energy, you can directly go to the following online AVI cutters to complete your tasks.
Kapwing
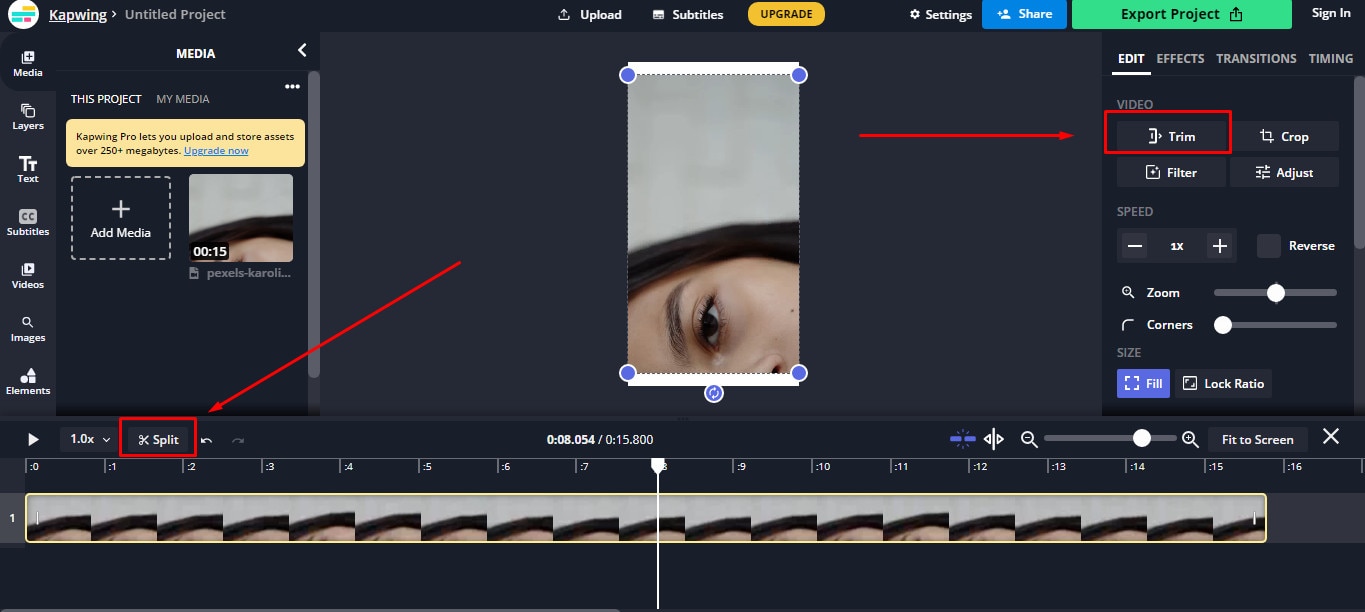
Kapwing is an online video editor best for casual creatives, such as Vloggers and YouTubers. You can use this web-based platform to cut your videos. Gladly, Kapwing supports all AVI incomings. You can upload your AVI video files to this platform and use its trim or split feature. To do that, you need to upload your AVI video and choose the “Trim” or “Split” tool to see the magic. Once done with the trimming process, you can explore Kapwing’s other incredible traits and apply them to your project.
Features
- Video splitting, trimming, and merging
- Audio capturing
- Speed adjustment
- Image and video library
- Text editing and overlay
- Auto-generated subtitles
- Several collaboration tools
- Video creation from scratch
- Templates, shapes, and emojis
- Simple drag-and-drop interface
- Video transitions, plugins, and elements
Pros
- Free online video trimmer
- User-friendly interface
- You can export 30-minutes long projects
- Allows you to export unlimited videos with a watermark
- One watermark-free video export is available each month
Cons
- Cannot export long videos with a free account
- Only 10 minutes transcription limit is available for free users
- You need to purchase a monthly or annual subscription to remove the watermark from multiple videos
Clideo
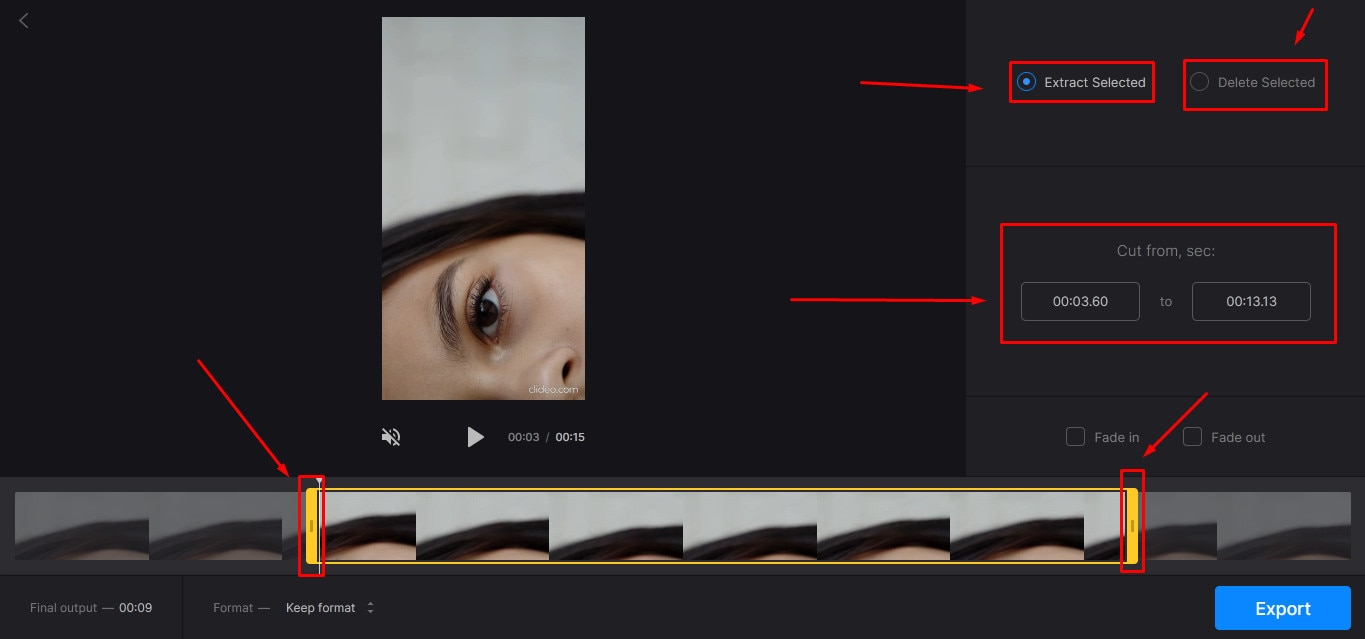
Clideo is not just a video cutter but an online solution to all your video editing problems. The tool is super popular, with 4 million+ users a month. And why not? This is one of those web-based platforms that allow AVI video files to be imported and exported without converting them into any other formats.
Nevertheless, if you’re only looking for video cutting options, this tool makes your life easy. Simply upload your video, and select the portion of it by setting start and end times. Choose whether you want to delete or extract the selected part from the clip, and hit the “Export” button.
And within a few moments, you can enjoy a trimmed video clip. And if you plan to be more creative, you can look for other Clideo features to make videos more fascinating.
Features
- Video combining and cutting
- Resize and crop clips
- Compress your videos
- Add text and subtitles
- Add music to your video files
- Filters and color correction tools
- Audio mute, cutting, and muting
- Video rotation, flipping, and speed adjustment
Pros
- Basic tools can be used for free
- Best for beginners and intermediate users
- Ideal for AVI videos and also supports other video formats
Cons
- You cannot use the free version regularly
Aspose
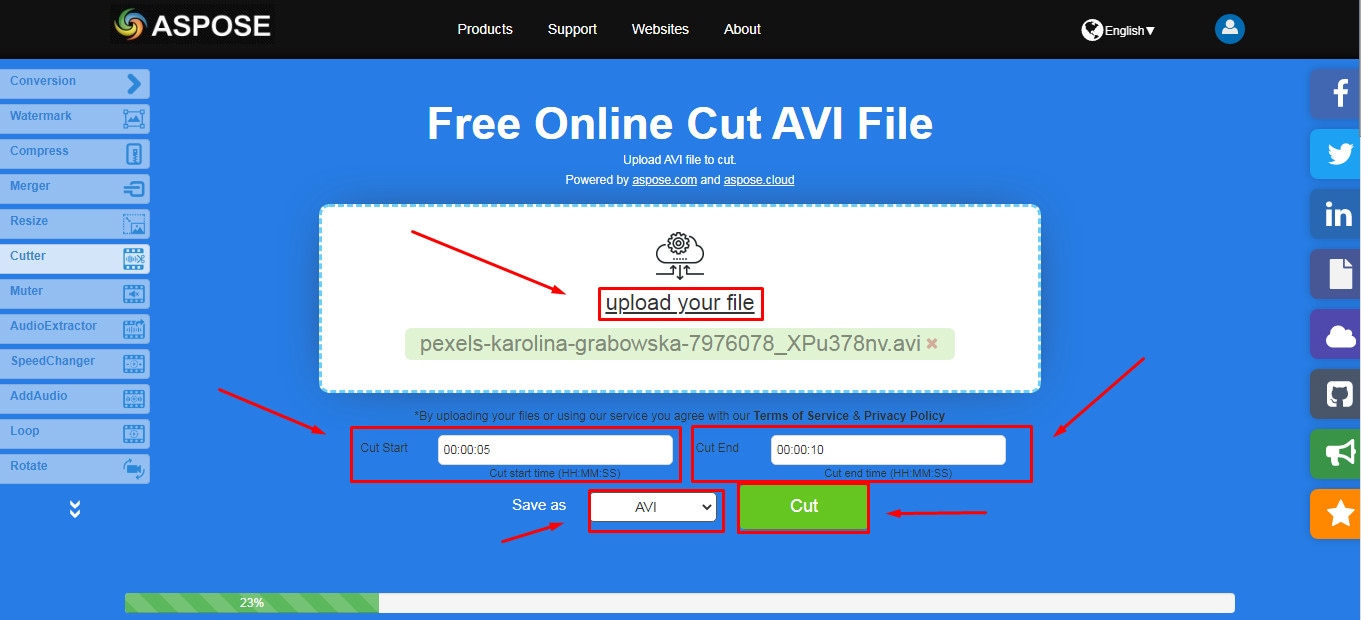
Aspose is a free web-based application to cut clips. You can use this tool on any operating system. It supports all major video file formats, including AVI, MKV, MOV, MP4, FLV, WMV, WEBM, and GIF. Additionally, you can use Aspose for various other reasons, such as audio extraction, video resizing, and more.
Features
- Video cutting and compressing
- Looping, rotation, and video merging
- Adding watermarks on videos
- Sound muting
- Speed change and audio addition
Pros
- Aspose is a free online tool
- It offers straightforward options to cut and edit videos
Cons
- No color correction option
- Slow video cutting process
- Lacks timeline and other valuable features
Part 7: Bottom Line
Tired of finding AVI cutters? Relax and try these top 16 AVI video cutters for Windows, MAC, iPhone, Android, and online. Almost all these tools are free to use and are extremely handy. On the other hand, if you want to cut and trim videos professionally, download Filmora and follow the step-by-step guide in this article for making clean cuts.
Part 8: FAQs
Q1. How do I trim an AVI video?
To trim an AVI video file, ensure that the software or tool you use supports AVI input. Generally, you need to upload or import a clip on the program, select the portion of the video, and apply the cut/trim feature to make it happen.
Q2. Which is the best online video cutter?
Kapwing and Clideo are the two best online video cutters you can use for free. Both web-based tools also allow you to cut your AVI videos.
Q3. Which is the best video cutter and joiner software?
Filmora, iMovie, and Kapwing are some of the best video cutters and joiner tools. These video editors are also free to use and come with different features.
Q4. How do I trim an AVI file in Windows 10?
Trimming an AVI video file in Windows 10 is very simple. Launch the Microsoft Photos (Photo App) application on your computer, add clip, and select the “Trim” tool to trim a specific video part.
Q5. How can I cut a video on my computer for free?
MAC and Windows users can download Filmora to cut videos for free. Filmora also offers a wide range of other features to make your clips exciting. Contrarily, Windows users can use the built-in Photo App in Windows 10 or download Gihosoft or Handbrake software to cut clips. Likewise, MAC users can download VideoPad, Xilisoft Video Cutter, or iMovie for free.
With the growing fame of video-sharing and social media applications like Twitter, Instagram, and TikTok, the demand for simple and fast video cutting and trimming tools has dramatically increased. Nowadays, you don’t have to play with complex video editing tools to produce high-quality videos.
Thanks to several user-friendly editing software to make things easy for everybody. However, finding the right programs to trim/cut videos is still challenging, especially in AVI format.
But, guess what? These top 16 AVI video cutters for Windows, MAC, Android, iPhone, and online will make video cutting and trimming fun, especially when you learn to do it using Filmora.
In this Article
Part 1: Best AVI Video Cutter to Trim/Cut AVI Video on Windows and MAC – Filmora Video Cutter [with steps}
Part 2: Top 3 Free AVI Video Cutter on Windows
Part 3: Top 3 Free AVI Video Cutter on MAC
Part 4: Top 3 Free AVI Video Cutter on Android
Part 5: Top 3 Free AVI Video Cutter on iPhone
Part 6: Top 3 Free AVI Video Cutter Online
Part 7: Bottom Line
Part 8: FAQs
Part 1: Best AVI Video Cutter to Trim/Cut AVI Video on Windows and MAC – Filmora Video Cutter [with steps]
Filmora by Wondershare is a star video editor with outstanding outcomes. Whether you have a MAC or Windows PC, you can download Filmora regardless of your operating system. The program best serves those who intend to make high-quality videos. The software provides editing support for all video formats, including AVI.
Although Filmora is an affordable editor with tons of audio and video editing options, you can still download the software for free and create projects if watermarks don’t bother you. Moreover, you can count this tool’s capabilities in cropping, resizing, and Chroma screen support. But that’s not the only sweet fruit.
In fact, Filmora is equipped with many jaw-dropping features, including preset templates, auto beat sync, split-screen, speed ramping, motion tracking, keyframing, creative transitions, titles, filters, and much more. And the best part is, you can learn and understand Filmora in no time. That’s why the program is loved and supported by all types of users.
So does Filmora helps cut and trim AVI videos? Yes! It does if you follow these steps correctly.
Step 1: Download Filmora Video Editor
First, download Filmora Video Editor by choosing your operating system, as seen in the screenshot below.
Run the setup and let it finish without any pause or break.
Step 2: Import Your Video to Filmora Video Editor
Importing your AVI video is a very simple process. Just click on the “Film Clip” icon.
It will open a new window screen on your computer to select the video from the directory. Find the clip you want to import and cut. Use your mouse to select it and click the “Open” button.
The video will be loaded in the “Media” folder of Filmora. The clip’s thumbnail should be visible to assure you have done everything correctly.
If you can see that, let’s go to the next step.
Step 3: Drag and Drop Video to Filmora’s Timeline
Select the video in the media folder by clicking over it once. Now, without leaving the hold of the left button of your mouse, slide the video down to the track in the timeline.
After that, a message will pop up, asking about your preference for the project settings. It is recommended to choose the “Match to Media” option unless you’re an experienced video editor who knows how to play with the resolution and frame rates.
You will see the video on the timeline with its preview on the “Preview Screen” on the right side of the interface.
Step 4: Cutting Your Video in Filmora
Here comes the core step you have been waiting for. But before you go any further, you need to know about the “Playhead.”
Playhead is an orange-reddish marker you can find on the timeline.
It has an important role in cutting your videos.
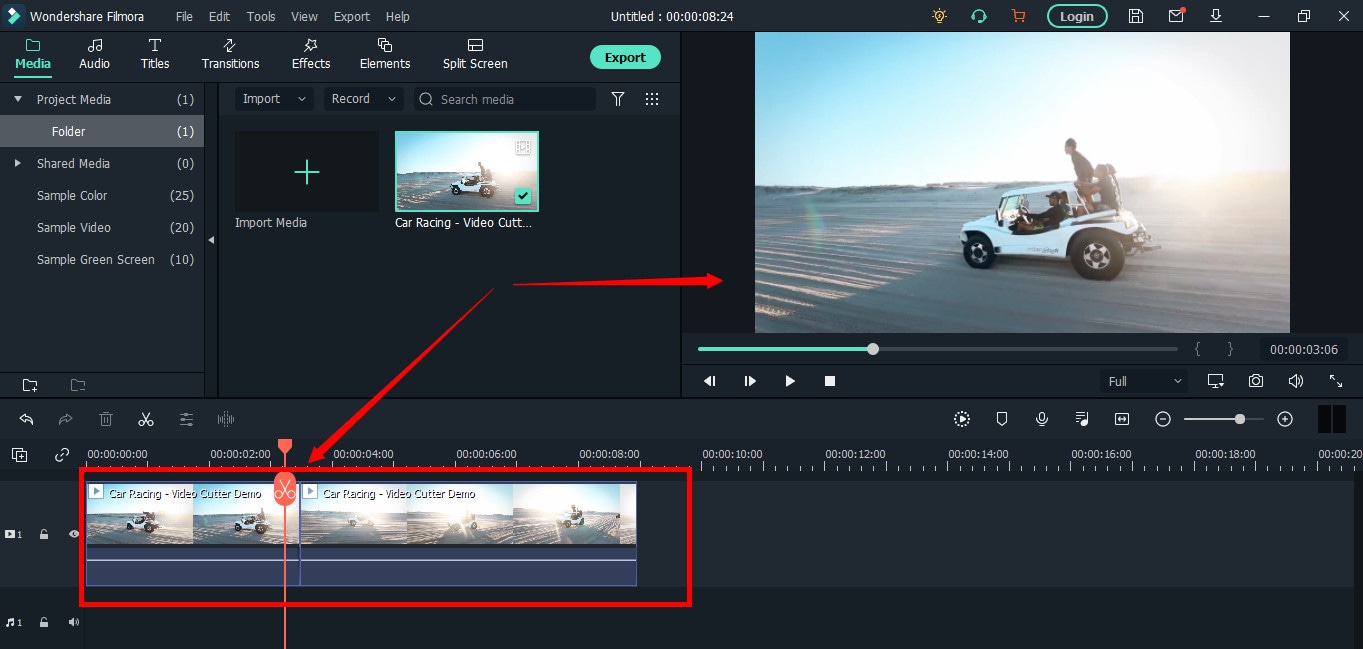
So, move the playhead to your desired frame and click on the “scissor” icon to make the “starting” cut.
As soon as you do it, you will see that the single clip is now divided into two parts similar to this image.
The “Red” marked area in the above screenshot ensures a gap between the clips on the timeline. The “Yellow” arrows confirm two separate clips of the same video.
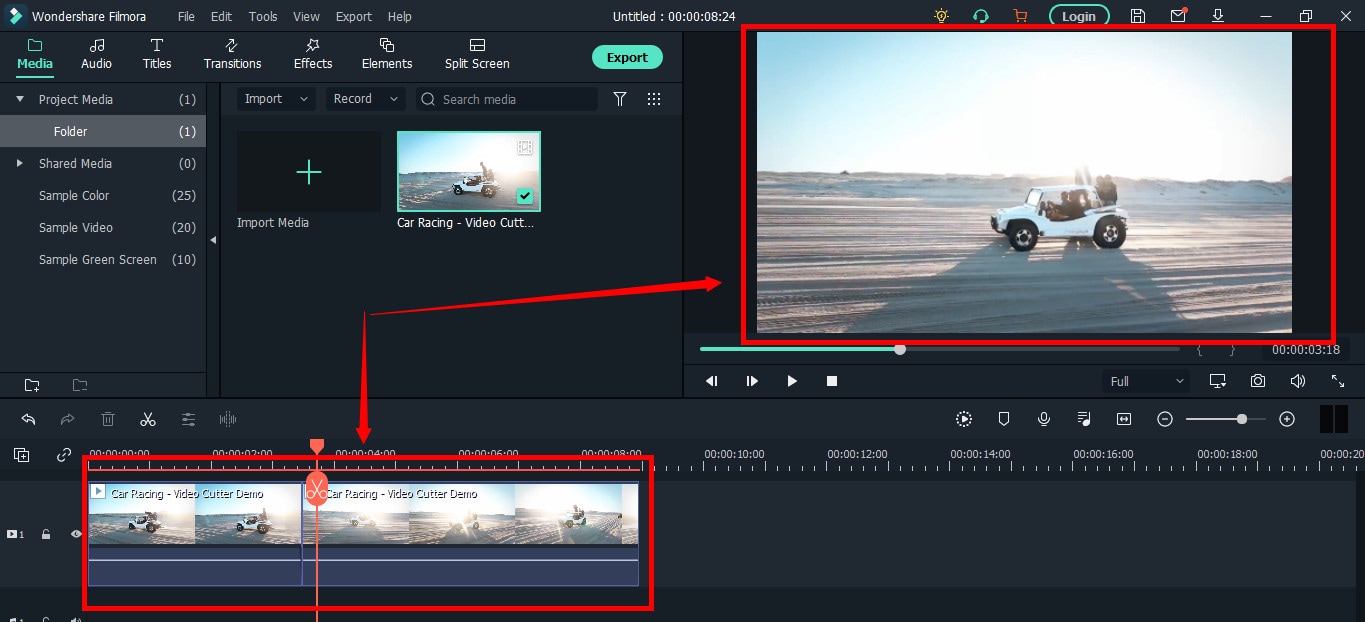
Place the two clips together as seen in this “Green” area.
And place the playhead anywhere on the clip. And click on the “scissor” icon once again to make the “ending” cut (second cut).
If done correctly, there should be three clips now of the same video, as you can observe in this screenshot.
Again, the “Red” area in the above photo indicates the gap, and the “Yellow” area ensures a third segment of the video.
Note: The gaps you can see in the divided clips are made intentionally for understanding. Practically, Filmora doesn’t move the clip or make gaps in between after you have made the cuts.
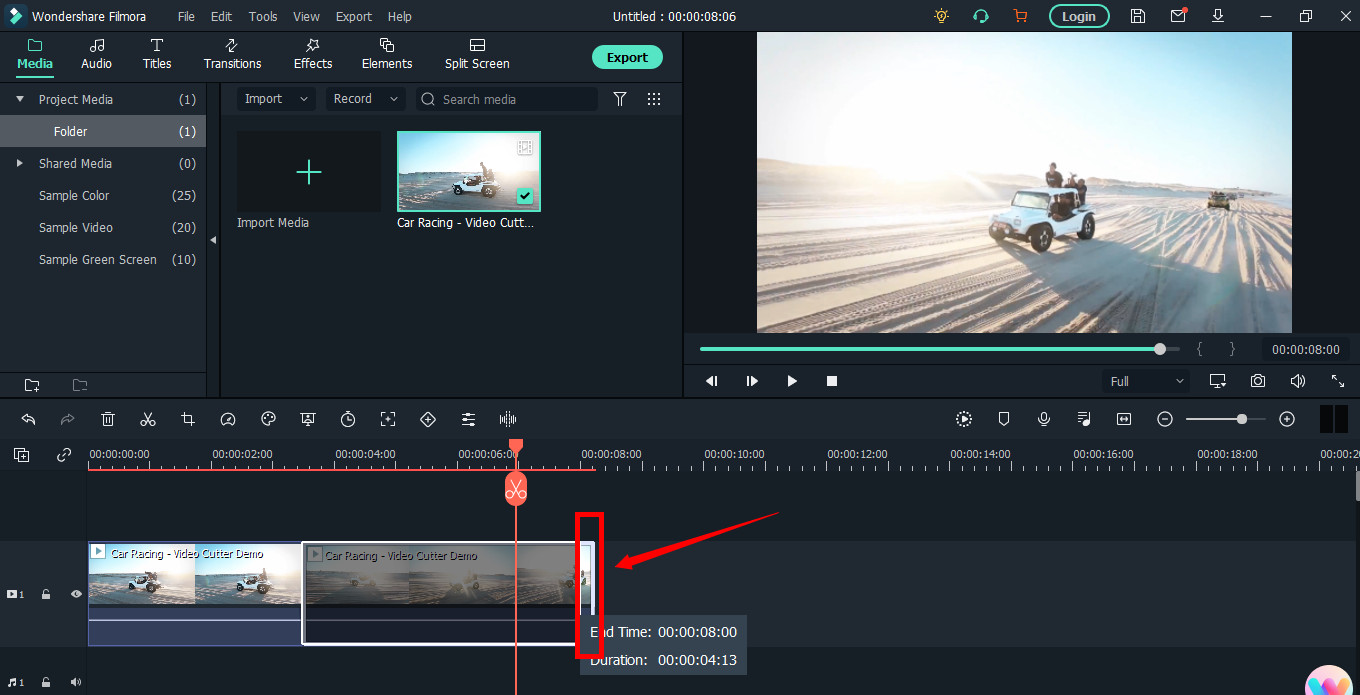
Keep in mind that there are three clips on the timeline. Now, if you want to remove the second clip from the video, you need to select that portion first by clicking on it.
Then, right-click on the mouse and choose “Cut” from the menu.
Within a semi-second, the selected portion will be removed from the timeline. And you will be able to see the remaining parts of the video. Now, pull the second clip using your mouse and place it at the end of the first clip without leaving a gap in between.
Then, click the “Play” button under the preview screen to see the results.
You can see in the above two screenshots that there’s a jump between the scenes due to cuts, confirming that video has been cut significantly.
Step 5: Trimming Your Video in Filmora
Remember that cutting and trimming in Filmora are two different things. Trimming allows you to remove a particular video part from visibility without deleting the portion.
So feel free to skip this step if you’re happy learning the cutting technique. But if you’re interested in trimming, here’s how you do it.
Take your mouse cursor at the beginning or end of the clip you want to trim. Keep holding the clip’s corner and slide the mouse back or front to trim the part
Note: Since the trim tool doesn’t delete the video, the final project based on trimming will be of a larger size. Therefore, it is advised to cut videos rather than trimming for fast rendering, better results, and small video size.
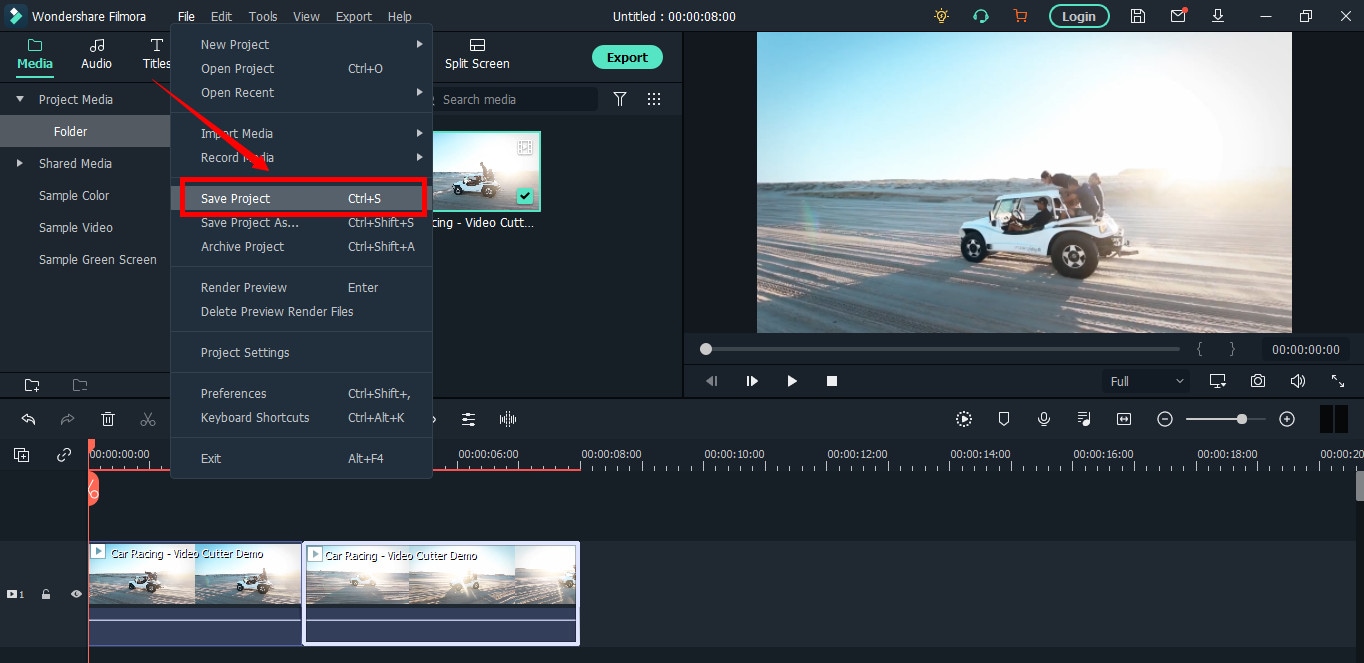
Step 6: Save Project and Export Your Cut/Trimmed AVI Video
Choose “Save Project” from the “File” menu.
Select the directory to save the project, rename the new video, and click the “Save” button.
Click on the “Export” button to save the video in AVI or any other video format of your choice on your computer.
Part 2: Top 3 Free AVI Video Cutter on Windows
As a Windows user, finding an excellent video cutter is relatively easy. However, not all software permits importing AVI videos. In the same way, some video trimmers come at a price. So if you really don’t want to pay and enjoy cutting your AVI files, try using these three video cutting tools.
Microsoft Photos (Windows 10)
Microsoft Photos or Photo App is a free photo viewer and editor with your Windows 10. It offers incredible photo editing and enhancement along with different tools for organizing and editing videos in a very friendly way. Likewise, you can create drawings over the videos and add 3D effects and background music to your clips.
You can also trim AVI videos with Microsoft Photos quickly. All you need to do is open your clip with the Photo App, choose the “Trim” option, select a portion of the video you want to trim, and go ahead.
That’s it!
Features
- Quick video trimming
- Cool text effects
- 3D library and effects
- It has a clear interface
- You can find and tag people’s faces
- The program has 15+ filters for editing
- Motion tracking option for drawing on videos
- Allows you to view and organize your files easily
Pros
- Microsoft Photos is free for Windows users
- It automatically creates albums
- The program has a touch-friendly interface
- You can integrate your OneDrive with the software
Cons
- Lacks before and after view
- Not included in older Windows versions
- It doesn’t support selective focus or panorama stitching
Handbrake
Handbrake is best-known for its video transcoding traits. Unlike typical video editors, this open-source tool includes limited options to rip Blu-rays and DVDs. Moreover, you can mix the 5.1 soundtracks and convert them to stereo to make the audio compatible with your TV speakers.
But the exciting thing about Handbrake is that you can use this software on your macOS 10.13 or later versions to cut AVI videos for free. However, it’s a bit technical process, as there’s no timeline to help you trim or make cuts on the clips directly with the help of your mouse.
You are required to mention a time range (seconds, minutes, or hours) to keep a specific part of the video while the software removes the non-ranged parts of the clip. For instance, you have a video of 10 seconds. You start the range from 5 seconds and end it at 10 seconds. So, the first four seconds of the video will be cut from the entire clip.
Features
- Video cutting, cropping, and resizing
- Low-quality and old video restoration
- Video conversion from any format to MKV or MP4
Pros
- Handbrake is free
- You can convert batch videos with ease
- It supports MAC, Windows, and Linux OS
- Allows you to import video files in all major formats
- The software comes with various video conversion presets
Cons
- Handbrake is not a user-friendly tool
- The video file output is limited to two formats (MKV and MP4) only
Gihosoft Video Cutter
Gihosoft is a clean, free, lossless video cutter on your Windows PC. It’s a simple tool that helps you cut video files into various output formats. So be it AVI, MPEG, or any other file, with Gihosoft, everything becomes handy.
Another fascinating fact about this software is that it allows you to cut videos in three simple steps without losing the quality. So right after installing the program, you simply need to import your file, choose the start and end time, and click the “Cut” button to remove the part of the video.
Features
- Fast video and audio cutting
- Easy drag and drop audio/video files
- It supports most audio and video formats
Pros
- Free for both Windows and MAC operating systems
- The cutter saves video in original quality
Cons
- It does not include basic video editing features
Part 3: Top 3 Free AVI Video Cutter on MAC
Are you looking for a great AVI video cutter for your MAC? Sadly, you have limited product choices as compared to Windows users. But to ensure you don’t waste time looking for a suitable tool, here’s a list of three AVI video cutting programs you can use on your Macintosh.
iMovie
The first and foremost recommended software for free video cutting on MAC is Apple’s own tool, iMovie . It is a built-in program that comes with your system, so there is no need to spend extra on a video editor. iMovie allows you to browse and import most video files, including AVI, right from your computer. Also, this tool is equipped with multiple functions, such as audio editing, video quality enhancement, and much more.
This MAC’s video editor is ideal for beginners. Many home users and small business owners find this tool extremely simple, as they don’t like to be confused with complex features. So, if you want to make cuts to your video clips, start working on iMovie. And within a few clicks, you can trim or cut your videos for free.
Features
- Video cutting and trimming
- Cropping and rotation
- Effects and transitions
- Built-in themes
- HD and 4K video support
- Movie sharing
- Audio adjustments
- Chroma screen controls
- Character tracking
Pros
- Free to use for MAC users
- Clean timeline
- One-click video cutting and trimming
- Easy-to-remember keyboard shortcuts
- Direct share projects to your social media, like YouTube
Cons
- It takes a lot of time to export videos
- iMovie needs high HDD storage space
VideoPad by NCH
VideoPad by NCH is a beginner-level video editor with all the basic features. The software is specifically designed for home movie makers. That is why VideoPad is easy to understand and use.
VideoPad is entirely free of cost for non-commercial purposes, but it has limited features. On the other hand, if you want to enjoy full traits, you can purchase the tool.
VideoPad supports video files, including AVI, WMV, MPEG, MOV, MP4, ASF, and XviD. Likewise, you can also burn movies to Blu-ray, DVD, HD-DVD, or CD. And most importantly, you can easily cut or trim AVI videos on your MAC, as the software is available on both MAC and Windows systems.
Features
- Audio tools
- Video rotation
- Video sharing
- Visual effects
- Video transitions
- 3D Video editing
- Color correction
- Overlays and texts
- Video optimization
- Great plugin support
- Direct video uploading
- Multiple video resolutions
- Video cutting and trimming
- Files exportation to various devices
- Stereoscopic conversion from 2D to 3D
Pros
- You can use the basic tools for free
- Allows 360-degree video production
- It supports a wide range of video formats
- Compatible with MAC and Windows computers
Cons
- The auto speech feature performs poorly
- The free version has annoying notifications
Xilisoft Video Cutter
Xilisoft Video Cutter is the simplest tool to cut videos on MAC. This software has a straightforward option to cut the clip after importing it to the timeline. The program is fast and has a user-friendly interface.
Moreover, you can polish your videos by merging multiple clips or increasing the video quality once you’re done with the cutting process. At the same time, this video cutter allows you to import all video formats, including XviD, DivX, MOV, FLV, MP4, MPEG-4/, MKV, MPEG, WMV, and AVI.
Features
- Video joining
- Support multiple output video formats, including HD
Pros
- Easy video cutting and merging
- It doesn’t require a large storage space
- Extremely uncomplicated interface
- Real-time preview to make better cuts
- Available on both MAC and Windows systems
Cons
- The trial version is free to use but limits you from enjoying extra features
Part 4: Top 3 Free AVI Video Cutter on Android
After capturing nice videos with your Android mobile phone, you may need to cut unnecessary scenes to make your clips look professional. While there are numerous Android cutters, not all support the AVI format. So below, you will find the 3 best AVI video cutters for Android, which are free to use.
Quick – Video Editor & Maker
Quick – Video Editor & Maker is a free video editor with PRO results. Many photographers and vloggers love using this app to cut clips immediately. Furthermore, the application offers a wide range of options to assure you don’t have to look to any other tool to rotate or compress video. Quick – Video Editor & Maker lets you import videos in all major formats, including AVI, MPEG, WMA, and more.
Features
- Video cutting, fading, and rotation
- Speed control tools
- Conversion from video to GIF
Pros
- Free app
- Simple interface
Cons
- Lack of updates
- Some users complain about app crash
Funimate Video Editor & Maker
If you want to make some professional-grade video edits quickly, you are welcome to download and use Funimate Video Editor & Maker on your Android device. It’s a free tool to cut videos. It has an easy procedure, and you can cut AVI videos in a few seconds.
Plus, you can use the app to add custom animations, effects, and many other exciting elements. You can share your makes on social media like TikTok, Instagram, and other platforms. Contrarily, the app itself is a community with millions of Funimate-users who share their creations daily. You can also join or watch videos from other creators to learn more about new techniques and trends in video editing.
Features
- Video trimming and splitting
- Animation and cropping
- Filters and AI effects
- Speed adjustment
- Keyframing and video merging
Pros
- Free Android application with several editing tools
- Easy trimming, splitting, and cropping
- Aspect ratio, border, and color customization
- Direct social media sharing
Cons
- Free users cannot use templates
- The free version stamps watermarks on each project
Part 5: Top 3 Free AVI Video Cutter on iPhone
No wonder iPhone’s camera captures high-quality videos. But the problem begins when there’s no free app to cut AVI videos. So if you’re recording great spots, but deep inside, you really want to remove some parts, then these 3 free AVI video cutters will work smoothly on your iPhone.
Cut, Trim, Split Video Editor
Download Cut, Trim, Split Video Editor on your iPhone to delete/cut unwanted portions of your video clips. The tool is also best for trimming iPhone-recorded clips without messing with the frames. Or, if you just want to split the video into multiple parts for your next WhatsApp status, this iPhone app can do that job for you.
The app supports multiple video file types, including MOV, MP4, AVI, MPEG, MPEG-2, and 3GPP
Features
- Easy trimming and cutting video clips
- Splitting big-sized videos into two smaller clips
- Import video from file-sharing platforms, like iCloud, using Wi-Fi
Pros
- Free app for fast video cutting and sharing
- Simple UI interface
Cons
- The free version shows advertisements
Splice - Video Editor & Maker
Splice is an extraordinary video editor that makes it easy to make fully customized and professional videos from your iPhone. The app is also best for video cutting. Besides, it has many interesting features, which you can use from your device.
Features
- Cutting, trimming, and cropping your videos
- Exposure, saturation, and exposure adjustment
- Slow and fast motion with speed ramping option
- Video masking and overlay
- Color correction and text overlays
Pros
- Free basic features, such as video cutting
- iTunes integration
- Supports AVI video input
- User-friendly application
- Access to the music library
- Quick and simple social sharing
Cons
- Output videos require high mobile storage space
Part 6: Top 3 Free AVI Video Cutter Online
Don’t want to install video cutters on your MAC, Windows, smartphone, or any other device? No problem! You can use online video cutters and trimmers to split, cut, or trim your clips for free.
However, the problem still exists in online tools, as not all web-based editors allow importing AVI files. So to save your time and energy, you can directly go to the following online AVI cutters to complete your tasks.
Kapwing
Kapwing is an online video editor best for casual creatives, such as Vloggers and YouTubers. You can use this web-based platform to cut your videos. Gladly, Kapwing supports all AVI incomings. You can upload your AVI video files to this platform and use its trim or split feature. To do that, you need to upload your AVI video and choose the “Trim” or “Split” tool to see the magic. Once done with the trimming process, you can explore Kapwing’s other incredible traits and apply them to your project.
Features
- Video splitting, trimming, and merging
- Audio capturing
- Speed adjustment
- Image and video library
- Text editing and overlay
- Auto-generated subtitles
- Several collaboration tools
- Video creation from scratch
- Templates, shapes, and emojis
- Simple drag-and-drop interface
- Video transitions, plugins, and elements
Pros
- Free online video trimmer
- User-friendly interface
- You can export 30-minutes long projects
- Allows you to export unlimited videos with a watermark
- One watermark-free video export is available each month
Cons
- Cannot export long videos with a free account
- Only 10 minutes transcription limit is available for free users
- You need to purchase a monthly or annual subscription to remove the watermark from multiple videos
Clideo
Clideo is not just a video cutter but an online solution to all your video editing problems. The tool is super popular, with 4 million+ users a month. And why not? This is one of those web-based platforms that allow AVI video files to be imported and exported without converting them into any other formats.
Nevertheless, if you’re only looking for video cutting options, this tool makes your life easy. Simply upload your video, and select the portion of it by setting start and end times. Choose whether you want to delete or extract the selected part from the clip, and hit the “Export” button.
And within a few moments, you can enjoy a trimmed video clip. And if you plan to be more creative, you can look for other Clideo features to make videos more fascinating.
Features
- Video combining and cutting
- Resize and crop clips
- Compress your videos
- Add text and subtitles
- Add music to your video files
- Filters and color correction tools
- Audio mute, cutting, and muting
- Video rotation, flipping, and speed adjustment
Pros
- Basic tools can be used for free
- Best for beginners and intermediate users
- Ideal for AVI videos and also supports other video formats
Cons
- You cannot use the free version regularly
Aspose
Aspose is a free web-based application to cut clips. You can use this tool on any operating system. It supports all major video file formats, including AVI, MKV, MOV, MP4, FLV, WMV, WEBM, and GIF. Additionally, you can use Aspose for various other reasons, such as audio extraction, video resizing, and more.
Features
- Video cutting and compressing
- Looping, rotation, and video merging
- Adding watermarks on videos
- Sound muting
- Speed change and audio addition
Pros
- Aspose is a free online tool
- It offers straightforward options to cut and edit videos
Cons
- No color correction option
- Slow video cutting process
- Lacks timeline and other valuable features
Part 7: Bottom Line
Tired of finding AVI cutters? Relax and try these top 16 AVI video cutters for Windows, MAC, iPhone, Android, and online. Almost all these tools are free to use and are extremely handy. On the other hand, if you want to cut and trim videos professionally, download Filmora and follow the step-by-step guide in this article for making clean cuts.
Part 8: FAQs
Q1. How do I trim an AVI video?
To trim an AVI video file, ensure that the software or tool you use supports AVI input. Generally, you need to upload or import a clip on the program, select the portion of the video, and apply the cut/trim feature to make it happen.
Q2. Which is the best online video cutter?
Kapwing and Clideo are the two best online video cutters you can use for free. Both web-based tools also allow you to cut your AVI videos.
Q3. Which is the best video cutter and joiner software?
Filmora, iMovie, and Kapwing are some of the best video cutters and joiner tools. These video editors are also free to use and come with different features.
Q4. How do I trim an AVI file in Windows 10?
Trimming an AVI video file in Windows 10 is very simple. Launch the Microsoft Photos (Photo App) application on your computer, add clip, and select the “Trim” tool to trim a specific video part.
Q5. How can I cut a video on my computer for free?
MAC and Windows users can download Filmora to cut videos for free. Filmora also offers a wide range of other features to make your clips exciting. Contrarily, Windows users can use the built-in Photo App in Windows 10 or download Gihosoft or Handbrake software to cut clips. Likewise, MAC users can download VideoPad, Xilisoft Video Cutter, or iMovie for free.
With the growing fame of video-sharing and social media applications like Twitter, Instagram, and TikTok, the demand for simple and fast video cutting and trimming tools has dramatically increased. Nowadays, you don’t have to play with complex video editing tools to produce high-quality videos.
Thanks to several user-friendly editing software to make things easy for everybody. However, finding the right programs to trim/cut videos is still challenging, especially in AVI format.
But, guess what? These top 16 AVI video cutters for Windows, MAC, Android, iPhone, and online will make video cutting and trimming fun, especially when you learn to do it using Filmora.
In this Article
Part 1: Best AVI Video Cutter to Trim/Cut AVI Video on Windows and MAC – Filmora Video Cutter [with steps}
Part 2: Top 3 Free AVI Video Cutter on Windows
Part 3: Top 3 Free AVI Video Cutter on MAC
Part 4: Top 3 Free AVI Video Cutter on Android
Part 5: Top 3 Free AVI Video Cutter on iPhone
Part 6: Top 3 Free AVI Video Cutter Online
Part 7: Bottom Line
Part 8: FAQs
Part 1: Best AVI Video Cutter to Trim/Cut AVI Video on Windows and MAC – Filmora Video Cutter [with steps]
Filmora by Wondershare is a star video editor with outstanding outcomes. Whether you have a MAC or Windows PC, you can download Filmora regardless of your operating system. The program best serves those who intend to make high-quality videos. The software provides editing support for all video formats, including AVI.
Although Filmora is an affordable editor with tons of audio and video editing options, you can still download the software for free and create projects if watermarks don’t bother you. Moreover, you can count this tool’s capabilities in cropping, resizing, and Chroma screen support. But that’s not the only sweet fruit.
In fact, Filmora is equipped with many jaw-dropping features, including preset templates, auto beat sync, split-screen, speed ramping, motion tracking, keyframing, creative transitions, titles, filters, and much more. And the best part is, you can learn and understand Filmora in no time. That’s why the program is loved and supported by all types of users.
So does Filmora helps cut and trim AVI videos? Yes! It does if you follow these steps correctly.
Step 1: Download Filmora Video Editor
First, download Filmora Video Editor by choosing your operating system, as seen in the screenshot below.
Run the setup and let it finish without any pause or break.
Step 2: Import Your Video to Filmora Video Editor
Importing your AVI video is a very simple process. Just click on the “Film Clip” icon.
It will open a new window screen on your computer to select the video from the directory. Find the clip you want to import and cut. Use your mouse to select it and click the “Open” button.
The video will be loaded in the “Media” folder of Filmora. The clip’s thumbnail should be visible to assure you have done everything correctly.
If you can see that, let’s go to the next step.
Step 3: Drag and Drop Video to Filmora’s Timeline
Select the video in the media folder by clicking over it once. Now, without leaving the hold of the left button of your mouse, slide the video down to the track in the timeline.
After that, a message will pop up, asking about your preference for the project settings. It is recommended to choose the “Match to Media” option unless you’re an experienced video editor who knows how to play with the resolution and frame rates.
You will see the video on the timeline with its preview on the “Preview Screen” on the right side of the interface.
Step 4: Cutting Your Video in Filmora
Here comes the core step you have been waiting for. But before you go any further, you need to know about the “Playhead.”
Playhead is an orange-reddish marker you can find on the timeline.
It has an important role in cutting your videos.
So, move the playhead to your desired frame and click on the “scissor” icon to make the “starting” cut.
As soon as you do it, you will see that the single clip is now divided into two parts similar to this image.
The “Red” marked area in the above screenshot ensures a gap between the clips on the timeline. The “Yellow” arrows confirm two separate clips of the same video.
Place the two clips together as seen in this “Green” area.
And place the playhead anywhere on the clip. And click on the “scissor” icon once again to make the “ending” cut (second cut).
If done correctly, there should be three clips now of the same video, as you can observe in this screenshot.
Again, the “Red” area in the above photo indicates the gap, and the “Yellow” area ensures a third segment of the video.
Note: The gaps you can see in the divided clips are made intentionally for understanding. Practically, Filmora doesn’t move the clip or make gaps in between after you have made the cuts.
Keep in mind that there are three clips on the timeline. Now, if you want to remove the second clip from the video, you need to select that portion first by clicking on it.
Then, right-click on the mouse and choose “Cut” from the menu.
Within a semi-second, the selected portion will be removed from the timeline. And you will be able to see the remaining parts of the video. Now, pull the second clip using your mouse and place it at the end of the first clip without leaving a gap in between.
Then, click the “Play” button under the preview screen to see the results.
You can see in the above two screenshots that there’s a jump between the scenes due to cuts, confirming that video has been cut significantly.
Step 5: Trimming Your Video in Filmora
Remember that cutting and trimming in Filmora are two different things. Trimming allows you to remove a particular video part from visibility without deleting the portion.
So feel free to skip this step if you’re happy learning the cutting technique. But if you’re interested in trimming, here’s how you do it.
Take your mouse cursor at the beginning or end of the clip you want to trim. Keep holding the clip’s corner and slide the mouse back or front to trim the part
Note: Since the trim tool doesn’t delete the video, the final project based on trimming will be of a larger size. Therefore, it is advised to cut videos rather than trimming for fast rendering, better results, and small video size.
Step 6: Save Project and Export Your Cut/Trimmed AVI Video
Choose “Save Project” from the “File” menu.
Select the directory to save the project, rename the new video, and click the “Save” button.
Click on the “Export” button to save the video in AVI or any other video format of your choice on your computer.
Part 2: Top 3 Free AVI Video Cutter on Windows
As a Windows user, finding an excellent video cutter is relatively easy. However, not all software permits importing AVI videos. In the same way, some video trimmers come at a price. So if you really don’t want to pay and enjoy cutting your AVI files, try using these three video cutting tools.
Microsoft Photos (Windows 10)
Microsoft Photos or Photo App is a free photo viewer and editor with your Windows 10. It offers incredible photo editing and enhancement along with different tools for organizing and editing videos in a very friendly way. Likewise, you can create drawings over the videos and add 3D effects and background music to your clips.
You can also trim AVI videos with Microsoft Photos quickly. All you need to do is open your clip with the Photo App, choose the “Trim” option, select a portion of the video you want to trim, and go ahead.
That’s it!
Features
- Quick video trimming
- Cool text effects
- 3D library and effects
- It has a clear interface
- You can find and tag people’s faces
- The program has 15+ filters for editing
- Motion tracking option for drawing on videos
- Allows you to view and organize your files easily
Pros
- Microsoft Photos is free for Windows users
- It automatically creates albums
- The program has a touch-friendly interface
- You can integrate your OneDrive with the software
Cons
- Lacks before and after view
- Not included in older Windows versions
- It doesn’t support selective focus or panorama stitching
Handbrake
Handbrake is best-known for its video transcoding traits. Unlike typical video editors, this open-source tool includes limited options to rip Blu-rays and DVDs. Moreover, you can mix the 5.1 soundtracks and convert them to stereo to make the audio compatible with your TV speakers.
But the exciting thing about Handbrake is that you can use this software on your macOS 10.13 or later versions to cut AVI videos for free. However, it’s a bit technical process, as there’s no timeline to help you trim or make cuts on the clips directly with the help of your mouse.
You are required to mention a time range (seconds, minutes, or hours) to keep a specific part of the video while the software removes the non-ranged parts of the clip. For instance, you have a video of 10 seconds. You start the range from 5 seconds and end it at 10 seconds. So, the first four seconds of the video will be cut from the entire clip.
Features
- Video cutting, cropping, and resizing
- Low-quality and old video restoration
- Video conversion from any format to MKV or MP4
Pros
- Handbrake is free
- You can convert batch videos with ease
- It supports MAC, Windows, and Linux OS
- Allows you to import video files in all major formats
- The software comes with various video conversion presets
Cons
- Handbrake is not a user-friendly tool
- The video file output is limited to two formats (MKV and MP4) only
Gihosoft Video Cutter
Gihosoft is a clean, free, lossless video cutter on your Windows PC. It’s a simple tool that helps you cut video files into various output formats. So be it AVI, MPEG, or any other file, with Gihosoft, everything becomes handy.
Another fascinating fact about this software is that it allows you to cut videos in three simple steps without losing the quality. So right after installing the program, you simply need to import your file, choose the start and end time, and click the “Cut” button to remove the part of the video.
Features
- Fast video and audio cutting
- Easy drag and drop audio/video files
- It supports most audio and video formats
Pros
- Free for both Windows and MAC operating systems
- The cutter saves video in original quality
Cons
- It does not include basic video editing features
Part 3: Top 3 Free AVI Video Cutter on MAC
Are you looking for a great AVI video cutter for your MAC? Sadly, you have limited product choices as compared to Windows users. But to ensure you don’t waste time looking for a suitable tool, here’s a list of three AVI video cutting programs you can use on your Macintosh.
iMovie
The first and foremost recommended software for free video cutting on MAC is Apple’s own tool, iMovie . It is a built-in program that comes with your system, so there is no need to spend extra on a video editor. iMovie allows you to browse and import most video files, including AVI, right from your computer. Also, this tool is equipped with multiple functions, such as audio editing, video quality enhancement, and much more.
This MAC’s video editor is ideal for beginners. Many home users and small business owners find this tool extremely simple, as they don’t like to be confused with complex features. So, if you want to make cuts to your video clips, start working on iMovie. And within a few clicks, you can trim or cut your videos for free.
Features
- Video cutting and trimming
- Cropping and rotation
- Effects and transitions
- Built-in themes
- HD and 4K video support
- Movie sharing
- Audio adjustments
- Chroma screen controls
- Character tracking
Pros
- Free to use for MAC users
- Clean timeline
- One-click video cutting and trimming
- Easy-to-remember keyboard shortcuts
- Direct share projects to your social media, like YouTube
Cons
- It takes a lot of time to export videos
- iMovie needs high HDD storage space
VideoPad by NCH
VideoPad by NCH is a beginner-level video editor with all the basic features. The software is specifically designed for home movie makers. That is why VideoPad is easy to understand and use.
VideoPad is entirely free of cost for non-commercial purposes, but it has limited features. On the other hand, if you want to enjoy full traits, you can purchase the tool.
VideoPad supports video files, including AVI, WMV, MPEG, MOV, MP4, ASF, and XviD. Likewise, you can also burn movies to Blu-ray, DVD, HD-DVD, or CD. And most importantly, you can easily cut or trim AVI videos on your MAC, as the software is available on both MAC and Windows systems.
Features
- Audio tools
- Video rotation
- Video sharing
- Visual effects
- Video transitions
- 3D Video editing
- Color correction
- Overlays and texts
- Video optimization
- Great plugin support
- Direct video uploading
- Multiple video resolutions
- Video cutting and trimming
- Files exportation to various devices
- Stereoscopic conversion from 2D to 3D
Pros
- You can use the basic tools for free
- Allows 360-degree video production
- It supports a wide range of video formats
- Compatible with MAC and Windows computers
Cons
- The auto speech feature performs poorly
- The free version has annoying notifications
Xilisoft Video Cutter
Xilisoft Video Cutter is the simplest tool to cut videos on MAC. This software has a straightforward option to cut the clip after importing it to the timeline. The program is fast and has a user-friendly interface.
Moreover, you can polish your videos by merging multiple clips or increasing the video quality once you’re done with the cutting process. At the same time, this video cutter allows you to import all video formats, including XviD, DivX, MOV, FLV, MP4, MPEG-4/, MKV, MPEG, WMV, and AVI.
Features
- Video joining
- Support multiple output video formats, including HD
Pros
- Easy video cutting and merging
- It doesn’t require a large storage space
- Extremely uncomplicated interface
- Real-time preview to make better cuts
- Available on both MAC and Windows systems
Cons
- The trial version is free to use but limits you from enjoying extra features
Part 4: Top 3 Free AVI Video Cutter on Android
After capturing nice videos with your Android mobile phone, you may need to cut unnecessary scenes to make your clips look professional. While there are numerous Android cutters, not all support the AVI format. So below, you will find the 3 best AVI video cutters for Android, which are free to use.
Quick – Video Editor & Maker
Quick – Video Editor & Maker is a free video editor with PRO results. Many photographers and vloggers love using this app to cut clips immediately. Furthermore, the application offers a wide range of options to assure you don’t have to look to any other tool to rotate or compress video. Quick – Video Editor & Maker lets you import videos in all major formats, including AVI, MPEG, WMA, and more.
Features
- Video cutting, fading, and rotation
- Speed control tools
- Conversion from video to GIF
Pros
- Free app
- Simple interface
Cons
- Lack of updates
- Some users complain about app crash
Funimate Video Editor & Maker
If you want to make some professional-grade video edits quickly, you are welcome to download and use Funimate Video Editor & Maker on your Android device. It’s a free tool to cut videos. It has an easy procedure, and you can cut AVI videos in a few seconds.
Plus, you can use the app to add custom animations, effects, and many other exciting elements. You can share your makes on social media like TikTok, Instagram, and other platforms. Contrarily, the app itself is a community with millions of Funimate-users who share their creations daily. You can also join or watch videos from other creators to learn more about new techniques and trends in video editing.
Features
- Video trimming and splitting
- Animation and cropping
- Filters and AI effects
- Speed adjustment
- Keyframing and video merging
Pros
- Free Android application with several editing tools
- Easy trimming, splitting, and cropping
- Aspect ratio, border, and color customization
- Direct social media sharing
Cons
- Free users cannot use templates
- The free version stamps watermarks on each project
Part 5: Top 3 Free AVI Video Cutter on iPhone
No wonder iPhone’s camera captures high-quality videos. But the problem begins when there’s no free app to cut AVI videos. So if you’re recording great spots, but deep inside, you really want to remove some parts, then these 3 free AVI video cutters will work smoothly on your iPhone.
Cut, Trim, Split Video Editor
Download Cut, Trim, Split Video Editor on your iPhone to delete/cut unwanted portions of your video clips. The tool is also best for trimming iPhone-recorded clips without messing with the frames. Or, if you just want to split the video into multiple parts for your next WhatsApp status, this iPhone app can do that job for you.
The app supports multiple video file types, including MOV, MP4, AVI, MPEG, MPEG-2, and 3GPP
Features
- Easy trimming and cutting video clips
- Splitting big-sized videos into two smaller clips
- Import video from file-sharing platforms, like iCloud, using Wi-Fi
Pros
- Free app for fast video cutting and sharing
- Simple UI interface
Cons
- The free version shows advertisements
Splice - Video Editor & Maker
Splice is an extraordinary video editor that makes it easy to make fully customized and professional videos from your iPhone. The app is also best for video cutting. Besides, it has many interesting features, which you can use from your device.
Features
- Cutting, trimming, and cropping your videos
- Exposure, saturation, and exposure adjustment
- Slow and fast motion with speed ramping option
- Video masking and overlay
- Color correction and text overlays
Pros
- Free basic features, such as video cutting
- iTunes integration
- Supports AVI video input
- User-friendly application
- Access to the music library
- Quick and simple social sharing
Cons
- Output videos require high mobile storage space
Part 6: Top 3 Free AVI Video Cutter Online
Don’t want to install video cutters on your MAC, Windows, smartphone, or any other device? No problem! You can use online video cutters and trimmers to split, cut, or trim your clips for free.
However, the problem still exists in online tools, as not all web-based editors allow importing AVI files. So to save your time and energy, you can directly go to the following online AVI cutters to complete your tasks.
Kapwing
Kapwing is an online video editor best for casual creatives, such as Vloggers and YouTubers. You can use this web-based platform to cut your videos. Gladly, Kapwing supports all AVI incomings. You can upload your AVI video files to this platform and use its trim or split feature. To do that, you need to upload your AVI video and choose the “Trim” or “Split” tool to see the magic. Once done with the trimming process, you can explore Kapwing’s other incredible traits and apply them to your project.
Features
- Video splitting, trimming, and merging
- Audio capturing
- Speed adjustment
- Image and video library
- Text editing and overlay
- Auto-generated subtitles
- Several collaboration tools
- Video creation from scratch
- Templates, shapes, and emojis
- Simple drag-and-drop interface
- Video transitions, plugins, and elements
Pros
- Free online video trimmer
- User-friendly interface
- You can export 30-minutes long projects
- Allows you to export unlimited videos with a watermark
- One watermark-free video export is available each month
Cons
- Cannot export long videos with a free account
- Only 10 minutes transcription limit is available for free users
- You need to purchase a monthly or annual subscription to remove the watermark from multiple videos
Clideo
Clideo is not just a video cutter but an online solution to all your video editing problems. The tool is super popular, with 4 million+ users a month. And why not? This is one of those web-based platforms that allow AVI video files to be imported and exported without converting them into any other formats.
Nevertheless, if you’re only looking for video cutting options, this tool makes your life easy. Simply upload your video, and select the portion of it by setting start and end times. Choose whether you want to delete or extract the selected part from the clip, and hit the “Export” button.
And within a few moments, you can enjoy a trimmed video clip. And if you plan to be more creative, you can look for other Clideo features to make videos more fascinating.
Features
- Video combining and cutting
- Resize and crop clips
- Compress your videos
- Add text and subtitles
- Add music to your video files
- Filters and color correction tools
- Audio mute, cutting, and muting
- Video rotation, flipping, and speed adjustment
Pros
- Basic tools can be used for free
- Best for beginners and intermediate users
- Ideal for AVI videos and also supports other video formats
Cons
- You cannot use the free version regularly
Aspose
Aspose is a free web-based application to cut clips. You can use this tool on any operating system. It supports all major video file formats, including AVI, MKV, MOV, MP4, FLV, WMV, WEBM, and GIF. Additionally, you can use Aspose for various other reasons, such as audio extraction, video resizing, and more.
Features
- Video cutting and compressing
- Looping, rotation, and video merging
- Adding watermarks on videos
- Sound muting
- Speed change and audio addition
Pros
- Aspose is a free online tool
- It offers straightforward options to cut and edit videos
Cons
- No color correction option
- Slow video cutting process
- Lacks timeline and other valuable features
Part 7: Bottom Line
Tired of finding AVI cutters? Relax and try these top 16 AVI video cutters for Windows, MAC, iPhone, Android, and online. Almost all these tools are free to use and are extremely handy. On the other hand, if you want to cut and trim videos professionally, download Filmora and follow the step-by-step guide in this article for making clean cuts.
Part 8: FAQs
Q1. How do I trim an AVI video?
To trim an AVI video file, ensure that the software or tool you use supports AVI input. Generally, you need to upload or import a clip on the program, select the portion of the video, and apply the cut/trim feature to make it happen.
Q2. Which is the best online video cutter?
Kapwing and Clideo are the two best online video cutters you can use for free. Both web-based tools also allow you to cut your AVI videos.
Q3. Which is the best video cutter and joiner software?
Filmora, iMovie, and Kapwing are some of the best video cutters and joiner tools. These video editors are also free to use and come with different features.
Q4. How do I trim an AVI file in Windows 10?
Trimming an AVI video file in Windows 10 is very simple. Launch the Microsoft Photos (Photo App) application on your computer, add clip, and select the “Trim” tool to trim a specific video part.
Q5. How can I cut a video on my computer for free?
MAC and Windows users can download Filmora to cut videos for free. Filmora also offers a wide range of other features to make your clips exciting. Contrarily, Windows users can use the built-in Photo App in Windows 10 or download Gihosoft or Handbrake software to cut clips. Likewise, MAC users can download VideoPad, Xilisoft Video Cutter, or iMovie for free.
Free Online Video Editing Software: The Top 10 Contenders
Top 10+ Best Free Online Video Editors for Video Editing Online

Ollie Mattison
Mar 27, 2024• Proven solutions
With the creation of social video sharing networks online like YouTube, Vimeo, Instagram and Vine, editing and making videos stopped being the exclusive domain of professionals. All you need right now is a good computer system and bingo you are a video editor. You can now edit videos online without downloading any program on your Windows or Mac computer - all you require is a decent network connection to the internet. In this article, we are going to talk about the top 10 most recommended best free online video editing solutions that you can access online.
Most of these free online video editors are beginner-friendly, so even if you just come to the video editing world, you can make a video quickly with these online video editing tools. If you’re an experienced video editor , then check our picks of the best professional video editing software.
Personally, I don’t recommend using online tools since sometimes the network connection isn’t good, and when there is a network error, all the efforts are gone. Editing videos with online tools also need high upload and download speed, so it’s suitable for editing short and small size video clips. Besides, online video editing solutions maybe not the best choice if you need more advanced editing options and beautiful video effects. In this case, I highly recommend Wondershare Filmora for the tool you can’t miss. Just download it to have a try to explore the editing features, plentiful effects and presets. It can be used on Mac and Windows computers both and is suitable for beginners and semi-pros both.
Note: in the free trial version of Filmora 11, there will be a watermark like most online video editors listed below. But you’re allowed to use all the features and effects and save it to your computer or share it on YouTube or Vimeo directly. If you’re a teacher or a student or school staff, you can enjoy our discount on purchasing.
To improve your video editing and create a more stunning video, you can use the package Filmora & Filmstock video templates”, click the image below to see how to make your storytelling more engaging.
Filmstock Stock Media Library ](https://filmstock.wondershare.com/creative-theme-tutorial?spm=rs.filmora%5Fweb&source%5Fchannel=seo%5Farticle )
Top 10+ Best Free Online Video Editors
Though some online video editing tools listed below provide free trial versions, if you need to download the video, you may need to upgrade your free plan to the paid version. And some free versions will leave a watermark on your video footage in 480p quality. So, please pay attention to it before you dive into this online platform. Please note the online video editors listed are in no particular order.
#2. ClipChamp
Clipchamp is a well-known free online video editing tool, besides the video editing tools, it provides a video compressor, converter, and webcam recorder as well. The best part is that its intuitive work platform allows beginners to complete their video editing within very little time and the output can be directly saved on the computer or shared to Google Drive etc.
Simple drag and drop features allow you to trim, crop, rotate, and flip videos as per their need. Further, it is also possible to adjust brightness, saturation, and contrast with ease. You can also add transitions, text, overlays, backgrounds. There is a stock library that provides both paid and free video and audio files, so you can choose based on your situation. However, if you add a logo to your footage, you may need to upgrade to the Paid version.
You can select different aspect ratios such as 1:1, 9:16, 4:3, or 16:9, and it also provides a built-in guide so you can make a video with it easily. However, you need to sign up with your Google account or Facebook account first before using this all-in-one online video editor. And the free version is limited to export at the 480P SD resolution with no watermark. Though you can import 4K footage, it is recommended to compress it first since large files may cause problems when editing, and the video footage can’t be exported in 4K. I’m not sure what the problem is, but when I added the audio to the video and play it back, it didn’t go smooth. Let me know if you’ve met the same issue when using it in the comment below.
Go to ClipChamp Online Video Editor >>
#3. FlexClip
FlexClip is a free and powerful online video editor that is packed with features. Not only will it allow you to publish videos in a matter of minutes, but it also gives you access to a library that contains 2.5 million videos and stock images, classified in sectors such as business, background, holiday, food, sports, etc.
Of course, you probably want to upload your images, video clips, and music, and that’s perfectly possible: just drag and drop, and you’re done. You can combine footage with your own videos for maximum impact, and there are also hundreds of professional templates to choose from.
With FlexClip, you can easily overlay text on your sequences, attracting attention with elegant fonts and impressive effects, and you can also incorporate smooth transitions between clips. Besides, FlexClip’s aspect ratio feature allows you to vary sizes and formats to fit the proportions needed for various social platforms, including Facebook, YouTube, Instagram Stories, and more.
No download or even signup is required to use FlexClip, and you can choose from Annual Plan (USD 49.99, Customers can add USD 18.99 / month for effects and plugins), Perpetual Plan (USD 79.99, Customers can add USD 36.96 / month for effects and plugins) packages to get started. But better yet, you can start with the free version to see if you feel comfortable with the tool.
Go to FlexClip video maker
#4. WeVideo

WeVideo is a shared online video creation tool. You can upload your own videos, photos, music files from your computer or from social sites such as Google Drive, Facebook, Box, Instagram, Dropbox, etc. to the Media panel, or use the built-in stock videos, audio, and images to make a video quickly. However, the stock images, videos, and audio files are limited to Professional and Business plans, you can also choose to use free music and sound effects instead of Premium music.
Besides the basic trimming and splitting, WeVideo allows you to add markers to the specific clip, static simple text, and callouts to the video, or transitions, background graphics, overlays, or frames. You can also download the WeVideo on your iPhone, Android phones, and Windows10 computer as well if you prefer to edit videos offline.
If you subscribed to the paid version, you can use the premium editing features such as green screen, voiceover, slow motion, screencasting and sync across iOS, Android, and web platforms, and more features.
Though WeVideo says it supports 4K resolution, 4K UHD is only supported on Unlimited ($9.99/mo), Professional ($19.99/mo), and Business ($39.99/mo) plans, and Besides, there are so many limitations for the free plan, like you can only publish 5 min/month and the max video resolution is 480P. Besides, there will be a watermark in the right upper corner of the video in the Free plan. The same as using Clip Champ, you need to sign in before using the WeVideo online video editor.
Go to WeVideo Online Video Maker >>
#5. Wideo

Wideo is an online video creating site for creating animated videos, explainer videos and other marketing videos with a lot of video templates. Sign in first to make a video online with this animated editor and then drag and drop elements of the website’s editing service, create a sequence of animations.
Wideo allows you to use the different elements as many times as you want to create your video and unlike some websites, you are not limited to using stock elements (text, cartoons, drawings, and images) and components. It seems that Wideo only allows you to upload your own images in .jpg, .png and .gif and backgrounds or music, I didn’t find out a way to add my own video footage to this online video editor. Let me know if you have any clue.
What I like about Wideo is that it allows you to choose video aspect ratio such as 16:9, 1:1, and 9;16, and there are a lot of video templates available, although most of them need to pay. It also provides a 7 -day trial, and the paid versions cost from 19/mo to 79/mo.
However, if you want to download the video on your computer, you’ll need to upgrade your plan. If you want to use your own footage and save the edited videos on your desk, Wideo isn’t a free option for you.
Go to Wideo Animated Video Maker >>
#6. PowToon

PowToon is a great way to create videos that will serve an explanatory purpose. If you need a video that is to serve as a sort of guide or teacher then PowToon is definitely the website you want to use. It allows you to use what is essentially a digital version of paper cut-outs superimposed on colorful backgrounds. The drag and drop style editing leaves you with a video reminiscent of the Common Craft style.
You need to sign in to use this online, and it provides many video templates available for different situations such as explainer video, marketing video, infographic video, video ads, and presentation. It also allows you to create 1:1 square, 16:9 horizontal, and 9:16 vertical videos, you can upload your own video footage or use the built-in video sources from Storyblocks. You can choose to select one of PowToon’s many drawings of people and objects, which you can then arrange on a blank canvas or on a colorful background of your choice.
The free version will also leave a Powtoon branding watermark on your export video and you can export video up to 3 mins in HD quality, and you can’t download the video as MP4 too.
Go to Learn more about PowToon >>
#7. Video Toolbox

Touted as the future of video editing, Video Toolbox is a free online platform that in addition to editing your video files analyses it and gives you highly detailed information about the bit rate, codec, frame rate, and resolution.
It can also convert your video file to the most popular video formats such as MKV, MOV, MP4, and AVI. This online platform allows you to upload videos from a computer or from a URL, it can now handle video files up to 1500MB and that still gives you a lot to play around with, and you can merge, crop, or cut video files. The editing features are simple and limited but it also allows you to record a webcam. One amazing thing is that there is no watermark and the video quality is good after cutting clips with Video Toolbox.
You need to sign up and activate your account in your email first and then log in to enter the main menu. And to be honest, I found this video editor layout is outdated and not user-friendly enough. You need to click the select action to choose the target editing feature and in more cases, there will be no real-time preview window to check the editing progress.
Go to Video Toolbox Online Video Editor Platform >>
#8. Kizoa
Kizoa is well recognized for its wide set of transition effects and that can assist you to develop professional style videos with ease. You can make a video on Kizoa with photos, videos, and music, add text, special effects, music, and transitions to polish the clip. Kizoa also supports 4K UHD footage and provides different aspect ratios such as 16:9, 4:3, 3:2, 1:1, and 9:16, 3:4, and 2:3 portrait formats. You can add videos and photos from your computer or from social media accounts like Facebook.
Library of Kizoa is loaded with lots of animations and effects that can be used to customize videos as per the specific needs of particular editing projects. You will find it much easier to personalize several details of video clips like position, size, duration, timing, etc. There is no need to register to access all these incredible features so most professionals, as well as beginners, prefer to use Kizoa for their routine needs. But if you need to download or share the video, you still need to register.
There is no timeline, you just need to add your photos and video footage to the storyboard at the bottom, click the Play button to preview the result. Every time you select an effect, Kizoa will indicate how to do it next, which makes it easier for beginners. But there will be a watermark in the Free plan, and the exported video is limited to 720P, and you need to upgrade to the paid plan to remove the watermark.
Go to Kizoa Free Online Movie Maker >>
#9. Hippo Video
Hippo Video is an all-in-one video marketing platform that also provides video editing tools. You can add your media files from a computer or from Google Drive, but as it is claimed that video formats are limited to mp4, Mkv, Flv, 3gp, and mpg, and the supported maximum video file is 500MB, and you can only add one video at importing. Besides importing videos, you can also use Hippo Video to record your desktop screen, webcam, and voiceover.
The free version does provide some basic editing features such as split, trim, crop, add text or resize, and add simple titles, emojis, and callouts, but if you want to do some professional editing, you may need to recommend it to your friends or upgrade your account.
You need to register for this online platform first before editing. And there is no video footage nor stock music available (maybe it is hidden in the Pro editing mode). You can share the video directly to social media platforms such as FB, Twitter, YouTube, or via email. You can also download the clip to your desk. NO watermark in Free Plan.
Go to Hippo Video Online Video Marketing Platform >>
#10. Magisto
Magisto is a great online video maker that is really popular for automatically turning what would otherwise be an everyday type video into a beautiful poignant movie and outstanding social videos. It is user-friendly and very quick with all the tools you’d expect from software you hocked your kidney to buy.
After signing up with your FB or G+ account, you can add photos and videos to Magisto also provides various video templates which cover different industries such as Birthday wishes, Wedding, promotion, announce and inspiration. Next just choose the editing styles from popular, family, business, social, seasonal, fun, and clean. You can preview the style by hovering the cursor over the thumbnail. Some styles may need to upgrade to use. Then, you can choose music from the built-in music library or upload your own music. Magisto will complete the following editing tasks and add transitions to the video automatically.
Magisto is a cross-platform which means you can use it on Mobile devices, tablets, and the web, just use the same account and you can access your videos on all devices. You can share the video to social media platforms directly, but if you want to save the videos to a computer, you need to upgrade your plan or invite friends to get the free download.
Go to Magisto Online Video Maker >>
#11. Kapwing
Kapwing provides lots of online video editing related products such as online meme generator, video maker, video resizer, and video trimmer, add subtitles, add audio and loop video, as well as an all-in-one online video studio. This lets you combine videos, GIFs, and photos, add texts and audio to create a brand new video.
To editing videos, just upload your media file from the computer or paste the video URL to start. Kapwing allows you to customize the output video size in 1:1, 9:16, 16:9, 4:5, or 5:4, do some basic editing such as trim, crop, change speed or mute audio. You can also add images to video to make a PIP mode video , and some shapes to make the video with fun. Besides, this online video maker also provides samples, so you can use the samples before uploading your own media. You can download the edited video directly or share it to social accounts. There will be a watermark if you didn’t sign in a Kapwing account. To remove it, just sign in with your Google account or Facebook.
Go to Kapwing Online >>
#12. Online Video Cutter
Though it isn’t a video editor to some degree, this intuitive online video editing tool application appears user-friendly and it isn’t limited to cut videos as the name indicates. You can upload videos from computer or via Dropbox, Google Drive or URL directly. With this online video cutter, you can easily rotate the videos to 90, 180 or even 270 degrees, crop them, trim or apply several professional style editing features to create incredible projects. You can save the video with the original quality or to 1080P Full HD.
It can easily handle the maximum file size of 500MB and allow users to access any popular media file format with ease. It is free to use and you can access all advanced features even without buying any license.
What I like about this online video editing tool is that you don’t need to register to use it and there is also no watermark in the saved video. But it would be greater if this online tool can integrate some music and effects as well.
1. Is There Any Online Video Editor No Watermark?
Yes, there are some free online video editors without watermarks, such as ClipChamp, Online Video Cutter and Hippo Video after exporting. But you should note that in some online video editing tool, the video resolution may be limited to 480p in the free plan.
While, free online video editors like Clip Champ didn’t watermark your video but the quality is limited to 480P. Video Toolbox can remain the original quality and keeps no watermark, but the interface isn’t intuitive. The rising star Kapwing will be a good choice if you don’t need many editing features.
2. Is There Any Online Video Maker With Music And Pictures?
For those who want to use the music and pictures from the online video maker, I recommend you try Magisto and Kizoa. From the description of these two editors, you can see they are a perfect match.
Conclusion
Above are some free online video makers that you can use right in your browser on both Windows, Mac, Linux or mobile devices if you like. Most of these online video makers are beginners friendly and easy to use since they provide simple editing features. But some of them may need you to register first to use the online video editing tools, and some may leave a braning watermark in the free version.
However, Filmora is one of the easiest-to-use home video editing software with special editing features lets you seamlessly stitch together video clips, music & text, apply effects and get a professional-looking home movie in minutes. All classic video editing functions such as trim, crop, zoom, cut, split as well as stunning video effects (PIP, Green Screen, Faceo-off, etc) are provided. Up to 100 audio and video tracks to use.
Transform Long Videos into Short Ones Instantly
Turn long videos into viral clips. Effortlessly transform lengthy videos into engaging, shareable clips.

Ollie Mattison
Ollie Mattison is a writer and a lover of all things video.
Follow @Ollie Mattison
Ollie Mattison
Mar 27, 2024• Proven solutions
With the creation of social video sharing networks online like YouTube, Vimeo, Instagram and Vine, editing and making videos stopped being the exclusive domain of professionals. All you need right now is a good computer system and bingo you are a video editor. You can now edit videos online without downloading any program on your Windows or Mac computer - all you require is a decent network connection to the internet. In this article, we are going to talk about the top 10 most recommended best free online video editing solutions that you can access online.
Most of these free online video editors are beginner-friendly, so even if you just come to the video editing world, you can make a video quickly with these online video editing tools. If you’re an experienced video editor , then check our picks of the best professional video editing software.
Personally, I don’t recommend using online tools since sometimes the network connection isn’t good, and when there is a network error, all the efforts are gone. Editing videos with online tools also need high upload and download speed, so it’s suitable for editing short and small size video clips. Besides, online video editing solutions maybe not the best choice if you need more advanced editing options and beautiful video effects. In this case, I highly recommend Wondershare Filmora for the tool you can’t miss. Just download it to have a try to explore the editing features, plentiful effects and presets. It can be used on Mac and Windows computers both and is suitable for beginners and semi-pros both.
Note: in the free trial version of Filmora 11, there will be a watermark like most online video editors listed below. But you’re allowed to use all the features and effects and save it to your computer or share it on YouTube or Vimeo directly. If you’re a teacher or a student or school staff, you can enjoy our discount on purchasing.
To improve your video editing and create a more stunning video, you can use the package Filmora & Filmstock video templates”, click the image below to see how to make your storytelling more engaging.
Filmstock Stock Media Library ](https://filmstock.wondershare.com/creative-theme-tutorial?spm=rs.filmora%5Fweb&source%5Fchannel=seo%5Farticle )
Top 10+ Best Free Online Video Editors
Though some online video editing tools listed below provide free trial versions, if you need to download the video, you may need to upgrade your free plan to the paid version. And some free versions will leave a watermark on your video footage in 480p quality. So, please pay attention to it before you dive into this online platform. Please note the online video editors listed are in no particular order.
#2. ClipChamp
Clipchamp is a well-known free online video editing tool, besides the video editing tools, it provides a video compressor, converter, and webcam recorder as well. The best part is that its intuitive work platform allows beginners to complete their video editing within very little time and the output can be directly saved on the computer or shared to Google Drive etc.
Simple drag and drop features allow you to trim, crop, rotate, and flip videos as per their need. Further, it is also possible to adjust brightness, saturation, and contrast with ease. You can also add transitions, text, overlays, backgrounds. There is a stock library that provides both paid and free video and audio files, so you can choose based on your situation. However, if you add a logo to your footage, you may need to upgrade to the Paid version.
You can select different aspect ratios such as 1:1, 9:16, 4:3, or 16:9, and it also provides a built-in guide so you can make a video with it easily. However, you need to sign up with your Google account or Facebook account first before using this all-in-one online video editor. And the free version is limited to export at the 480P SD resolution with no watermark. Though you can import 4K footage, it is recommended to compress it first since large files may cause problems when editing, and the video footage can’t be exported in 4K. I’m not sure what the problem is, but when I added the audio to the video and play it back, it didn’t go smooth. Let me know if you’ve met the same issue when using it in the comment below.
Go to ClipChamp Online Video Editor >>
#3. FlexClip
FlexClip is a free and powerful online video editor that is packed with features. Not only will it allow you to publish videos in a matter of minutes, but it also gives you access to a library that contains 2.5 million videos and stock images, classified in sectors such as business, background, holiday, food, sports, etc.
Of course, you probably want to upload your images, video clips, and music, and that’s perfectly possible: just drag and drop, and you’re done. You can combine footage with your own videos for maximum impact, and there are also hundreds of professional templates to choose from.
With FlexClip, you can easily overlay text on your sequences, attracting attention with elegant fonts and impressive effects, and you can also incorporate smooth transitions between clips. Besides, FlexClip’s aspect ratio feature allows you to vary sizes and formats to fit the proportions needed for various social platforms, including Facebook, YouTube, Instagram Stories, and more.
No download or even signup is required to use FlexClip, and you can choose from Annual Plan (USD 49.99, Customers can add USD 18.99 / month for effects and plugins), Perpetual Plan (USD 79.99, Customers can add USD 36.96 / month for effects and plugins) packages to get started. But better yet, you can start with the free version to see if you feel comfortable with the tool.
Go to FlexClip video maker
#4. WeVideo
WeVideo is a shared online video creation tool. You can upload your own videos, photos, music files from your computer or from social sites such as Google Drive, Facebook, Box, Instagram, Dropbox, etc. to the Media panel, or use the built-in stock videos, audio, and images to make a video quickly. However, the stock images, videos, and audio files are limited to Professional and Business plans, you can also choose to use free music and sound effects instead of Premium music.
Besides the basic trimming and splitting, WeVideo allows you to add markers to the specific clip, static simple text, and callouts to the video, or transitions, background graphics, overlays, or frames. You can also download the WeVideo on your iPhone, Android phones, and Windows10 computer as well if you prefer to edit videos offline.
If you subscribed to the paid version, you can use the premium editing features such as green screen, voiceover, slow motion, screencasting and sync across iOS, Android, and web platforms, and more features.
Though WeVideo says it supports 4K resolution, 4K UHD is only supported on Unlimited ($9.99/mo), Professional ($19.99/mo), and Business ($39.99/mo) plans, and Besides, there are so many limitations for the free plan, like you can only publish 5 min/month and the max video resolution is 480P. Besides, there will be a watermark in the right upper corner of the video in the Free plan. The same as using Clip Champ, you need to sign in before using the WeVideo online video editor.
Go to WeVideo Online Video Maker >>
#5. Wideo
Wideo is an online video creating site for creating animated videos, explainer videos and other marketing videos with a lot of video templates. Sign in first to make a video online with this animated editor and then drag and drop elements of the website’s editing service, create a sequence of animations.
Wideo allows you to use the different elements as many times as you want to create your video and unlike some websites, you are not limited to using stock elements (text, cartoons, drawings, and images) and components. It seems that Wideo only allows you to upload your own images in .jpg, .png and .gif and backgrounds or music, I didn’t find out a way to add my own video footage to this online video editor. Let me know if you have any clue.
What I like about Wideo is that it allows you to choose video aspect ratio such as 16:9, 1:1, and 9;16, and there are a lot of video templates available, although most of them need to pay. It also provides a 7 -day trial, and the paid versions cost from 19/mo to 79/mo.
However, if you want to download the video on your computer, you’ll need to upgrade your plan. If you want to use your own footage and save the edited videos on your desk, Wideo isn’t a free option for you.
Go to Wideo Animated Video Maker >>
#6. PowToon
PowToon is a great way to create videos that will serve an explanatory purpose. If you need a video that is to serve as a sort of guide or teacher then PowToon is definitely the website you want to use. It allows you to use what is essentially a digital version of paper cut-outs superimposed on colorful backgrounds. The drag and drop style editing leaves you with a video reminiscent of the Common Craft style.
You need to sign in to use this online, and it provides many video templates available for different situations such as explainer video, marketing video, infographic video, video ads, and presentation. It also allows you to create 1:1 square, 16:9 horizontal, and 9:16 vertical videos, you can upload your own video footage or use the built-in video sources from Storyblocks. You can choose to select one of PowToon’s many drawings of people and objects, which you can then arrange on a blank canvas or on a colorful background of your choice.
The free version will also leave a Powtoon branding watermark on your export video and you can export video up to 3 mins in HD quality, and you can’t download the video as MP4 too.
Go to Learn more about PowToon >>
#7. Video Toolbox
Touted as the future of video editing, Video Toolbox is a free online platform that in addition to editing your video files analyses it and gives you highly detailed information about the bit rate, codec, frame rate, and resolution.
It can also convert your video file to the most popular video formats such as MKV, MOV, MP4, and AVI. This online platform allows you to upload videos from a computer or from a URL, it can now handle video files up to 1500MB and that still gives you a lot to play around with, and you can merge, crop, or cut video files. The editing features are simple and limited but it also allows you to record a webcam. One amazing thing is that there is no watermark and the video quality is good after cutting clips with Video Toolbox.
You need to sign up and activate your account in your email first and then log in to enter the main menu. And to be honest, I found this video editor layout is outdated and not user-friendly enough. You need to click the select action to choose the target editing feature and in more cases, there will be no real-time preview window to check the editing progress.
Go to Video Toolbox Online Video Editor Platform >>
#8. Kizoa
Kizoa is well recognized for its wide set of transition effects and that can assist you to develop professional style videos with ease. You can make a video on Kizoa with photos, videos, and music, add text, special effects, music, and transitions to polish the clip. Kizoa also supports 4K UHD footage and provides different aspect ratios such as 16:9, 4:3, 3:2, 1:1, and 9:16, 3:4, and 2:3 portrait formats. You can add videos and photos from your computer or from social media accounts like Facebook.
Library of Kizoa is loaded with lots of animations and effects that can be used to customize videos as per the specific needs of particular editing projects. You will find it much easier to personalize several details of video clips like position, size, duration, timing, etc. There is no need to register to access all these incredible features so most professionals, as well as beginners, prefer to use Kizoa for their routine needs. But if you need to download or share the video, you still need to register.
There is no timeline, you just need to add your photos and video footage to the storyboard at the bottom, click the Play button to preview the result. Every time you select an effect, Kizoa will indicate how to do it next, which makes it easier for beginners. But there will be a watermark in the Free plan, and the exported video is limited to 720P, and you need to upgrade to the paid plan to remove the watermark.
Go to Kizoa Free Online Movie Maker >>
#9. Hippo Video
Hippo Video is an all-in-one video marketing platform that also provides video editing tools. You can add your media files from a computer or from Google Drive, but as it is claimed that video formats are limited to mp4, Mkv, Flv, 3gp, and mpg, and the supported maximum video file is 500MB, and you can only add one video at importing. Besides importing videos, you can also use Hippo Video to record your desktop screen, webcam, and voiceover.
The free version does provide some basic editing features such as split, trim, crop, add text or resize, and add simple titles, emojis, and callouts, but if you want to do some professional editing, you may need to recommend it to your friends or upgrade your account.
You need to register for this online platform first before editing. And there is no video footage nor stock music available (maybe it is hidden in the Pro editing mode). You can share the video directly to social media platforms such as FB, Twitter, YouTube, or via email. You can also download the clip to your desk. NO watermark in Free Plan.
Go to Hippo Video Online Video Marketing Platform >>
#10. Magisto
Magisto is a great online video maker that is really popular for automatically turning what would otherwise be an everyday type video into a beautiful poignant movie and outstanding social videos. It is user-friendly and very quick with all the tools you’d expect from software you hocked your kidney to buy.
After signing up with your FB or G+ account, you can add photos and videos to Magisto also provides various video templates which cover different industries such as Birthday wishes, Wedding, promotion, announce and inspiration. Next just choose the editing styles from popular, family, business, social, seasonal, fun, and clean. You can preview the style by hovering the cursor over the thumbnail. Some styles may need to upgrade to use. Then, you can choose music from the built-in music library or upload your own music. Magisto will complete the following editing tasks and add transitions to the video automatically.
Magisto is a cross-platform which means you can use it on Mobile devices, tablets, and the web, just use the same account and you can access your videos on all devices. You can share the video to social media platforms directly, but if you want to save the videos to a computer, you need to upgrade your plan or invite friends to get the free download.
Go to Magisto Online Video Maker >>
#11. Kapwing
Kapwing provides lots of online video editing related products such as online meme generator, video maker, video resizer, and video trimmer, add subtitles, add audio and loop video, as well as an all-in-one online video studio. This lets you combine videos, GIFs, and photos, add texts and audio to create a brand new video.
To editing videos, just upload your media file from the computer or paste the video URL to start. Kapwing allows you to customize the output video size in 1:1, 9:16, 16:9, 4:5, or 5:4, do some basic editing such as trim, crop, change speed or mute audio. You can also add images to video to make a PIP mode video , and some shapes to make the video with fun. Besides, this online video maker also provides samples, so you can use the samples before uploading your own media. You can download the edited video directly or share it to social accounts. There will be a watermark if you didn’t sign in a Kapwing account. To remove it, just sign in with your Google account or Facebook.
Go to Kapwing Online >>
#12. Online Video Cutter
Though it isn’t a video editor to some degree, this intuitive online video editing tool application appears user-friendly and it isn’t limited to cut videos as the name indicates. You can upload videos from computer or via Dropbox, Google Drive or URL directly. With this online video cutter, you can easily rotate the videos to 90, 180 or even 270 degrees, crop them, trim or apply several professional style editing features to create incredible projects. You can save the video with the original quality or to 1080P Full HD.
It can easily handle the maximum file size of 500MB and allow users to access any popular media file format with ease. It is free to use and you can access all advanced features even without buying any license.
What I like about this online video editing tool is that you don’t need to register to use it and there is also no watermark in the saved video. But it would be greater if this online tool can integrate some music and effects as well.
1. Is There Any Online Video Editor No Watermark?
Yes, there are some free online video editors without watermarks, such as ClipChamp, Online Video Cutter and Hippo Video after exporting. But you should note that in some online video editing tool, the video resolution may be limited to 480p in the free plan.
While, free online video editors like Clip Champ didn’t watermark your video but the quality is limited to 480P. Video Toolbox can remain the original quality and keeps no watermark, but the interface isn’t intuitive. The rising star Kapwing will be a good choice if you don’t need many editing features.
2. Is There Any Online Video Maker With Music And Pictures?
For those who want to use the music and pictures from the online video maker, I recommend you try Magisto and Kizoa. From the description of these two editors, you can see they are a perfect match.
Conclusion
Above are some free online video makers that you can use right in your browser on both Windows, Mac, Linux or mobile devices if you like. Most of these online video makers are beginners friendly and easy to use since they provide simple editing features. But some of them may need you to register first to use the online video editing tools, and some may leave a braning watermark in the free version.
However, Filmora is one of the easiest-to-use home video editing software with special editing features lets you seamlessly stitch together video clips, music & text, apply effects and get a professional-looking home movie in minutes. All classic video editing functions such as trim, crop, zoom, cut, split as well as stunning video effects (PIP, Green Screen, Faceo-off, etc) are provided. Up to 100 audio and video tracks to use.
Transform Long Videos into Short Ones Instantly
Turn long videos into viral clips. Effortlessly transform lengthy videos into engaging, shareable clips.
Ollie Mattison
Ollie Mattison is a writer and a lover of all things video.
Follow @Ollie Mattison
Unlocking Adobe Premiere Pro: Import, Edit, and Export Video Files with Ease
How to Import and Export Videos in Adobe Premiere

Benjamin Arango
Mar 27, 2024• Proven solutions
Adobe Premiere Pro offers different paths to importing and exporting videos. Here we mainly discuss how to import and export media files in Adobe Premiere Pro.
Learn more tips, tricks and hacks of Premiere for accelerating video editing.
This is a basic tutorial about Adobe Premiere, professional video editing software. However, if video editing is new to you, consider Wondershare Filmora , which is a powerful but easy-to-use tool for users just starting out. Download the free trial version below.
Download Mac Version ](https://tools.techidaily.com/wondershare/filmora/download/ )
Importing
There are two main ways to import media into Premiere, the import command and the media browser. They do things slightly differently and have uses they are both best suited to, here we will look at the process itself and which method to use in a given situation.
1. Import Command
This is a straightforward command that works like most other programs, and is accessed from the file menu, or via the Control+I shortcut on the PC or Command+I on the Mac. You can also double click an empty area of the project panel to automatically open the import dialogue.
Whichever way you access it, you get the standard for the platform import dialogue box we see here.

This method of importing is best suited to self-contained media such as audio or graphics, or video files such as MP4 that are single files themselves, whose location on your computer you know so you can navigate to them easily. This is not the way to import videos from cameras, as they invariably create complex file and folder arrangements that make choosing the correct files difficult. This is where you would opt for the media browser method instead.
2. Media Browser
Whilst on the surface media browser appears to do the same job as the import command the way they carry out the task is somewhat different, media browser is designed to let you see the media created by cameras, and show you easy to understand icons and metadata rather than the intricate pattern of files and folders they use. This makes picking the correct clip from a selection much easier, with metadata showing you date and duration as well as file type.

The media browser panel is found in the project panel, which on the standard layout is the bottom left corner, and can also be accessed by the Shift+8 shortcut. As you can see from the screenshot it works like an operating system file browser and allows you to navigate through the file directories of hard drives and removable media connected to the system.
One of the benefits of media browser is to narrow down the type of media being shown, so you can set to avchd for instance and it will display just that type of file in a given location. Because many projects use media from different sources this can be a real boon to finding the right file within a list.
File Types
Media browser displays more or less any file there is in a given location, and importing is simply a matter of selecting the correct file and double clicking it or right clicking and selecting import from the menu. You can select multiple files at once by holding down shift and import them all together if needed.
There are some exceptions to this, however, despite having a huge number of file types supported natively within Premiere, you will sometimes run into files that are not supported, FLV and MKV files being the most common ones, but this is not the end of the world and there is a simple solution.
Wondershare Video Converter Ultimate offers an easy way to convert any file you may have into media that Premiere can use quickly and efficiently, and is a great tool to have alongside premiere if you commonly work with multiple file types.
Exporting
The ultimate aim of any project is obviously to finish it and let others see the result of your creativity, and that means exporting your work into a format that is suitable for the medium you wish the project to be viewed on. Premiere offers a number of options regarding export, you can select an entire sequence to export as a single file for the web or disc, choose a single frame to post to a website, blog or to distribute through email, you can export just the audio, or just the video from a sequence, and if you have the right hardware, can export directly to tape or disk.
To export a project that closely matches the original media in quality and frame rates, often called a master copy, is very straightforward in Premiere, with the sequence selected, either in the Timeline Panel or the Project Panel, you simply use the File > Export > Media path :

Which opens the media export dialogue.

Selecting ‘Match Sequence Settings’ here creates a finished file that matches the quality of the original source media. Then you simply choose a suitable name for the file in the Output Name field, and click export. This creates in essence a digital clone of the sequence, and best practice is to always do this for any project, however, for many projects, this is not necessarily the format you would want the final product to be in, those concentrating on YouTube output, or someone wanting to author a DVD for instance will need other options.
Thankfully Premiere caters here as well. Instead of selecting the ‘Match Sequence Settings’ within export dialogue, you can click on the ‘Format’ field to change the type of file that is produced. What options here can vary depending on codecs installed, this screenshot shows only those that are included with the product for clarity.

Depending on which format you choose. The preset below will allow you to choose a wide range of output settings to suit the intended platform. For instance, selecting format brings up a huge number of presets for various Tablets and Phones, but also for Vimeo and YouTube, which is why it is one of the most common output formats. Here’s a look at some of the presets available from the menu.

Once you choose a preset, you can further modify the parameters to suit the project you are working on and even save those as an additional custom preset for later projects should you wish. Again, choosing a suitable file name and clicking Export ends the process.
The other common requirement is for DVD or Blu-Ray files. Whilst you need access to the appropriate hardware to burn the disk, Premiere creates the file structure for that natively and you have two options here. Mpeg2 in either DVD or Blu-Ray form, or Blu-Ray. With high quality source material, the two formats are virtually indistinguishable in their final format, however, MPEG2 will be much quicker to render and is a good choice for most applications. Although does allow more content to fit into a given space, so it does have uses. Importing and exporting are the foundation of Premiere use, and as we have shown Premiere makes it very easy to do and produces the right file types for whatever your project is to be used for.
With the addition of Wondershare Video Converter Ultimate you have a workflow that can ingest and export any type of media file you will ever come across with the minimum of fuss.
Benjamin Arango
Benjamin Arango is a writer and a lover of all things video.
Follow @Benjamin Arango
Benjamin Arango
Mar 27, 2024• Proven solutions
Adobe Premiere Pro offers different paths to importing and exporting videos. Here we mainly discuss how to import and export media files in Adobe Premiere Pro.
Learn more tips, tricks and hacks of Premiere for accelerating video editing.
This is a basic tutorial about Adobe Premiere, professional video editing software. However, if video editing is new to you, consider Wondershare Filmora , which is a powerful but easy-to-use tool for users just starting out. Download the free trial version below.
Download Mac Version ](https://tools.techidaily.com/wondershare/filmora/download/ )
Importing
There are two main ways to import media into Premiere, the import command and the media browser. They do things slightly differently and have uses they are both best suited to, here we will look at the process itself and which method to use in a given situation.
1. Import Command
This is a straightforward command that works like most other programs, and is accessed from the file menu, or via the Control+I shortcut on the PC or Command+I on the Mac. You can also double click an empty area of the project panel to automatically open the import dialogue.
Whichever way you access it, you get the standard for the platform import dialogue box we see here.
This method of importing is best suited to self-contained media such as audio or graphics, or video files such as MP4 that are single files themselves, whose location on your computer you know so you can navigate to them easily. This is not the way to import videos from cameras, as they invariably create complex file and folder arrangements that make choosing the correct files difficult. This is where you would opt for the media browser method instead.
2. Media Browser
Whilst on the surface media browser appears to do the same job as the import command the way they carry out the task is somewhat different, media browser is designed to let you see the media created by cameras, and show you easy to understand icons and metadata rather than the intricate pattern of files and folders they use. This makes picking the correct clip from a selection much easier, with metadata showing you date and duration as well as file type.
The media browser panel is found in the project panel, which on the standard layout is the bottom left corner, and can also be accessed by the Shift+8 shortcut. As you can see from the screenshot it works like an operating system file browser and allows you to navigate through the file directories of hard drives and removable media connected to the system.
One of the benefits of media browser is to narrow down the type of media being shown, so you can set to avchd for instance and it will display just that type of file in a given location. Because many projects use media from different sources this can be a real boon to finding the right file within a list.
File Types
Media browser displays more or less any file there is in a given location, and importing is simply a matter of selecting the correct file and double clicking it or right clicking and selecting import from the menu. You can select multiple files at once by holding down shift and import them all together if needed.
There are some exceptions to this, however, despite having a huge number of file types supported natively within Premiere, you will sometimes run into files that are not supported, FLV and MKV files being the most common ones, but this is not the end of the world and there is a simple solution.
Wondershare Video Converter Ultimate offers an easy way to convert any file you may have into media that Premiere can use quickly and efficiently, and is a great tool to have alongside premiere if you commonly work with multiple file types.
Exporting
The ultimate aim of any project is obviously to finish it and let others see the result of your creativity, and that means exporting your work into a format that is suitable for the medium you wish the project to be viewed on. Premiere offers a number of options regarding export, you can select an entire sequence to export as a single file for the web or disc, choose a single frame to post to a website, blog or to distribute through email, you can export just the audio, or just the video from a sequence, and if you have the right hardware, can export directly to tape or disk.
To export a project that closely matches the original media in quality and frame rates, often called a master copy, is very straightforward in Premiere, with the sequence selected, either in the Timeline Panel or the Project Panel, you simply use the File > Export > Media path :
Which opens the media export dialogue.
Selecting ‘Match Sequence Settings’ here creates a finished file that matches the quality of the original source media. Then you simply choose a suitable name for the file in the Output Name field, and click export. This creates in essence a digital clone of the sequence, and best practice is to always do this for any project, however, for many projects, this is not necessarily the format you would want the final product to be in, those concentrating on YouTube output, or someone wanting to author a DVD for instance will need other options.
Thankfully Premiere caters here as well. Instead of selecting the ‘Match Sequence Settings’ within export dialogue, you can click on the ‘Format’ field to change the type of file that is produced. What options here can vary depending on codecs installed, this screenshot shows only those that are included with the product for clarity.
Depending on which format you choose. The preset below will allow you to choose a wide range of output settings to suit the intended platform. For instance, selecting format brings up a huge number of presets for various Tablets and Phones, but also for Vimeo and YouTube, which is why it is one of the most common output formats. Here’s a look at some of the presets available from the menu.
Once you choose a preset, you can further modify the parameters to suit the project you are working on and even save those as an additional custom preset for later projects should you wish. Again, choosing a suitable file name and clicking Export ends the process.
The other common requirement is for DVD or Blu-Ray files. Whilst you need access to the appropriate hardware to burn the disk, Premiere creates the file structure for that natively and you have two options here. Mpeg2 in either DVD or Blu-Ray form, or Blu-Ray. With high quality source material, the two formats are virtually indistinguishable in their final format, however, MPEG2 will be much quicker to render and is a good choice for most applications. Although does allow more content to fit into a given space, so it does have uses. Importing and exporting are the foundation of Premiere use, and as we have shown Premiere makes it very easy to do and produces the right file types for whatever your project is to be used for.
With the addition of Wondershare Video Converter Ultimate you have a workflow that can ingest and export any type of media file you will ever come across with the minimum of fuss.
Benjamin Arango
Benjamin Arango is a writer and a lover of all things video.
Follow @Benjamin Arango
Also read:
- Updated FLAC Converter Guide Finding the Perfect One for Your Needs
- FCP X Effects Made Simple A Quick 3-Step Tutorial for 2024
- 2024 Approved Final Cut Pro X Title Essentials Getting Started with Style
- Discover the Power of Jaycut A Comprehensive Guide to Free Online Video Editing for 2024
- Avidemux Video Editing A Beginners Guide to Cropping and Resizing for 2024
- New Best Zero-Cost VOB Video Editors A Comprehensive Review
- 2024 Approved From Footage to Film Mastering the Art of Cinematic Editing in Final Cut Pro X
- The Stunning Guide on YouTube Audio Download for 2024
- In 2024, Best Time-Lapse Apps for iPhone and Android Devices
- Updated Best of the Best Top 10 Free WebM Video Editors This Year
- 7 Reliable Video Merging Tools with No Watermark Output
- Optimize Your Facebook Videos A Beginners Guide to Aspect Ratios
- New VLC Trimmer Mac Best Way to Trim VLC Without Losing Quality
- Blur Faces or Objects in Videos Best Apps for iOS and Android
- 2024 Approved Free Windows Video Editing Software 10 Alternatives to Movie Maker
- Updated Best Lyric Video Makers Online You Should Try Free and Paid
- New Free Video Cutter for Windows 10 Top Picks and Reviews
- Easy Video Reframing Best Editor Software and Apps
- Beam Local Content to Chromecast Easy Setup for Windows, Mac, Android, and iOS Users
- Optimize Your Facebook Video Cover A Guide to the Right Size
- Updated How to Stabilize Shaky Videos in After Effects 3 Ways
- 2024 Approved Top Converter Tools Download 4K Videos in MP4 Format with Ease
- In 2024, Top 15 Apps To Hack WiFi Password On Vivo X90S
- In 2024, How to Get and Use Pokemon Go Promo Codes On Realme Narzo 60 Pro 5G | Dr.fone
- Can Life360 Track You When Your Oppo A18 is off? | Dr.fone
- Remove the lock of Find N3 Flip
- In 2024, Does Motorola G24 Power Have Find My Friends? | Dr.fone
- In 2024, Tips and Tricks for Setting Up your Infinix Zero 5G 2023 Turbo Phone Pattern Lock
- In 2024, How to Unlock Disabled iPhone 15 Pro/iPad Without Computer
- In 2024, How to Change Your Motorola Edge 40 Neo Location on life360 Without Anyone Knowing? | Dr.fone
- A Quick Guide to OnePlus Nord N30 5G FRP Bypass Instantly
- In 2024, Latest way to get Shiny Meltan Box in Pokémon Go Mystery Box On Samsung Galaxy F14 5G | Dr.fone
- In 2024, Will Pokémon Go Ban the Account if You Use PGSharp On Google Pixel 7a | Dr.fone
- In 2024, Catch or Beat Sleeping Snorlax on Pokemon Go For Apple iPhone 6 Plus | Dr.fone
- In 2024, For People Wanting to Mock GPS on Honor X7b Devices | Dr.fone
- What You Need To Know To Improve Your Itel A05s Hard Reset | Dr.fone
- How to use iSpoofer on HTC U23 Pro? | Dr.fone
- 6 Ways to Change Spotify Location On Your Xiaomi Redmi K70 Pro | Dr.fone
- In 2024, 10 Fake GPS Location Apps on Android Of your Xiaomi Redmi Note 12 Pro 4G | Dr.fone
- 4 Methods to Turn off Life 360 On OnePlus Nord CE 3 Lite 5G without Anyone Knowing | Dr.fone
- All About Factory Reset, What Is It and What It Does to Your Vivo Y02T? | Dr.fone
- Title: Updated Bringing Your Memories to Life A Guide to Creating Video Slideshows in Final Cut Pro
- Author: Giselle
- Created at : 2024-04-25 07:34:44
- Updated at : 2024-04-26 07:34:44
- Link: https://ai-vdieo-software.techidaily.com/updated-bringing-your-memories-to-life-a-guide-to-creating-video-slideshows-in-final-cut-pro/
- License: This work is licensed under CC BY-NC-SA 4.0.
