
:max_bytes(150000):strip_icc():format(webp)/the-11-best-whatsapp-tricks-and-tips-in-2020-4782877-fd12628437f34b85ac38f1a9ac95637e.jpg)
Master FLV Video Editing on Windows 8 Tips and Tricks
Master FLV Video Editing on Windows 8: Tips and Tricks
FLV Editor for Windows 8: Easily Edit FLV Videos on PC

Ollie Mattison
Mar 27, 2024• Proven solutions
Many of the most popular web sites with video content use FLV as a chosen format (YouTube, Vimeo, Keepvid video, etc.), you may have stored oodles of FLV videos on your computer. Now it’s your way to give them a spin. If you have upgraded to Windows 8 and haven’t found a proper FLV editor for Windows 8 yet, give Wondershare Filmora (Originally Wondershare Video Editor) (Windows 8/7/XP/Vista supported) a try. Check the video to know more details.
 Download Mac Version ](https://tools.techidaily.com/wondershare/filmora/download/ )
Related: Top 5 Best FLV Video Editors
FLV Editor for Windows 8 is specially designed to arrange, edit and convert FLV to most other video format like AVI, MP4, WMV, MOV, MPEG, etc. Apart from this, you can add voiceover, transition, effects, titles, etc. With it, You’ll find that editting and making video movie from FLV files is so easier and amazing. Just download the free trial of FLV editor windows 8 to show your creativeness now.
Note: FLV editor for Windows 8 supports a wide range of videos, audios, and photos, see its tech spec here.
1 Import your source FLV videos
FLV video editor windows 8 is an easy to use video editing software for PC that comes with an intuitive interface. It provides a User’s album to help you manage the added videos, audios, and photos at ease.

2 Easy FLV editing in Windows 8 - Crop, Rotate, Trim, Split, Transition, Intro/Credit and more
With FLV video editor for Windows 8, everything is at your fingertips. Whatever you want to, just get the right tool at your hand, including trimming, cropping, rotating, and more.

Plus, all editing features in the toolbar support drag-n-drop feature, which makes it even easier to touch up your videos in no time. For example:
- To add transitions, drag and drop a transition to the video/photo, or right click it to “Apply to All”.
- To add title, drag and drop a title template to the position you want it to show up and customize it.
- To apply effects, choose from 50+ video effects, select it and apply to your photos/videos instantly.

3 Save and share the edited FLV video
When everything satisfied, now output your edited MP4 videos in Windows 8 and easily share them on YouTube as well as an optional message sending to Facebook and Twitter. Click Create in the middle right of the program window, you’ll come to below Output window.
In addition, you can also choose a video format for convenient playback on computer or devices, and burn that file to a DVD for better preservation. Just go for it, and it will have a good output quality. After that, click Create and you’re done.

Check out below video tutorial on how to edit FLV files in Windows 8 step by step:

Ollie Mattison
Ollie Mattison is a writer and a lover of all things video.
Follow @Ollie Mattison
Ollie Mattison
Mar 27, 2024• Proven solutions
Many of the most popular web sites with video content use FLV as a chosen format (YouTube, Vimeo, Keepvid video, etc.), you may have stored oodles of FLV videos on your computer. Now it’s your way to give them a spin. If you have upgraded to Windows 8 and haven’t found a proper FLV editor for Windows 8 yet, give Wondershare Filmora (Originally Wondershare Video Editor) (Windows 8/7/XP/Vista supported) a try. Check the video to know more details.
Download Mac Version ](https://tools.techidaily.com/wondershare/filmora/download/ )
Related: Top 5 Best FLV Video Editors
FLV Editor for Windows 8 is specially designed to arrange, edit and convert FLV to most other video format like AVI, MP4, WMV, MOV, MPEG, etc. Apart from this, you can add voiceover, transition, effects, titles, etc. With it, You’ll find that editting and making video movie from FLV files is so easier and amazing. Just download the free trial of FLV editor windows 8 to show your creativeness now.
Note: FLV editor for Windows 8 supports a wide range of videos, audios, and photos, see its tech spec here.
1 Import your source FLV videos
FLV video editor windows 8 is an easy to use video editing software for PC that comes with an intuitive interface. It provides a User’s album to help you manage the added videos, audios, and photos at ease.
2 Easy FLV editing in Windows 8 - Crop, Rotate, Trim, Split, Transition, Intro/Credit and more
With FLV video editor for Windows 8, everything is at your fingertips. Whatever you want to, just get the right tool at your hand, including trimming, cropping, rotating, and more.
Plus, all editing features in the toolbar support drag-n-drop feature, which makes it even easier to touch up your videos in no time. For example:
- To add transitions, drag and drop a transition to the video/photo, or right click it to “Apply to All”.
- To add title, drag and drop a title template to the position you want it to show up and customize it.
- To apply effects, choose from 50+ video effects, select it and apply to your photos/videos instantly.
3 Save and share the edited FLV video
When everything satisfied, now output your edited MP4 videos in Windows 8 and easily share them on YouTube as well as an optional message sending to Facebook and Twitter. Click Create in the middle right of the program window, you’ll come to below Output window.
In addition, you can also choose a video format for convenient playback on computer or devices, and burn that file to a DVD for better preservation. Just go for it, and it will have a good output quality. After that, click Create and you’re done.
Check out below video tutorial on how to edit FLV files in Windows 8 step by step:
Ollie Mattison
Ollie Mattison is a writer and a lover of all things video.
Follow @Ollie Mattison
The Ultimate List of Free Video Editing Software for Beginners
Top 15 Free Video Editing Software for Beginners [Very Easy to Use]
Ollie Mattison
Mar 27, 2024• Proven solutions
If you are not a video-making expert, own a video studio, or have a video specialist to trim and shoot video features, then don’t worry!
We are here to take you on the tour of the easiest video editing software that would promise a professional-looking end-product despite being absolutely inexperienced!
In my opinion, an ideal video editing software should be easy for everyone to get started. It could be simple video editing software, but it at least contains all the basic features you want. My recommendation is Wondershare Filmora, which compromises usability and capability to the best. It not only comes with all common video editing tools at your fingertips but also features you may need to bring your videos to the next level.
- 15 Best Easy Video Editing Software
- Basic Features You Need in an Easy Video Editing Software
- Why Video Editing Matters Nowadays?
- Basic Video Editing Terms You Should Know
Watch Video to Take a Quick View of the 18 Best Video Editors
Filmora Video Editor is an expert in creating and editing videos with outstanding functions and features. The easy-to-use interface will help you much! It offers versions for Windows, Mac, Android and iOS! Worth to have a try!
Try Free Video Editor Try Free Video Editor Try Free Video Editor Learn More >
15 Best Easy Video Editing Software
Below are the brief detail of easy video editors for PC, giving you more editing scalability than mobile-based editing apps. So if you are seeking easy video editing software for YouTube or website then look no further!
1. Wondershare Filmora - Easy Video Editing Software, Unlimited Video Sharing
Compatibility: Windows, Mac, Android, iPhone and iPad.
Wondershare Filmora paves the way to share videos instantly with family and friends, whatever it’s on YouTube, computer, mobile devices, or TV, you’ll choose your way.
For Win 7 or later (64-bit)
 Secure Download
For macOS 10.14 or later
Secure Download
You can directly upload the video to YouTube, as well as an optional message sending to Facebook and Twitter.
Preset profiles are included in output videos for playing on mobile devices like iPhone, iPad, iPod, PSP, etc. No further conversion required. A build-in DVD tool allows you to burn video to a high-quality DVD for watching on TV with your home DVD player.
Filmstock Stock Media Library ](https://filmstock.wondershare.com/creative-theme-tutorial?spm=rs.filmora%5Fweb&source%5Fchannel=seo%5Farticle )
Download the free trial version of Wondershare Filmora for your Mac/Windows version below, start to make your stunning home movies today!
2. Blender
Compatibility: Windows, Mac, and Linux.
This is free and open-source software, originally designed as a 3D animation suite but also has a use video editor. This editor lets you carry out basic actions like video cutting and video splicing. Hence, it is an easy video cutter and easy video joiner. It can also perform more advanced tasks such as video masking.
3. Lightworks
Compatibility: Windows, Mac, and Linux.
Lightworks is a free easy to use video editing software that comes with High precision video trimming, 720p video export for YouTube, Multicam support, and support of a large range of video formats. Its free version has ample features enough for most of the users. Although the paid pro version costs $25 a month.
4. Shotcut
Compatibility: Windows, Mac, and Linux.
Shotcut is a free, open-source video editing software, packed with ample features with wide range video formats support, timeline editing, 4K HD resolution support, and have several tutorials video.

Wondershare Filmora Video Editor
Filmora - No Watermark Video Editing Software
• Easily edit and export video files without watermark
• offers popular effects and filters for making your video professional
• Cross-platform supported - (Windows, Mac, iOS, Android)
Try Video Editor without Watermark Try Video Editor without Watermark Try Video Editor without Watermark Learn More >
5. VSDC
Compatibility: Windows
VSDC, an easy video editing software for windows, is a free video editing software, having an easy-to-learn powerful suite of features including audio editing and color correction. Although a paid version, pro, costs $19.99, having visual waveform, image stabilization and voice over support.
6. Machete Lite
Compatibility: Windows
Machete Lite is a free yet the simplest video editing software perfect for simple editing tasks. Only AVI and WMV files are supported in its free version. Its full version costs $19.95 having audio editing and more file type support, unlike the free version.
7. Avidemux
Compatibility: Windows, Mac, and Linux
Avoided is the simplest video editing software, perfect for beginners. It allows performing simple editing features like Encoding, simple cutting, and filtering with an easy-to-use interface.
8. Hitfilm Express
Compatibility: Windows and Mac
HitFilm Express is a free video editing software with features ranging from basic editing features like trimming, audio editing, and slicing to advance tools and features. Its free version supports over 180 special effects. There’s a built-in YouTube uploading.
Finding a Way to Edit Video for Free? Try This Out!
Filmora Video Editor brings you all the convenience of editing videos with handy functions. You can make your creative ideas into realize! More importantly, your edited video can export without a watermark!
Try It Free Try It Free Try It Free Learn More >
9. iMovie
Compatibility: Mac
If you are a beginner and searching for a good video editing software to get your hands clean on editing then iMovie editor is perfect for you. It is an easy video editing software for mac having an easy drag and drop interface. Features like Video trimming, split-screen, audio editing, pre-made transitions library, and 4K resolution support.
10. Openshot
Compatibility: Windows, Mac, and Linux
It is a free open source video editing software with an easy-to-use interface. Features like unlimited layers and tracks, time-mapping, real-time previews, trimming, snapping, clip resizing, curve-based keyframe animations etc. It offers more than enough features for free software.
11. Movie Maker
Compatibility: Windows
It is an easy video maker and editing software for beginners which can be downloaded from any third-party and use it to make and share high-quality movies.
12. Lumen5
Compatibility: Windows and Mac
It’s a perfect web-based video editing tool, best for Social Media promotion Campaigns with an easy drag-and-drop interface.
![]()
A cross-platform for making videos anywhere for all creators

Why your video editing isn’t good enough? How about some creative inspo?
- 100 Million+ Users
- 150+ Countries and Regions
- 4 Million+ Social Media Followers
- 5 Million+ Stock Media for Use
* Secure Download

13. Adobe Spark
Compatibility: Windows and Mac
Adobe Sparks is also a web-based easy video editor, similar to Lumen5. It offers an easy user interface but is a little restricted when it comes to offering a bank of images and footage to use.
14. Videopad
Compatibility: Windows
VideoPad is a simple video editing software for beginners, maybe not suitable for professional use. It has features like 3D Video Editing, Sound Effects and pre-made transitions Library, Reduce Camera Shakes and Multiple Resolutions export support.
15. Freemake
Compatibility: Windows
Freemake is a free video converter that is used to convert and alter videos that can modify and convert videos, embed videos to websites, and extract audio from video clips simply and fast. It supports above 500 video file formats and is compatible with multiple audio and image file formats for slideshows and video clip creation.
Basic Features You Need in an Easy Video Editing Software
A software having:
- Easy montage maker
- Easy video cutter
- Easy video joiner
- Compositing multiple elements together
- Color grading
- Motion tracking
- Stabilization
- Titles
- Background replacement
- Basic color correction
- Cross dissolves and fade-to-black transitions
- Audio crossfades
- Audio level adjustment using keyframes
- Auto synchronization of additional audio tracks
- Image position adjustment using keyframes
- Footage speed adjustments
- Basic color correction
- Footage bins for roughly organizing imported footage
Why Video Editing Matters Nowadays?
If videos aren’t a primary focus of your content marketing plan, the probability is it’s soon going to be certain! Every next production is turning into video-based content, be it content marketers or SEOs.
Around 50% of the content marketers are using Facebook and YouTube channels for the sake of video distribution since online activity spent on watching videos is 50%.
Moreover, by 2021, video is going to be projected to account for more than 80% out of all internet traffic.
Therefore, it has become a need to focus on video content if you are looking to grow the organic traffic of your publications.

Filmora Free Video Editor
Create AI-Generated Video with Filmora
Filmora Free video editor offers a ChatGPT plug-in and AI tools to enhance your creative vision. Make your idea into reality.
Try It Free Try It Free Try It Free Learn More >
Basic Video Editing Terms You Should Know
Below are some of the important yet basic terms that you should know related to videography in general and video editing in specific as well, whether you are a beginner or professional.
Aspect ratio:
The aspect ratio is the ratio of width and height of a video. Examples of the most used aspect ratios are: 4:3, 16:9, 1.85:1.
Refer to the image given below for a better understanding.

B-roll:
B-roll facilities one with the flexibility, when editing, to the video editing rules as it is an add-on picture that makes a previously incoherent scene seamless.
As shown in the image below, B-roll is used to insert which can make the transition easy to look on the eyes.
Bit rate:
Bit rate, also known as data rate, refers to the amount of data used for every second within the video. It is most commonly expressed in kilobits per second (kbps).
Close up:
Close-up refers to the shots that frame to subject tightly.
For instance, if it is a person, then the close-up covers solely his face.
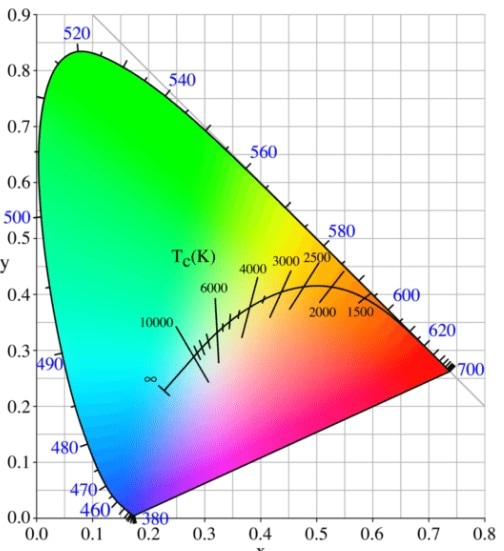
Color temperature:
Color temperature refers to the light visibility in a shot. Color temperature is expressed in Kelvin. The scale of color temperature ranges from cool to warm.
Composition:
Composition entails the process of combining multiple footages using video editing software.
Compression:
Compression is the process of minimizing the quantity of data utilized in a video file. It helps make in the process of uploading and downloading quite faster. This also leaves you with ample space for more of your publications.
Crop factor:
Crop factor refers to a number that expresses the ratio of the imaging area of a sensor to a full-frame sensor. It typically ranges from 1.3 to 2.0.
Cut-in
Cut-in refers to showing a specific part of a subject in order to emphasize a certain aspect or emotion. For instance, hand gestures may show nervousness, enthusiasm, agitation, etc.
Foley:
Often times the original sound of the scene captured in the video is not captured as naturally as they were supposed to sound like in reality. Hence, Foley is when you reproduce those sounds for that video.
Frame rate:
Frame rate refers to the video capturing by a shutter in a second or shutter cycling rate through opening and closing. Some of the common frame rates are 24, 25, 29.97, 30, etc. The frame rate is expressed in frames per second (fps).
High definition media interface:
HDMI is the connectors that digitally transfer audio and HD video to a television. This is helpful if you intend to work on a bigger screen or wish to share some of your productions.
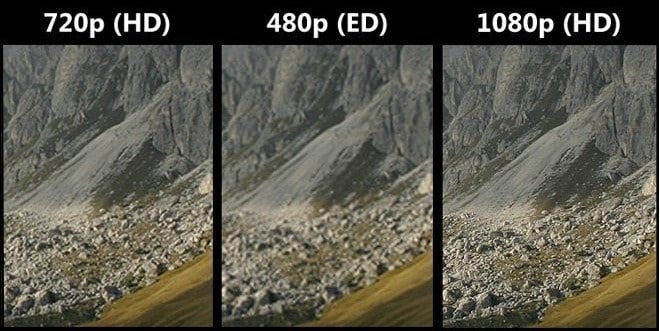
Resolution:
Resolution refers to the horizontal and vertical pixels of your video. For instance 640×480 for SD and 1280×720 for HD. Sometimes resolution refers only to the number of pixels that paper vertically. For example 480p, 720p, and 1080p respectively.
J-Cut:
J-cut refers to the editing technique in which the audio from a next scene is overlapped with the image from the previous scene, such that the audio segment of the next scene begins playing prior to its picture.
Jumpcut:
Jumpcut editing techniques refer to an abrupt transition between the two consecutive frames. The entity in the video containing jump cuts appears to jump along with the scene from one place to another. This looks disruptive to the audience.
L-Cut:
L-cut is exactly opposite to J-cut where the audio from the next scene overlays the image from the next scene to play the audio after an image has been displayed in the video.
Lower third:
As the name suggests, the lower third is derived from the rule of third which refers to the type of title, mostly used by vloggers, broadcasters, interviewers, and you tubers.
Memory bank:
You can understand the term by thinking of a memory box where we keep certain things as a memory of the events in someone’s life. Memory bank serves the same purpose through the use of video. It often uses natural sounds, document travel or merely store moments in routine life.
Press kit:
Press kit is used to provide information regarding your productions to the press for promotional purposes. Such information is often background including synopsis, crew, cast’s bios Q&A with the director, production stills and its reviews.
Shot list:
The shot list refers to the checklist related to the shots that a videographer plans to include in his/her content. This may help you save time and gear with efficient planning and handling. This gives a sense of direction to your production.
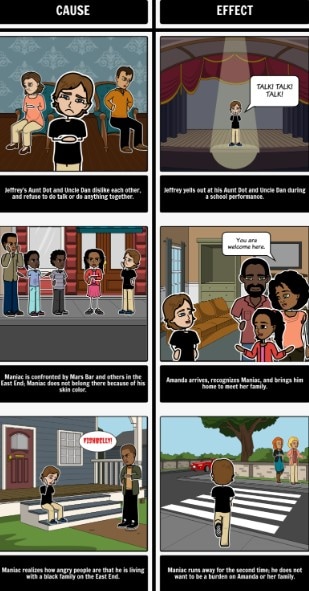
Storyboard:
A storyboard is a drawing to illustrate the scenes in the video. This gives a direct and organized way to visualize the needs for the shots or animation.
Sync:
Synchronization, aka sync, refers to the alignment of audio with video imaging.
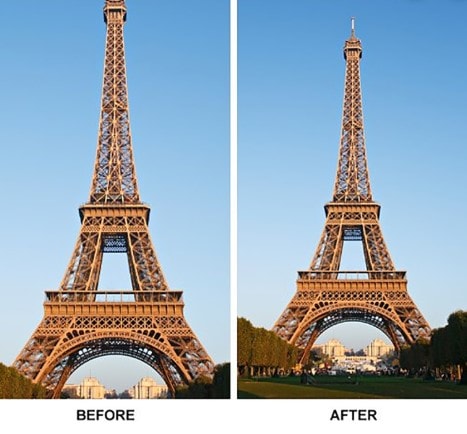
Rule of thirds:
The rule of third is a grid that helps you to compose interesting and balanced shots to make your productions aesthetically pleasing. The grid is similar to a tic-tac-toe board since it segregates the picture into 9 segments. It helps bring points of interest to be aligned with the lines or intersection given in the grid.

Three-point lighting:
This helps one to diminish the shadows for image balancing and provides an appealing contrast. These three lights are commonly known as fill, key, and backlight.

Tilts:
Tilts refer to the vertical transitions that your camera. This is the opposite of pans.

Pans:
Pans refer to the horizontal movements of your camera. This is exactly contrary to tilts.
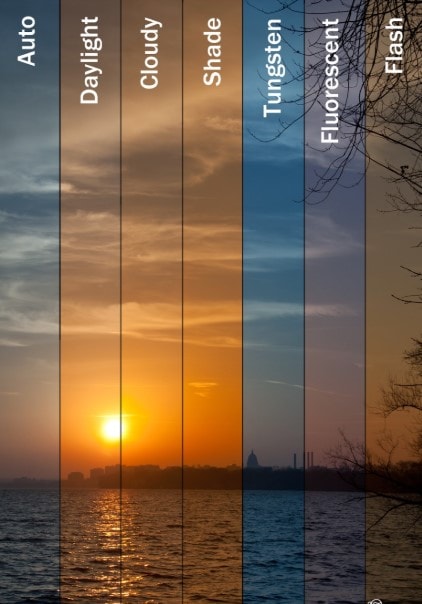
White balance:
White balance refers to the process where the unrealistic color casts are removed in order to render a white object to be actually white in your photo, and not have other tints.
Wide-angle:
A wide-angel lens refers to a short focal length of a lens. This brings more of a subject rather than a subject being captured by a normal lens at equal distances.
Non-linear editing:
NLEs is a non-destructive editing technique that allows one to access any frame in a video clip regardless of the sequence in the clip. It gives you the freedom to easily include effects, transitions, fades, etc. which cannot be achieved with linear editing
Pixel aspect ratio:
Pixels are several tiny squares that build up an image in a video. Whereas, aspect ratio refers to the ratio of width to height of a video. Hence, the pixel aspect ratio (PAR) is the ratio of width to height of the pixels.
Conclusion
Be it Instagram stories, YouTube product testimonials, or Facebook ads, using these easy-to-use video editing software will elevate your content into a professional and slick look.
So, I hope you are now ready to get started.
Lights, camera, action!
For Win 7 or later (64-bit)
Secure Download
For macOS 10.14 or later
Secure Download
Click here to get Filmora for PC by email
or Try Filmora App for mobile >>>
download filmora app for ios ](https://app.adjust.com/b0k9hf2%5F4bsu85t ) download filmora app for android ](https://app.adjust.com/b0k9hf2%5F4bsu85t )
Ollie Mattison
Ollie Mattison is a writer and a lover of all things video.
Follow @Ollie Mattison
Ollie Mattison
Mar 27, 2024• Proven solutions
If you are not a video-making expert, own a video studio, or have a video specialist to trim and shoot video features, then don’t worry!
We are here to take you on the tour of the easiest video editing software that would promise a professional-looking end-product despite being absolutely inexperienced!
In my opinion, an ideal video editing software should be easy for everyone to get started. It could be simple video editing software, but it at least contains all the basic features you want. My recommendation is Wondershare Filmora, which compromises usability and capability to the best. It not only comes with all common video editing tools at your fingertips but also features you may need to bring your videos to the next level.
- 15 Best Easy Video Editing Software
- Basic Features You Need in an Easy Video Editing Software
- Why Video Editing Matters Nowadays?
- Basic Video Editing Terms You Should Know
Watch Video to Take a Quick View of the 18 Best Video Editors
Filmora Video Editor is an expert in creating and editing videos with outstanding functions and features. The easy-to-use interface will help you much! It offers versions for Windows, Mac, Android and iOS! Worth to have a try!
Try Free Video Editor Try Free Video Editor Try Free Video Editor Learn More >
15 Best Easy Video Editing Software
Below are the brief detail of easy video editors for PC, giving you more editing scalability than mobile-based editing apps. So if you are seeking easy video editing software for YouTube or website then look no further!
1. Wondershare Filmora - Easy Video Editing Software, Unlimited Video Sharing
Compatibility: Windows, Mac, Android, iPhone and iPad.
Wondershare Filmora paves the way to share videos instantly with family and friends, whatever it’s on YouTube, computer, mobile devices, or TV, you’ll choose your way.
For Win 7 or later (64-bit)
Secure Download
For macOS 10.14 or later
Secure Download
You can directly upload the video to YouTube, as well as an optional message sending to Facebook and Twitter.
Preset profiles are included in output videos for playing on mobile devices like iPhone, iPad, iPod, PSP, etc. No further conversion required. A build-in DVD tool allows you to burn video to a high-quality DVD for watching on TV with your home DVD player.
Filmstock Stock Media Library ](https://filmstock.wondershare.com/creative-theme-tutorial?spm=rs.filmora%5Fweb&source%5Fchannel=seo%5Farticle )
Download the free trial version of Wondershare Filmora for your Mac/Windows version below, start to make your stunning home movies today!
2. Blender
Compatibility: Windows, Mac, and Linux.
This is free and open-source software, originally designed as a 3D animation suite but also has a use video editor. This editor lets you carry out basic actions like video cutting and video splicing. Hence, it is an easy video cutter and easy video joiner. It can also perform more advanced tasks such as video masking.
3. Lightworks
Compatibility: Windows, Mac, and Linux.
Lightworks is a free easy to use video editing software that comes with High precision video trimming, 720p video export for YouTube, Multicam support, and support of a large range of video formats. Its free version has ample features enough for most of the users. Although the paid pro version costs $25 a month.
4. Shotcut
Compatibility: Windows, Mac, and Linux.
Shotcut is a free, open-source video editing software, packed with ample features with wide range video formats support, timeline editing, 4K HD resolution support, and have several tutorials video.
Wondershare Filmora Video Editor
Filmora - No Watermark Video Editing Software
• Easily edit and export video files without watermark
• offers popular effects and filters for making your video professional
• Cross-platform supported - (Windows, Mac, iOS, Android)
Try Video Editor without Watermark Try Video Editor without Watermark Try Video Editor without Watermark Learn More >
5. VSDC
Compatibility: Windows
VSDC, an easy video editing software for windows, is a free video editing software, having an easy-to-learn powerful suite of features including audio editing and color correction. Although a paid version, pro, costs $19.99, having visual waveform, image stabilization and voice over support.
6. Machete Lite
Compatibility: Windows
Machete Lite is a free yet the simplest video editing software perfect for simple editing tasks. Only AVI and WMV files are supported in its free version. Its full version costs $19.95 having audio editing and more file type support, unlike the free version.
7. Avidemux
Compatibility: Windows, Mac, and Linux
Avoided is the simplest video editing software, perfect for beginners. It allows performing simple editing features like Encoding, simple cutting, and filtering with an easy-to-use interface.
8. Hitfilm Express
Compatibility: Windows and Mac
HitFilm Express is a free video editing software with features ranging from basic editing features like trimming, audio editing, and slicing to advance tools and features. Its free version supports over 180 special effects. There’s a built-in YouTube uploading.
Finding a Way to Edit Video for Free? Try This Out!
Filmora Video Editor brings you all the convenience of editing videos with handy functions. You can make your creative ideas into realize! More importantly, your edited video can export without a watermark!
Try It Free Try It Free Try It Free Learn More >
9. iMovie
Compatibility: Mac
If you are a beginner and searching for a good video editing software to get your hands clean on editing then iMovie editor is perfect for you. It is an easy video editing software for mac having an easy drag and drop interface. Features like Video trimming, split-screen, audio editing, pre-made transitions library, and 4K resolution support.
10. Openshot
Compatibility: Windows, Mac, and Linux
It is a free open source video editing software with an easy-to-use interface. Features like unlimited layers and tracks, time-mapping, real-time previews, trimming, snapping, clip resizing, curve-based keyframe animations etc. It offers more than enough features for free software.
11. Movie Maker
Compatibility: Windows
It is an easy video maker and editing software for beginners which can be downloaded from any third-party and use it to make and share high-quality movies.
12. Lumen5
Compatibility: Windows and Mac
It’s a perfect web-based video editing tool, best for Social Media promotion Campaigns with an easy drag-and-drop interface.
![]()
A cross-platform for making videos anywhere for all creators
Why your video editing isn’t good enough? How about some creative inspo?
- 100 Million+ Users
- 150+ Countries and Regions
- 4 Million+ Social Media Followers
- 5 Million+ Stock Media for Use
* Secure Download
13. Adobe Spark
Compatibility: Windows and Mac
Adobe Sparks is also a web-based easy video editor, similar to Lumen5. It offers an easy user interface but is a little restricted when it comes to offering a bank of images and footage to use.
14. Videopad
Compatibility: Windows
VideoPad is a simple video editing software for beginners, maybe not suitable for professional use. It has features like 3D Video Editing, Sound Effects and pre-made transitions Library, Reduce Camera Shakes and Multiple Resolutions export support.
15. Freemake
Compatibility: Windows
Freemake is a free video converter that is used to convert and alter videos that can modify and convert videos, embed videos to websites, and extract audio from video clips simply and fast. It supports above 500 video file formats and is compatible with multiple audio and image file formats for slideshows and video clip creation.
Basic Features You Need in an Easy Video Editing Software
A software having:
- Easy montage maker
- Easy video cutter
- Easy video joiner
- Compositing multiple elements together
- Color grading
- Motion tracking
- Stabilization
- Titles
- Background replacement
- Basic color correction
- Cross dissolves and fade-to-black transitions
- Audio crossfades
- Audio level adjustment using keyframes
- Auto synchronization of additional audio tracks
- Image position adjustment using keyframes
- Footage speed adjustments
- Basic color correction
- Footage bins for roughly organizing imported footage
Why Video Editing Matters Nowadays?
If videos aren’t a primary focus of your content marketing plan, the probability is it’s soon going to be certain! Every next production is turning into video-based content, be it content marketers or SEOs.
Around 50% of the content marketers are using Facebook and YouTube channels for the sake of video distribution since online activity spent on watching videos is 50%.
Moreover, by 2021, video is going to be projected to account for more than 80% out of all internet traffic.
Therefore, it has become a need to focus on video content if you are looking to grow the organic traffic of your publications.
Filmora Free Video Editor
Create AI-Generated Video with Filmora
Filmora Free video editor offers a ChatGPT plug-in and AI tools to enhance your creative vision. Make your idea into reality.
Try It Free Try It Free Try It Free Learn More >
Basic Video Editing Terms You Should Know
Below are some of the important yet basic terms that you should know related to videography in general and video editing in specific as well, whether you are a beginner or professional.
Aspect ratio:
The aspect ratio is the ratio of width and height of a video. Examples of the most used aspect ratios are: 4:3, 16:9, 1.85:1.
Refer to the image given below for a better understanding.
B-roll:
B-roll facilities one with the flexibility, when editing, to the video editing rules as it is an add-on picture that makes a previously incoherent scene seamless.
As shown in the image below, B-roll is used to insert which can make the transition easy to look on the eyes.
Bit rate:
Bit rate, also known as data rate, refers to the amount of data used for every second within the video. It is most commonly expressed in kilobits per second (kbps).
Close up:
Close-up refers to the shots that frame to subject tightly.
For instance, if it is a person, then the close-up covers solely his face.
Color temperature:
Color temperature refers to the light visibility in a shot. Color temperature is expressed in Kelvin. The scale of color temperature ranges from cool to warm.
Composition:
Composition entails the process of combining multiple footages using video editing software.
Compression:
Compression is the process of minimizing the quantity of data utilized in a video file. It helps make in the process of uploading and downloading quite faster. This also leaves you with ample space for more of your publications.
Crop factor:
Crop factor refers to a number that expresses the ratio of the imaging area of a sensor to a full-frame sensor. It typically ranges from 1.3 to 2.0.
Cut-in
Cut-in refers to showing a specific part of a subject in order to emphasize a certain aspect or emotion. For instance, hand gestures may show nervousness, enthusiasm, agitation, etc.
Foley:
Often times the original sound of the scene captured in the video is not captured as naturally as they were supposed to sound like in reality. Hence, Foley is when you reproduce those sounds for that video.
Frame rate:
Frame rate refers to the video capturing by a shutter in a second or shutter cycling rate through opening and closing. Some of the common frame rates are 24, 25, 29.97, 30, etc. The frame rate is expressed in frames per second (fps).
High definition media interface:
HDMI is the connectors that digitally transfer audio and HD video to a television. This is helpful if you intend to work on a bigger screen or wish to share some of your productions.
Resolution:
Resolution refers to the horizontal and vertical pixels of your video. For instance 640×480 for SD and 1280×720 for HD. Sometimes resolution refers only to the number of pixels that paper vertically. For example 480p, 720p, and 1080p respectively.
J-Cut:
J-cut refers to the editing technique in which the audio from a next scene is overlapped with the image from the previous scene, such that the audio segment of the next scene begins playing prior to its picture.
Jumpcut:
Jumpcut editing techniques refer to an abrupt transition between the two consecutive frames. The entity in the video containing jump cuts appears to jump along with the scene from one place to another. This looks disruptive to the audience.
L-Cut:
L-cut is exactly opposite to J-cut where the audio from the next scene overlays the image from the next scene to play the audio after an image has been displayed in the video.
Lower third:
As the name suggests, the lower third is derived from the rule of third which refers to the type of title, mostly used by vloggers, broadcasters, interviewers, and you tubers.
Memory bank:
You can understand the term by thinking of a memory box where we keep certain things as a memory of the events in someone’s life. Memory bank serves the same purpose through the use of video. It often uses natural sounds, document travel or merely store moments in routine life.
Press kit:
Press kit is used to provide information regarding your productions to the press for promotional purposes. Such information is often background including synopsis, crew, cast’s bios Q&A with the director, production stills and its reviews.
Shot list:
The shot list refers to the checklist related to the shots that a videographer plans to include in his/her content. This may help you save time and gear with efficient planning and handling. This gives a sense of direction to your production.
Storyboard:
A storyboard is a drawing to illustrate the scenes in the video. This gives a direct and organized way to visualize the needs for the shots or animation.
Sync:
Synchronization, aka sync, refers to the alignment of audio with video imaging.
Rule of thirds:
The rule of third is a grid that helps you to compose interesting and balanced shots to make your productions aesthetically pleasing. The grid is similar to a tic-tac-toe board since it segregates the picture into 9 segments. It helps bring points of interest to be aligned with the lines or intersection given in the grid.
Three-point lighting:
This helps one to diminish the shadows for image balancing and provides an appealing contrast. These three lights are commonly known as fill, key, and backlight.
Tilts:
Tilts refer to the vertical transitions that your camera. This is the opposite of pans.
Pans:
Pans refer to the horizontal movements of your camera. This is exactly contrary to tilts.
White balance:
White balance refers to the process where the unrealistic color casts are removed in order to render a white object to be actually white in your photo, and not have other tints.
Wide-angle:
A wide-angel lens refers to a short focal length of a lens. This brings more of a subject rather than a subject being captured by a normal lens at equal distances.
Non-linear editing:
NLEs is a non-destructive editing technique that allows one to access any frame in a video clip regardless of the sequence in the clip. It gives you the freedom to easily include effects, transitions, fades, etc. which cannot be achieved with linear editing
Pixel aspect ratio:
Pixels are several tiny squares that build up an image in a video. Whereas, aspect ratio refers to the ratio of width to height of a video. Hence, the pixel aspect ratio (PAR) is the ratio of width to height of the pixels.
Conclusion
Be it Instagram stories, YouTube product testimonials, or Facebook ads, using these easy-to-use video editing software will elevate your content into a professional and slick look.
So, I hope you are now ready to get started.
Lights, camera, action!
For Win 7 or later (64-bit)
Secure Download
For macOS 10.14 or later
Secure Download
Click here to get Filmora for PC by email
or Try Filmora App for mobile >>>
download filmora app for ios ](https://app.adjust.com/b0k9hf2%5F4bsu85t ) download filmora app for android ](https://app.adjust.com/b0k9hf2%5F4bsu85t )
Ollie Mattison
Ollie Mattison is a writer and a lover of all things video.
Follow @Ollie Mattison
Sony Vegas VS Adobe Premiere, Which One Is Better? [2023 Comparison]
Sony Vegas VS Adobe Premiere, Which One is Better?
Ollie Mattison
Mar 27, 2024• Proven solutions
It’s an age-old battle, Vegas or Premiere , a comparison that many have made over the last few years in the market, as always when making a comparison, things are always skewed by the writer’s own views, so it is hard to draw any definitive conclusions. Here we aim to lay out the specifications of each product and discuss their effects on workflow, output, and usability to form an opinion beyond the ‘this is the one I like’ argument. However, we are aware of making a completely fair comparison is impossible. We will try our best. Hope you will enjoy it!
Part 1: Sony Vegas VS Adobe Premiere
1. Sony Vegas VS Adobe Premiere: Interface and Features Comparison

Adobe Premiere Interface

Vegas Interface
| Editing Features | Adobe Premiere | Sony Vegas |
|---|---|---|
| Animation Tools |  |
|
| Audio Transitions | |
|
| Color Correction | |
|
| Direct Camcorder Capture | |
|
| Drag and Drop | |
|
| DVD Burning | |
|
| Green Screen (Chroma Keying) | |
|
| HD Support | |
|
| Speed Change | |
|
| Subtitles | |
|
| Video Transitions | |
|
| Multi-Cam Support | |
|
| 3D Editing | |
|
| Visual Effects | |
Again the Premiere spec-sheet suggests it is a close call , and to be brutally honest that is mostly the truth. Premiere does have more ability within the editing department there is no question. There are very few things that Vegas does better (3D manipulation being the standout), but distilled into the bare bones of a list of ‘things’, so the differences are not so obvious. The usability factor for Vegas carries on into the editing process too, although it is perhaps inevitable that Premiere’s more complex abilities lead to a more complex interface structure and a steeper learning curve, it is still a truth that Vegas is just easier to get results from at the start.
Underneath the Vegas specifications though, Premiere does have plenty going for it, the Mercury Playback Engine that drives the editing suite enables renders real-time playback that saves time and makes for a much smoother workflow for any project, and whilst it will not apply to everyone, the multiple camera abilities are second to none and for those that use them, an invaluable and significant tool for producing professional-grade output.
I keep returning to this point, but in a comparison of the two products it is a very important one, whilst ultimately Premiere has more ability within it for producing high-quality video, it is the learning curve that is the major difference for new users . This should be a consideration for anyone looking at the two, however, the complexity of Premiere is not an insurmountable issue. There are numerous tutorials, both free and commercial, available to get any level of the user through the first steps of understanding the processes within Premiere, and of course the same is true of Vegas, although to my mind they would not be as essentially an item, whereas with Premiere, the very least that is required is going through Adobe’s own online video education for the software.
2. Sony Vegas VS Adobe Premiere: Specification Comparison
As we can see at first glance the two seem very comparable regarding the basic tools and utilities. The one glaring difference does not mentioned in the basic specs outlined above, however, is that Sony Vegas is a Windows-only product. Premiere has versions for both Mac and Windows , and whilst the dominance of Apple within the creative industries is nowhere near what it once was, a sizable number of people still use the Mac platform, and for them, Vegas isn’t even an option without resorting to emulation, which is a processor-intensive operation like video editing is not really a viable solution.
It is also important to consider that the spec-sheet itself doesn’t tell the whole story, with the audio and effect modules more advanced in Premiere , however, Vegas has the benefit of being a much easier program to get to grips with for anyone new to the video editing world, and although its abilities are perhaps ultimately not as sophisticated as Premiere, new users often find they get better results with Vegas due to the accessibility of its tools. For the more experienced this is probably not a factor, but it is worth considering for newcomers.
3. Sony Vegas VS Adobe Premiere: Workflow comparison
Once that initial barrier is overcome, however, I feel that the added functionality, workflow efficiency, and compatibility-out-of-the-box Premiere can deal with roughly double the number of media formats - of Adobe’s product makes it a superior product for long-term use.
The key here is long term, no one wants to relearn everything every couple of years, switching platforms endlessly searching for the ultimate product, so when making a choice for video editing I would always suggest that prospective users consider not just what they want now, but what they may want in the future. Vegas has the easier entry path, there is absolutely no question, however what if you later want the more sophisticated editing facilities? If you switch then you still have to go through learning Premiere, after learning Vegas. Learning one piece of software is a better choice, so which one will fulfill future needs should be taken into account.
4. Sony Vegas VS Adobe Premiere: Compatibility Comparison
There is also the issue of other production requirements. If you are aiming towards motion effects, animation, and other composite effects within your work, then consider the platform that will be carried out on as well. Here is where Adobe’s strength shines. The various products they put out work together extremely well, and in the case of video effects , Premiere and After Effects together offer a workflow and output quality that is as good as it gets. Saying either will do the job is not really a satisfactory conclusion for these types of comparisons, even if it is actually true. However, there are answers here.
Part 2: FAQ about Vegas
1. Can Sony Vegas be used on a Mac?
Sony Vegas professional was not generally a SONY item, and it is not, at this point, a SONY item.
It was offered to Magix before this previous year. It was initially a DAW Digital Audio Workstation programming that had video highlights. After some time, it developed into the item a considerable lot of us know and love, Vegas Pro.
A hearty and expert video altering programming! SONY hoped to port Vegas over to Mac for quite a while. They had effectively discharged a Mac form of SoundForge, and Vegas would have been straightaway.
I surmise they ran into a huge amount of specialized issues, the greatest being that they just needed Mac programming abilities.
Apple additionally discharged FCPX as a $299 altering application for Mac, which removed any gainfulness from the condition for SONY. So that answers why Sony Vegas on Mac is impossible.
2. Is there a Sony Vegas for free?
No, you do not get a Sony Vegas on Mac completely free at any time. However, there is a way in which you can torrent it or go for a free trial version.
Despite the option, the better suggestion for you is to go and purchase it instead of downloading it from anywhere else. It is because choosing the second option may lead to leakage of data from your computer.
Otherwise, you can also use alternative software such as Hitfilm Express or Lightworks. So, now you know that the Sony Vegas ‘Pro’ is just a faux term because there is no difference between the professional and normal version.
Both come at a premium cost anyway.
3. How much does Sony Vegas cost?
There are different plans of the Sony Vegas such as Vegas Pro Edit, Vegas Pro, Vegas Pro 365, Vegas Pro Suite. The Vegas Pro Edit generally costs around $698. Next, The Vegas Pro comes at the cost of $898. The popular Vegas Pro 365 is priced at $16.67 for every 3 months.
So, you need to pay a total of $66.68 annually. Lastly, the Sony Vegas Pro Suite comes at $1098 and is the costliest of all the versions.
Conclusion
In conclusion, Premiere is the more capable program, both in terms of workflow, output, and its ability to integrate with other applications to produce much more advanced output. For anyone looking for more than just an editor, it is the choice to make. Find some instructional material, dive in, and have fun.
This is a basic comparison between Adobe Premiere and Sony Vegas, which both are professional video editing software. If you want to learn more about Sony Vegas, please check Sony Vegas Editing . If you want to learn more about Premiere, you should not miss Adobe Premiere Editing Tips .
If neither Sony Vegas nor Adobe Premiere is the best suitable video editing software for you, you can visit The Best Sony Vegas Alternative for Windows , or Adobe Premiere Pro Alternatives and Similar Programs
 Download Mac Version ](https://tools.techidaily.com/wondershare/filmora/download/ )
Ollie Mattison
Ollie Mattison is a writer and a lover of all things video.
Follow @Ollie Mattison
Ollie Mattison
Mar 27, 2024• Proven solutions
It’s an age-old battle, Vegas or Premiere , a comparison that many have made over the last few years in the market, as always when making a comparison, things are always skewed by the writer’s own views, so it is hard to draw any definitive conclusions. Here we aim to lay out the specifications of each product and discuss their effects on workflow, output, and usability to form an opinion beyond the ‘this is the one I like’ argument. However, we are aware of making a completely fair comparison is impossible. We will try our best. Hope you will enjoy it!
Part 1: Sony Vegas VS Adobe Premiere
1. Sony Vegas VS Adobe Premiere: Interface and Features Comparison
Adobe Premiere Interface
Vegas Interface
| Editing Features | Adobe Premiere | Sony Vegas |
|---|---|---|
| Animation Tools | |
|
| Audio Transitions | |
|
| Color Correction | |
|
| Direct Camcorder Capture | |
|
| Drag and Drop | |
|
| DVD Burning | |
|
| Green Screen (Chroma Keying) | |
|
| HD Support | |
|
| Speed Change | |
|
| Subtitles | |
|
| Video Transitions | |
|
| Multi-Cam Support | |
|
| 3D Editing | |
|
| Visual Effects | |
Again the Premiere spec-sheet suggests it is a close call , and to be brutally honest that is mostly the truth. Premiere does have more ability within the editing department there is no question. There are very few things that Vegas does better (3D manipulation being the standout), but distilled into the bare bones of a list of ‘things’, so the differences are not so obvious. The usability factor for Vegas carries on into the editing process too, although it is perhaps inevitable that Premiere’s more complex abilities lead to a more complex interface structure and a steeper learning curve, it is still a truth that Vegas is just easier to get results from at the start.
Underneath the Vegas specifications though, Premiere does have plenty going for it, the Mercury Playback Engine that drives the editing suite enables renders real-time playback that saves time and makes for a much smoother workflow for any project, and whilst it will not apply to everyone, the multiple camera abilities are second to none and for those that use them, an invaluable and significant tool for producing professional-grade output.
I keep returning to this point, but in a comparison of the two products it is a very important one, whilst ultimately Premiere has more ability within it for producing high-quality video, it is the learning curve that is the major difference for new users . This should be a consideration for anyone looking at the two, however, the complexity of Premiere is not an insurmountable issue. There are numerous tutorials, both free and commercial, available to get any level of the user through the first steps of understanding the processes within Premiere, and of course the same is true of Vegas, although to my mind they would not be as essentially an item, whereas with Premiere, the very least that is required is going through Adobe’s own online video education for the software.
2. Sony Vegas VS Adobe Premiere: Specification Comparison
As we can see at first glance the two seem very comparable regarding the basic tools and utilities. The one glaring difference does not mentioned in the basic specs outlined above, however, is that Sony Vegas is a Windows-only product. Premiere has versions for both Mac and Windows , and whilst the dominance of Apple within the creative industries is nowhere near what it once was, a sizable number of people still use the Mac platform, and for them, Vegas isn’t even an option without resorting to emulation, which is a processor-intensive operation like video editing is not really a viable solution.
It is also important to consider that the spec-sheet itself doesn’t tell the whole story, with the audio and effect modules more advanced in Premiere , however, Vegas has the benefit of being a much easier program to get to grips with for anyone new to the video editing world, and although its abilities are perhaps ultimately not as sophisticated as Premiere, new users often find they get better results with Vegas due to the accessibility of its tools. For the more experienced this is probably not a factor, but it is worth considering for newcomers.
3. Sony Vegas VS Adobe Premiere: Workflow comparison
Once that initial barrier is overcome, however, I feel that the added functionality, workflow efficiency, and compatibility-out-of-the-box Premiere can deal with roughly double the number of media formats - of Adobe’s product makes it a superior product for long-term use.
The key here is long term, no one wants to relearn everything every couple of years, switching platforms endlessly searching for the ultimate product, so when making a choice for video editing I would always suggest that prospective users consider not just what they want now, but what they may want in the future. Vegas has the easier entry path, there is absolutely no question, however what if you later want the more sophisticated editing facilities? If you switch then you still have to go through learning Premiere, after learning Vegas. Learning one piece of software is a better choice, so which one will fulfill future needs should be taken into account.
4. Sony Vegas VS Adobe Premiere: Compatibility Comparison
There is also the issue of other production requirements. If you are aiming towards motion effects, animation, and other composite effects within your work, then consider the platform that will be carried out on as well. Here is where Adobe’s strength shines. The various products they put out work together extremely well, and in the case of video effects , Premiere and After Effects together offer a workflow and output quality that is as good as it gets. Saying either will do the job is not really a satisfactory conclusion for these types of comparisons, even if it is actually true. However, there are answers here.
Part 2: FAQ about Vegas
1. Can Sony Vegas be used on a Mac?
Sony Vegas professional was not generally a SONY item, and it is not, at this point, a SONY item.
It was offered to Magix before this previous year. It was initially a DAW Digital Audio Workstation programming that had video highlights. After some time, it developed into the item a considerable lot of us know and love, Vegas Pro.
A hearty and expert video altering programming! SONY hoped to port Vegas over to Mac for quite a while. They had effectively discharged a Mac form of SoundForge, and Vegas would have been straightaway.
I surmise they ran into a huge amount of specialized issues, the greatest being that they just needed Mac programming abilities.
Apple additionally discharged FCPX as a $299 altering application for Mac, which removed any gainfulness from the condition for SONY. So that answers why Sony Vegas on Mac is impossible.
2. Is there a Sony Vegas for free?
No, you do not get a Sony Vegas on Mac completely free at any time. However, there is a way in which you can torrent it or go for a free trial version.
Despite the option, the better suggestion for you is to go and purchase it instead of downloading it from anywhere else. It is because choosing the second option may lead to leakage of data from your computer.
Otherwise, you can also use alternative software such as Hitfilm Express or Lightworks. So, now you know that the Sony Vegas ‘Pro’ is just a faux term because there is no difference between the professional and normal version.
Both come at a premium cost anyway.
3. How much does Sony Vegas cost?
There are different plans of the Sony Vegas such as Vegas Pro Edit, Vegas Pro, Vegas Pro 365, Vegas Pro Suite. The Vegas Pro Edit generally costs around $698. Next, The Vegas Pro comes at the cost of $898. The popular Vegas Pro 365 is priced at $16.67 for every 3 months.
So, you need to pay a total of $66.68 annually. Lastly, the Sony Vegas Pro Suite comes at $1098 and is the costliest of all the versions.
Conclusion
In conclusion, Premiere is the more capable program, both in terms of workflow, output, and its ability to integrate with other applications to produce much more advanced output. For anyone looking for more than just an editor, it is the choice to make. Find some instructional material, dive in, and have fun.
This is a basic comparison between Adobe Premiere and Sony Vegas, which both are professional video editing software. If you want to learn more about Sony Vegas, please check Sony Vegas Editing . If you want to learn more about Premiere, you should not miss Adobe Premiere Editing Tips .
If neither Sony Vegas nor Adobe Premiere is the best suitable video editing software for you, you can visit The Best Sony Vegas Alternative for Windows , or Adobe Premiere Pro Alternatives and Similar Programs
Download Mac Version ](https://tools.techidaily.com/wondershare/filmora/download/ )
Ollie Mattison
Ollie Mattison is a writer and a lover of all things video.
Follow @Ollie Mattison
Split Your Screen for Free: Top Online and Offline Video Editors
Best Split Screen Video Editor [Online & Offline]
Ollie Mattison
Mar 27, 2024• Proven solutions
The effect that comes up after adding two or more screens in a single frame is called split screen, and the tool that enables the users to do this is a split screen video editor. These split screens have significant importance in post-production tasks. That said, the following sections discuss about the tools that enable you to create split screen videos, and explain the process of doing so.
As mentioned above, the split screen effect lets you add two or more screens in a single frame. When multiple activities occur at the same time but at different locations, they all can be shown on one screen by placing their corresponding footages side-by-side or in any other arrangement that the split screen video maker allows.
Best Split Screen Video Editing Software for Windows and Mac [Free & Paid]
After understanding what split screen is, it becomes both obvious and mandatory to know about some of the most used split screen video editor applications, and how they help you in adding the effect to your movies. Following is a list of a couple of such programs:
1. iMovie
A proprietary of Apple, iMovie is available for both iOS and macOS, and is absolutely free of cost. Even though the tool lacks some advanced options for fine editing, it still offers a good platform to those planning their career in post-production industry. With simple UI, it is easy to learn iMovie.
The step-by-step instructions given below explain how to use iMovie to add split screen effect to your videos:
Step 1: Add Footages to iMovie
After importing the footages to the Media Bin in iMovie, drag the first one to the Timeline, and then drag the second one above the first layer.
Step 2: Select the Split Screen Effect
Select the top video layer in the Timeline, and choose Split Screen from the screen type drop-down list at the top.
Step 3: Select Split Screen Preset
Choose a position for the selected layer from the Position drop-down list at the top, and use the Slide slider to adjust the speed of the appearance of the footage.
Pros
- iMovie is free to download and use
- The program is available for both macOS and iOS
Cons
- Allows only up to two videos to be used in split screen
You can get iMovie from here: https://www.apple.com/in/imovie/
2. Wondershare Filmora Editor
One of the most robust apps that is compared with post-production applications like Adobe Premiere Pro and Final Cut Pro X, Wondershare Filmora is also a video editor that helps split screen easily. The software is available for Windows and Mac computers, and provides prompt technical support to its consumers. Although Filmora that packed with more advanced tools is also available, most of the times Filmora serves the purpose pretty well.
You can learn how to add split screen effect in Wondershare Filmora by following the steps given below:
Step 1: Import Footages to Filmora
Launch Wondershare Filmora, click anywhere inside the Media window in the upper-left section, and import all the videos you want to use to create the split screen effect.
Step 2: Choose a Split Screen Preset
Click Split Screen from the standard toolbar at the top, click and drag your preferred preset to the Timeline, and then extend the duration of the effect in the Timeline by dragging its handle.
Step 3: Add Videos to Split Screen

Click ADVANCED from the bottom-right area of the Media pane, on the Advanced Split Screen Edit box, drag the first video from the left pane, and drop it on your preferred section in the right. Repeat the process to add all the other videos to their corresponding sections. Adjust their time of appearance by dragging their thumbnail in the Timeline of the box, and click OK.
Pros
- Wondershare Filmora is lightweight and is less resource intensive
- Allows as many as 6 videos to be added to create split screen effect
- Has 30+ split screen presets
Cons
- A couple of windows are required to be opened while working with split screen
3 . VSDC
VSDC is a free and efficient split screen video maker. In fact, the program is a full-fledged post-production application that can be used to edit the videos to prepare industry-standard clips for presentations, broadcasting, and commercial and private distribution. The best thing about VSDC is, it is absolutely free of cost, and doesn’t add any watermarks to the output files.
The instructions given below explain how to use the split screen feature in VSDC:
Step 1: Add Video Footages
Click Add object from the standard toolbar at the top, click Video, and select and add the first footage to the preview window. Repeat the process to add more video(s) as needed.
Step 2: Add Split Screen Effect
Grab any of the side handles of the video you added last, and drag it inward to reduce its size proportionally. Repeat the process to reduce the size of the other video(s) that is/are now revealed from beneath the one you just adjusted in order to create the split screen effect.
Pros
- Absolutely free to use
- Allows practically unlimited number of footages to be added to create the split screen videos
Cons
- No presets for automatic video positioning are available for split screen effect
You can get VSDC free video editor from here: http://www.videosoftdev.com/
4. Shotcut
A free and opensource editing tool, Shotcut can also be used as a split screen video maker to produce industry-standard movies and documentaries. Shotcut is available for FreeBSD, Windows, Linux, and macOS, and comes in both x64 and x86 variants. Being a free program, Shotcut doesn’t require any activation or registration.
The procedure that follows explains how to use Shortcut as a free split screen video editor:
Step 1: Add Clips to the Timeline
Import the footages to the Shotcut’s media bin, drag one of the clips from the bin to the Timeline at the bottom, and then press Ctrl + I on your keyboard to add more video tracks. You can press this shortcut key for another couple of times depending on the number films you want to use for the split screen effect. Next, drag each film from the bin to their corresponding tracks. Note: Make sure NOT to place all the clips on the same track, and that each of them is on a different, its own, video layer.
Step 2: Adjust the First Video
Select the last video you added to the Timeline (it should be the topmost track), click Filters from above the Timeline, click the + button from the upper-left corner, click Size and Position from the list that appears next, and select the clip’s position from the Preset drop-down list.
Step 3: Adjust Other Videos
Select the second video in the Timeline and repeat the process to set its position, and do the same for all other footages that you added in order to create the split screen effect.
Pros
- Available for FreeBSD, Windows, Linux, and macOS platforms
- If using presets, as many as 4 videos can be added for split screen effect
Cons
- Working with split screen manually may require practice and some calculations to position the clips on the screen correctly
You can get Shotcut from here: https://shotcut.org/
5. Lightworks
Used by the professionals to edit and prepare movies like Pulp Fiction, The Cure, L.A. Confidential, Bruce Almighty, The Wolf of Wall Street, etc., Lightworks is, in true means, a complete and full-fledged post-production application to create industry-standard outputs. The main reason for the app’s wide userbase is that it is a cross-platform software that is available for Linux, Mac, and Windows computers.
To use Lightworks as split screen video maker, you can follow the instructions given below:
Step 1: Add Tracks in Timeline
After importing the clips to Lightworks, leave them in the Media Bin for now, right-click anywhere in the Timeline at the bottom, go to Tracks, click Add multiple, and from the Number to add drop-down list, choose the number of tracks you want to add to the Timeline. Click Add to confirm the changes.
Step 2: Disable Auto Sync
Right-click anywhere in the Timeline, and click to deselect Auto track sync.
Step 3: Add Clips to Timeline
Drag the clips from the Media Bin to the Timeline. Make sure to place each footage on a different track, and that all the tracks are on top of each other. Optionally, right-click the audio that was added along with the clips, and click Remove from the context menu. Use this method to remove all the audios or leave the one you want to have. Note: Removing the audio tracks ensures that they do not overlap during the playback.
Step 4: Enable Split Screen
Click VFX from above the preview window, click the + (Add new effects) icon from the top of the left pane, select the DVE category from the upper-right corner of the left pane, scroll down the left pane to the Split-screen Presets section, and double-click your preferred split screen preset to add the effect to the participating clips.
Pros
- Even the free variant has split screen feature
- A complete post-production tool that doesn’t require any other program for finalizing the things
Cons
- Not many split screen presets are available
Download Lightworks free version from here: https://www.lwks.com/
6. Adobe Premiere Pro
One of the most appreciated and widely used post-production applications for Windows and Mac computers, Adobe Premiere Pro has been professionals’ first choice when it comes to video editing, irrespective of the fact that it has a steep learning curve, and is also a resource intensive software to work with.
The steps below explain how to use Adobe Premiere Pro as a split screen video maker:
Step 1: Add Videos to Timeline
After importing the clips to the Project window, drag each of them to the Timeline, and place them in their separate tracks one above the other.
Step 2: Position and Crop
Select the topmost video track in the Timeline, go to Effect Controls panel from the top of the upper-left pane, and use the Position slider to position the video to your preferred area of the screen. Repeat this process for all the clips in the Timeline you want to add to split screen.
Step 3: Crop the Clips
Search for the Crop effect in the Effects pane present at the lower-left corner, drag and drop the effect on each of the clips in the timeline, and use the Crop slider in the Effect Controls pane to crop the videos as needed. Optionally use the keyframes to add sliding animations to give more professional look to the split screen effect.
Pros
- Most robust and efficient video editing tool
- Allows practically unlimited number of videos to be used for split screen
Cons
- Requires subscription that needs to be renewed regularly
For more details about making split screen with Pr, check How to create a split screen in Premiere Pro
7. Final Cut Pro X
Available only for Mac computers at the time of this writing, Final Cut Pro X or FCPX gives tough competition to Adobe Premiere Pro. Since Apple devices are famous for their speedy processing, professionals any day prefer FCPX over Adobe Premiere Pro if they own a Mac PC running macOS.
You can use FCPX as split screen video maker by following the steps given below:
Step 1: Place Footages in the Timeline
As mentioned earlier, add the clips on top of each other on separate tracks in the Timeline of FCPX.
Step 2: Position and Crop
Select the first clip in the Timeline, from the Transform section of the Video Inspector pane in the right, use the Position slider to move the clip to your preferred side of the screen, and use the sliders from the Crop section to crop the footage to adjust the portion of interest. Repeat the process for the other video tracks as well to get your desired split screen effect in Final Cut Pro X.
Pros
- Offers quick and easy way to add split screen effect
- Allows practically unlimited number of videos to be used for split screen
Cons
- Doesn’t have any particular preset for split screen effect
You may also like: How to create a PIP video with Final Cut Pro X
Best Free Online Split Screen Video Editors
Apart from the desktop programs discussed above, there are a couple of web tools that can be used as split screen video maker online free. Two of the most used ones are introduced below:
1. Kapwing Collage Maker
Although Kapwing offers several other online tools like video resizer, meme generator, slideshow maker, etc., the solution that can be considered split screen video editor is Kapwing Collage Maker. This web app allows you to select a template to get started, and the rest of the process is simple.
The following steps explain how to create a split screen video with Kapwing:
Step 1: Add Clips to Preset
Go to the https://www.kapwing.com/collage link, click to select your preferred split screen preset, click REPLACE on one of the segments of the split screen on the next page, and select and upload the first video. Next, click REPLACE on the other segment(s), and select and upload the other videos as well.
Step 2: Reposition and Publish
Click and drag each of the added clips to reposition them on the screen, use the other tools to crop and adjust the videos as needed, and click Publish from the top-right corner. Note: Optionally you can click Timeline from the top of the preview window, adjust the timings and other settings as needed on the next page, and click Done. After this, you can go ahead and hit Publish to create the split screen effect out of the uploaded videos.
Pros
- Free to use
- Allows as many as 4 videos to create split screen effect
Cons
- Requires you to register and sign in to remove the watermark from the output file
2. WeVideo
Yet another split screen video maker online free solution, WeVideo offers almost desktop program-like experience while creating split screen effects. Even though all the subscription plans that the vendor offers are chargeable, the Education plan can be tried for 30 days for free, post which the teachers are required to pay to continue using the web tool.
The following steps explain how to get split screen effect with WeVideo:
Step 1: Import Videos
Visit https://www.wevideo.com and on the main window, click Video from under the Create a new section at the top, select a layout on the Let’s get started box, and click START EDITING from the bottom right corner. Next, click ADD in the My media window in the upper-left section, click BROWSE TO SELECT on the Import media box, and add the videos you want to use in the split screen effect.
Step 2: Add Clips to Timeline
As explained earlier, drag the videos from the My media pane and drop them in the Timeline. Make sure to place every video in its separate layer, and that all the layers are on top of each other.
Step 3: Create Split Screen Effect
Select any clip in the Timeline, and click the Open clip editor icon from the upper-left area of the track. On the next page, use the Scale slider to reduce the size of the selected clip, and from the preview window in the right, drag to reposition the video to your preferred location on the screen. Click SAVE CHANGES from the bottom of the left pane to confirm the settings. Repeat the process for the second clip in the Timeline to resize and reposition it on the screen. Click FINISH from the upper-right corner, on the next box, enter a name for the video in the available field, click SET, choose your preferred settings on the next page, and click EXPORT from the bottom-right corner to produce the split screen video.
Pros
- Free to use
- Allows multiple videos to be used for split screen
Cons
- Paid subscription is needed to remove watermark from the outputs
FAQs About Split Screen Video Editors
Why you should use split screen effect in video?
There are a couple of reasons you may want to use split screen effect in your video. Some of the most common uses include:
- Showing multiple actions by the same or different characters at the same time, without changing the screen
- Comparing multiple objects or picture quality. This can be done only when the entities in question are placed side-by-side
- Making your video look more professional
- Showing different effects on the same screen
Can I create a split screen video with Windows Movie Maker or Windows 10 Photos app?
No, you cannot. Although these tools enable you to resize the videos, since they don’t allow multi-tracked Timelines, no video clips can be placed one above the other which is an essential part for any split screen video maker to create the effect. However, as discussed above, there are several post-production tools, offline and online, that allow you to make split screen videos easily and without any cost.
Conclusion
Split screen video editor tools are both paid and free. Regardless of the program you use to create the effect, the output files always look more professional and informative. Furthermore, things become way simpler if the split screen video maker has simple UI, is less resource intensive, and is easy to use as it is the case with Wondershare Filmora.
Ollie Mattison
Ollie Mattison is a writer and a lover of all things video.
Follow @Ollie Mattison
Ollie Mattison
Mar 27, 2024• Proven solutions
The effect that comes up after adding two or more screens in a single frame is called split screen, and the tool that enables the users to do this is a split screen video editor. These split screens have significant importance in post-production tasks. That said, the following sections discuss about the tools that enable you to create split screen videos, and explain the process of doing so.
As mentioned above, the split screen effect lets you add two or more screens in a single frame. When multiple activities occur at the same time but at different locations, they all can be shown on one screen by placing their corresponding footages side-by-side or in any other arrangement that the split screen video maker allows.
Best Split Screen Video Editing Software for Windows and Mac [Free & Paid]
After understanding what split screen is, it becomes both obvious and mandatory to know about some of the most used split screen video editor applications, and how they help you in adding the effect to your movies. Following is a list of a couple of such programs:
1. iMovie
A proprietary of Apple, iMovie is available for both iOS and macOS, and is absolutely free of cost. Even though the tool lacks some advanced options for fine editing, it still offers a good platform to those planning their career in post-production industry. With simple UI, it is easy to learn iMovie.
The step-by-step instructions given below explain how to use iMovie to add split screen effect to your videos:
Step 1: Add Footages to iMovie
After importing the footages to the Media Bin in iMovie, drag the first one to the Timeline, and then drag the second one above the first layer.
Step 2: Select the Split Screen Effect
Select the top video layer in the Timeline, and choose Split Screen from the screen type drop-down list at the top.
Step 3: Select Split Screen Preset
Choose a position for the selected layer from the Position drop-down list at the top, and use the Slide slider to adjust the speed of the appearance of the footage.
Pros
- iMovie is free to download and use
- The program is available for both macOS and iOS
Cons
- Allows only up to two videos to be used in split screen
You can get iMovie from here: https://www.apple.com/in/imovie/
2. Wondershare Filmora Editor
One of the most robust apps that is compared with post-production applications like Adobe Premiere Pro and Final Cut Pro X, Wondershare Filmora is also a video editor that helps split screen easily. The software is available for Windows and Mac computers, and provides prompt technical support to its consumers. Although Filmora that packed with more advanced tools is also available, most of the times Filmora serves the purpose pretty well.
You can learn how to add split screen effect in Wondershare Filmora by following the steps given below:
Step 1: Import Footages to Filmora
Launch Wondershare Filmora, click anywhere inside the Media window in the upper-left section, and import all the videos you want to use to create the split screen effect.
Step 2: Choose a Split Screen Preset
Click Split Screen from the standard toolbar at the top, click and drag your preferred preset to the Timeline, and then extend the duration of the effect in the Timeline by dragging its handle.
Step 3: Add Videos to Split Screen
Click ADVANCED from the bottom-right area of the Media pane, on the Advanced Split Screen Edit box, drag the first video from the left pane, and drop it on your preferred section in the right. Repeat the process to add all the other videos to their corresponding sections. Adjust their time of appearance by dragging their thumbnail in the Timeline of the box, and click OK.
Pros
- Wondershare Filmora is lightweight and is less resource intensive
- Allows as many as 6 videos to be added to create split screen effect
- Has 30+ split screen presets
Cons
- A couple of windows are required to be opened while working with split screen
3 . VSDC
VSDC is a free and efficient split screen video maker. In fact, the program is a full-fledged post-production application that can be used to edit the videos to prepare industry-standard clips for presentations, broadcasting, and commercial and private distribution. The best thing about VSDC is, it is absolutely free of cost, and doesn’t add any watermarks to the output files.
The instructions given below explain how to use the split screen feature in VSDC:
Step 1: Add Video Footages
Click Add object from the standard toolbar at the top, click Video, and select and add the first footage to the preview window. Repeat the process to add more video(s) as needed.
Step 2: Add Split Screen Effect
Grab any of the side handles of the video you added last, and drag it inward to reduce its size proportionally. Repeat the process to reduce the size of the other video(s) that is/are now revealed from beneath the one you just adjusted in order to create the split screen effect.
Pros
- Absolutely free to use
- Allows practically unlimited number of footages to be added to create the split screen videos
Cons
- No presets for automatic video positioning are available for split screen effect
You can get VSDC free video editor from here: http://www.videosoftdev.com/
4. Shotcut
A free and opensource editing tool, Shotcut can also be used as a split screen video maker to produce industry-standard movies and documentaries. Shotcut is available for FreeBSD, Windows, Linux, and macOS, and comes in both x64 and x86 variants. Being a free program, Shotcut doesn’t require any activation or registration.
The procedure that follows explains how to use Shortcut as a free split screen video editor:
Step 1: Add Clips to the Timeline
Import the footages to the Shotcut’s media bin, drag one of the clips from the bin to the Timeline at the bottom, and then press Ctrl + I on your keyboard to add more video tracks. You can press this shortcut key for another couple of times depending on the number films you want to use for the split screen effect. Next, drag each film from the bin to their corresponding tracks. Note: Make sure NOT to place all the clips on the same track, and that each of them is on a different, its own, video layer.
Step 2: Adjust the First Video
Select the last video you added to the Timeline (it should be the topmost track), click Filters from above the Timeline, click the + button from the upper-left corner, click Size and Position from the list that appears next, and select the clip’s position from the Preset drop-down list.
Step 3: Adjust Other Videos
Select the second video in the Timeline and repeat the process to set its position, and do the same for all other footages that you added in order to create the split screen effect.
Pros
- Available for FreeBSD, Windows, Linux, and macOS platforms
- If using presets, as many as 4 videos can be added for split screen effect
Cons
- Working with split screen manually may require practice and some calculations to position the clips on the screen correctly
You can get Shotcut from here: https://shotcut.org/
5. Lightworks
Used by the professionals to edit and prepare movies like Pulp Fiction, The Cure, L.A. Confidential, Bruce Almighty, The Wolf of Wall Street, etc., Lightworks is, in true means, a complete and full-fledged post-production application to create industry-standard outputs. The main reason for the app’s wide userbase is that it is a cross-platform software that is available for Linux, Mac, and Windows computers.
To use Lightworks as split screen video maker, you can follow the instructions given below:
Step 1: Add Tracks in Timeline
After importing the clips to Lightworks, leave them in the Media Bin for now, right-click anywhere in the Timeline at the bottom, go to Tracks, click Add multiple, and from the Number to add drop-down list, choose the number of tracks you want to add to the Timeline. Click Add to confirm the changes.
Step 2: Disable Auto Sync
Right-click anywhere in the Timeline, and click to deselect Auto track sync.
Step 3: Add Clips to Timeline
Drag the clips from the Media Bin to the Timeline. Make sure to place each footage on a different track, and that all the tracks are on top of each other. Optionally, right-click the audio that was added along with the clips, and click Remove from the context menu. Use this method to remove all the audios or leave the one you want to have. Note: Removing the audio tracks ensures that they do not overlap during the playback.
Step 4: Enable Split Screen
Click VFX from above the preview window, click the + (Add new effects) icon from the top of the left pane, select the DVE category from the upper-right corner of the left pane, scroll down the left pane to the Split-screen Presets section, and double-click your preferred split screen preset to add the effect to the participating clips.
Pros
- Even the free variant has split screen feature
- A complete post-production tool that doesn’t require any other program for finalizing the things
Cons
- Not many split screen presets are available
Download Lightworks free version from here: https://www.lwks.com/
6. Adobe Premiere Pro
One of the most appreciated and widely used post-production applications for Windows and Mac computers, Adobe Premiere Pro has been professionals’ first choice when it comes to video editing, irrespective of the fact that it has a steep learning curve, and is also a resource intensive software to work with.
The steps below explain how to use Adobe Premiere Pro as a split screen video maker:
Step 1: Add Videos to Timeline
After importing the clips to the Project window, drag each of them to the Timeline, and place them in their separate tracks one above the other.
Step 2: Position and Crop
Select the topmost video track in the Timeline, go to Effect Controls panel from the top of the upper-left pane, and use the Position slider to position the video to your preferred area of the screen. Repeat this process for all the clips in the Timeline you want to add to split screen.
Step 3: Crop the Clips
Search for the Crop effect in the Effects pane present at the lower-left corner, drag and drop the effect on each of the clips in the timeline, and use the Crop slider in the Effect Controls pane to crop the videos as needed. Optionally use the keyframes to add sliding animations to give more professional look to the split screen effect.
Pros
- Most robust and efficient video editing tool
- Allows practically unlimited number of videos to be used for split screen
Cons
- Requires subscription that needs to be renewed regularly
For more details about making split screen with Pr, check How to create a split screen in Premiere Pro
7. Final Cut Pro X
Available only for Mac computers at the time of this writing, Final Cut Pro X or FCPX gives tough competition to Adobe Premiere Pro. Since Apple devices are famous for their speedy processing, professionals any day prefer FCPX over Adobe Premiere Pro if they own a Mac PC running macOS.
You can use FCPX as split screen video maker by following the steps given below:
Step 1: Place Footages in the Timeline
As mentioned earlier, add the clips on top of each other on separate tracks in the Timeline of FCPX.
Step 2: Position and Crop
Select the first clip in the Timeline, from the Transform section of the Video Inspector pane in the right, use the Position slider to move the clip to your preferred side of the screen, and use the sliders from the Crop section to crop the footage to adjust the portion of interest. Repeat the process for the other video tracks as well to get your desired split screen effect in Final Cut Pro X.
Pros
- Offers quick and easy way to add split screen effect
- Allows practically unlimited number of videos to be used for split screen
Cons
- Doesn’t have any particular preset for split screen effect
You may also like: How to create a PIP video with Final Cut Pro X
Best Free Online Split Screen Video Editors
Apart from the desktop programs discussed above, there are a couple of web tools that can be used as split screen video maker online free. Two of the most used ones are introduced below:
1. Kapwing Collage Maker
Although Kapwing offers several other online tools like video resizer, meme generator, slideshow maker, etc., the solution that can be considered split screen video editor is Kapwing Collage Maker. This web app allows you to select a template to get started, and the rest of the process is simple.
The following steps explain how to create a split screen video with Kapwing:
Step 1: Add Clips to Preset
Go to the https://www.kapwing.com/collage link, click to select your preferred split screen preset, click REPLACE on one of the segments of the split screen on the next page, and select and upload the first video. Next, click REPLACE on the other segment(s), and select and upload the other videos as well.
Step 2: Reposition and Publish
Click and drag each of the added clips to reposition them on the screen, use the other tools to crop and adjust the videos as needed, and click Publish from the top-right corner. Note: Optionally you can click Timeline from the top of the preview window, adjust the timings and other settings as needed on the next page, and click Done. After this, you can go ahead and hit Publish to create the split screen effect out of the uploaded videos.
Pros
- Free to use
- Allows as many as 4 videos to create split screen effect
Cons
- Requires you to register and sign in to remove the watermark from the output file
2. WeVideo
Yet another split screen video maker online free solution, WeVideo offers almost desktop program-like experience while creating split screen effects. Even though all the subscription plans that the vendor offers are chargeable, the Education plan can be tried for 30 days for free, post which the teachers are required to pay to continue using the web tool.
The following steps explain how to get split screen effect with WeVideo:
Step 1: Import Videos
Visit https://www.wevideo.com and on the main window, click Video from under the Create a new section at the top, select a layout on the Let’s get started box, and click START EDITING from the bottom right corner. Next, click ADD in the My media window in the upper-left section, click BROWSE TO SELECT on the Import media box, and add the videos you want to use in the split screen effect.
Step 2: Add Clips to Timeline
As explained earlier, drag the videos from the My media pane and drop them in the Timeline. Make sure to place every video in its separate layer, and that all the layers are on top of each other.
Step 3: Create Split Screen Effect
Select any clip in the Timeline, and click the Open clip editor icon from the upper-left area of the track. On the next page, use the Scale slider to reduce the size of the selected clip, and from the preview window in the right, drag to reposition the video to your preferred location on the screen. Click SAVE CHANGES from the bottom of the left pane to confirm the settings. Repeat the process for the second clip in the Timeline to resize and reposition it on the screen. Click FINISH from the upper-right corner, on the next box, enter a name for the video in the available field, click SET, choose your preferred settings on the next page, and click EXPORT from the bottom-right corner to produce the split screen video.
Pros
- Free to use
- Allows multiple videos to be used for split screen
Cons
- Paid subscription is needed to remove watermark from the outputs
FAQs About Split Screen Video Editors
Why you should use split screen effect in video?
There are a couple of reasons you may want to use split screen effect in your video. Some of the most common uses include:
- Showing multiple actions by the same or different characters at the same time, without changing the screen
- Comparing multiple objects or picture quality. This can be done only when the entities in question are placed side-by-side
- Making your video look more professional
- Showing different effects on the same screen
Can I create a split screen video with Windows Movie Maker or Windows 10 Photos app?
No, you cannot. Although these tools enable you to resize the videos, since they don’t allow multi-tracked Timelines, no video clips can be placed one above the other which is an essential part for any split screen video maker to create the effect. However, as discussed above, there are several post-production tools, offline and online, that allow you to make split screen videos easily and without any cost.
Conclusion
Split screen video editor tools are both paid and free. Regardless of the program you use to create the effect, the output files always look more professional and informative. Furthermore, things become way simpler if the split screen video maker has simple UI, is less resource intensive, and is easy to use as it is the case with Wondershare Filmora.
Ollie Mattison
Ollie Mattison is a writer and a lover of all things video.
Follow @Ollie Mattison
Also read:
- Updated From Motion to Still The Ultimate Guide to Video to Image Conversion
- Install Splice on Your Mac for Professional Video Editing for 2024
- New Ditch Pinnacle Studio? Here Are the Best Mac Video Editing Alternatives
- Updated Create Engaging Animations with Ease Top Drawing Software
- New From Zero to Hero How to Find and Add Free Sound Effects to Your Final Cut Pro Projects
- Updated Designing for Thumb-Friendly Screens Aspect Ratio Essentials
- Updated Free Video Editing Solutions for Chromebook Enthusiasts
- Mastering Text-to-Speech Essential Conversion Strategies for 2024
- Updated Best Public Domain Picture Sites 2023 Edition
- Are You Wondering YouTube Audio Download Procedure? Heres Your Quick yet Stunning Guide on YouTube 2 MP3 Conversion
- In 2024, Easy Video Joiner Not Your Cup of Tea? Try These 10 Alternatives Instead
- 2024 Approved Unlock Pro-Quality Jump Cuts in Final Cut Pro X
- In 2024, The Ultimate Guide to Free Video Trimming on Windows 10
- 2024 Approved AVI Video Rotation Made Easy 16 Free Solutions for Windows, MAC, Android, iPhone, and Online Users
- GoPro Video Editing for Mac Users Tips, Tricks, and Tutorials
- In 2024, Edit Like a Pro FCP Audio Editing Techniques for Video Creators
- Best Free Online Video Cutters Top Picks for 2024
- Cut, Edit, Share The Top 10 Vlog Editor Apps for iOS and Android for 2024
- New From Forward to Backward A Comprehensive Guide to Reversing TikTok Videos
- Fast Forward Best GIF Speed Editors for Any Device for 2024
- 2024 Approved Cropping Videos Like a Pro Tips, Tricks, and Techniques Using Avidemux
- In 2024, Optimal Video Size for Instagram A Complete Guide
- Updated FCPX Jump Cuts Tutorial From Beginner to Expert
- Updated Boost Your Visibility How to Resize LinkedIn Video Thumbnails
- In 2024, Top 10 Best Free Video Editing Software for Ubuntu
- New Beyond WMM Top Picks for Video Editing Software
- Best Free Video Cutter Tools Our Expert Recommendations for 2024
- 2024 Approved Best Free Invitation Video Maker Tools on the Web
- Unbiased Minitool Movie Maker Review and Top Picks for Alternatives
- In 2024, Final Cut Pro X Troubleshooting A Step-by-Step Reset Guide
- 2024 Approved Best Websites to Erase TikTok Watermarks From Videos
- Free Up Space Fast The Ultimate FCPX Storage Cleanup Guide
- Extract Audio From Videos Top MP4 to MP3 Apps for Mobile for 2024
- Edit MP4 Files Like a Pro Mac and Windows Tutorial for Beginners for 2024
- The Ultimate Guide to Titles in Final Cut Pro X 2023 Edition for 2024
- Free Video Upgrades The 8 Best Online Quality Enhancers This Year for 2024
- From Video to Live Photo Expert-Recommended Apps and Guides
- In 2024, Chromebooks Finest Top 10 Free Video Editors You Need to Try
- Updated Free WMV Video Trimmer Top-Rated Options
- In 2024, Expert Review Videopad Video Editor - The Good, the Bad, and the Ugly
- New Best Subtitle Edit Replacements for Mac Users
- 2024 Approved Interesting Fundamentals and Ultimate Guide to Animated Characters Drawings
- 4 solution to get rid of pokemon fail to detect location On Apple iPhone X | Dr.fone
- How to Unlock Motorola Moto G24 Phone Password Without Factory Reset?
- In 2024, Forgot Locked iPhone 11 Pro Max Password? Learn the Best Methods To Unlock
- How to Fix Android.Process.Media Has Stopped on Poco F5 Pro 5G | Dr.fone
- How to Turn Off Google Location to Stop Tracking You on OnePlus Ace 2 | Dr.fone
- In 2024, How To Activate and Use Life360 Ghost Mode On Lava Agni 2 5G | Dr.fone
- In 2024, Ultimate Guide on Motorola Moto G13 FRP Bypass
- How to Downgrade iPhone 11 Pro to an Older Version? | Dr.fone
- In 2024, Catch or Beat Sleeping Snorlax on Pokemon Go For Vivo Y17s | Dr.fone
- In 2024, What Is a SIM Network Unlock PIN? Get Your Samsung Galaxy A15 4G Phone Network-Ready
- How to Hide/Fake Snapchat Location on Your Apple iPhone 8 Plus | Dr.fone
- In 2024, How To Remove the Two Factor Authentication On iPhone SE (2022)
- Title: Master FLV Video Editing on Windows 8 Tips and Tricks
- Author: Giselle
- Created at : 2024-05-19 07:45:08
- Updated at : 2024-05-20 07:45:08
- Link: https://ai-vdieo-software.techidaily.com/master-flv-video-editing-on-windows-8-tips-and-tricks/
- License: This work is licensed under CC BY-NC-SA 4.0.
