
:max_bytes(150000):strip_icc():format(webp)/samsungappstore-c0194a478ba54e90a798b3bb5ff4f6d5.jpg)
In 2024, Capture Perfection Top-Rated Webcam Recording Software for Windows 10
Capture Perfection: Top-Rated Webcam Recording Software for Windows 10
10 Best Webcam Recording Software for Windows 10

Richard Bennett
Mar 27, 2024• Proven solutions
Which webcam softwarehave you installed on your laptop or desktop? Using the right webcam software to live stream videos, screen record videos, or chat on Skype results in high-quality images, smooth streaming, and high-quality images and videos.
There is a huge number of free webcam software with advanced features yet free for you to download, and use on your PC.
But how would you determine the best webcam software to use?
Before you mounted that webcam on your desktop or laptop, you had a reason. It’s your webcam features and purpose that should guide you to select the right software for the webcam camera.
In this article, we will show you 10 webcam software for Windows in this guide. Included are the most useful factors to consider as you make your choice – complexity of use, free/paid, integrations, editing tools, and more. You will learn:
- Part 1: The Best Webcam & Screen Recorder for Windows and Mac [Video Tutorial]
- Part 2: Top 10 Best Free Webcam Software for Windows
First take a quick look of the 10 best webcam software that is available on your Windows from a video:
For Win 7 or later (64-bit)
 Secure Download
For macOS 10.14 or later
Secure Download
Part 1: The Best Webcam & Screen Recorder for Computer
You need a sound and webcam recorder to record your video tutorials, streaming videos, presentations, or any other type of video. Wondershare Filmora is the software to use. Other than its most admired friendly intuitive interface, it’s simple and easy to use-suitable for both beginners and professionals.
For Win 7 or later (64-bit)
Secure Download
For macOS 10.14 or later
Secure Download
Among the outstanding features, you’ll find in Filmora include,
- Fast-paced recording speed of up to 120 fps
- Adverse professional editing tools that are easy to use
- Simultaneous recording from both webcam and computer screen
- Compatible with 50+ different file formats
- Rich title text and tutorial features
It’s free to download. Have a try now! Join in the Wondershare Video Community and get some inspiration from other Filomora users.
Part 2: Top 10 Best Free Webcam Software for Windows
To help you evaluate which webcam software best suits your needs, I’ve featured the strengths, shortcomings, and support services in each software review.
This is the list of the best free webcam software for Windows 10.
| 1 - Logitech Capture | 2 - CyberLink Youcam |
|---|---|
| 3 - ManyCam | 4 - SplitCam |
| 5 - Bandicam | 6 - NCH - Video Capture Software |
| 7 - YAWCAM | 8 - Windows Camera |
| 9 - Fake Webcam | 10 - IP Camera Viewer |
1. Logitech Capture
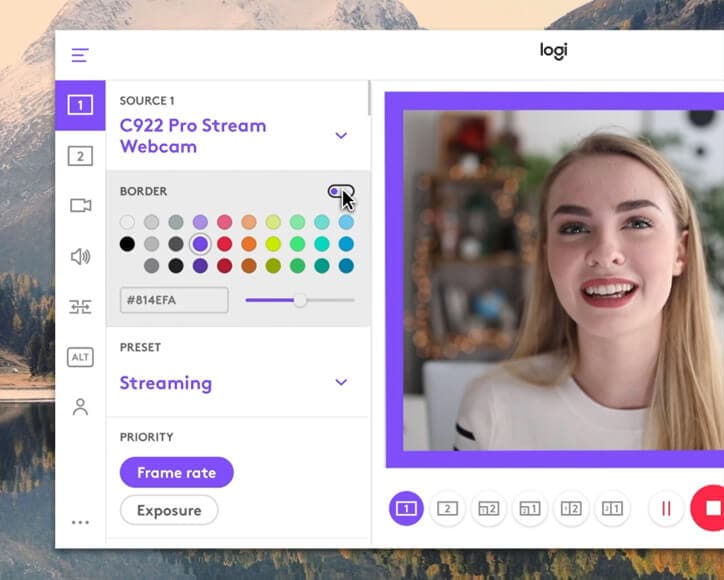
The multiple source recording feature and direct streaming app are the key strengths of this software. According to its mission statement- All-In-One Content Creation- you can use this software to record, edit, customize, and stream to your favorite channel.
Operating systems: Windows 10/8/7
Price: Free
Supported webcams: 1080P PRO STREAM, BRIO STREAM, C920s HD PRO, C922 PRO STREAM
Logitech Capture is among the few free webcam recording software for Windows 10 with studio controls applicable during recording. You can use this feature to adjust your image, create frames, adjust focus and transitions, and enable ChromaKey as you record.
In case you want to create a picture-in-picture presentation, this software allows you to use two webcams simultaneously. With the source switching and the auto-focus features, you can record the best tutorials or guides that show all dimensions and your image.
Pros
- Rich in transitions and effects
- Portrait optimization for mobile devices
- Its Capture app offers direct streaming to YouTube
- You can take passports or still images
Cons
- Limited to YouTube channel
- Account registration is mandatory
2. CyberLink Youcam
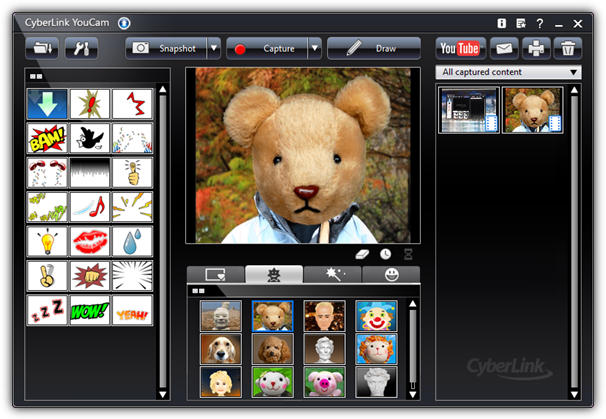
If you are used to video chatting and video recording, then, you’ll have 200+ fun effects to make your real-time videos as interesting as possible. In fact, the seamless app integration feature will keep your live streaming chats without buffering for long.
Operating systems: Windows 10/8/1.8/7
Price: Free/ Paid
Supported file formats: WMV, MP4, AVI
YouCam is the best free webcam software Windows 10 for YouTubers, business professionals, Streamers, home users, and Vloggers. It seamlessly integrates with live streaming media channels like Twitch, Wirecast, OBS Studio, Facebook Live, Xsplit, and YouTube Live.
The YouCam’s AR technology is one of its hidden treasures that will lighten up your skin by applying a natural-looking makeup. If your room is badly light, use the Live Skin Smoothing feature. Just below it is the TrueTheater Enhancement option to help you automatically adjust your facial sharpness and lighting.
Pros
- Hundreds of animated emojis
- Suitable for video conferencing services
- Plenty of interactive colorful particles and distortions
- Availability of face beautification tool
Cons
- Only limited to the Windows operating system
- Very few features for the free plan
3. ManyCam
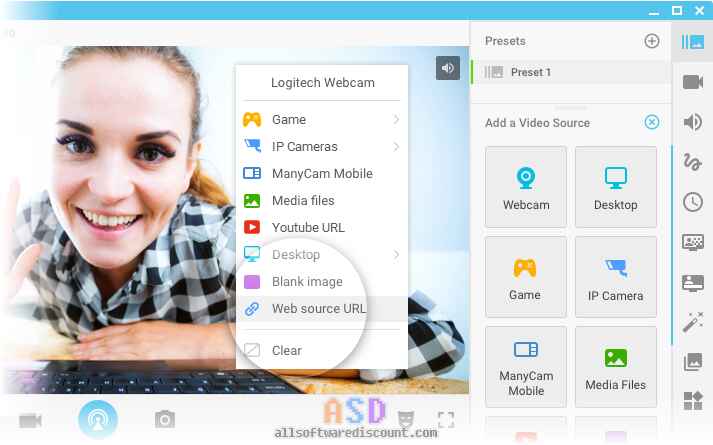
Downloading this webcam software guarantees you smooth streaming and effortless recording of videos. Also, this software will help you during game steaming, online education, mobile live streaming, and live telehealth communication.
Operating systems: Windows 10/8/7 and macOS X
Price: Free /Paid
Supported file formats: MJPEG, IP, MP4, AVI, MPEG, MOV
ManyCam is a free webcam recording software for windows 10 . It’s among the most widely used software internationally-not for many reasons, but because of its friendly intuitive user interface and live streaming tools for lessons and lecturers.
So, if you are a lecturer/teacher, you can use the Software Development Kit (SDK) to integrate the webcam with any online teaching platform. Among the features designed to facilitate better online teaching include the picture in picture, Chroma Key, multiple video sources, and screen sharing.
Pro
- Ability to stream 4K videos
- Real-time camera control settings
- No watermark even on the free plan
- Screencasting and screen recording feature
- Real-time drop and drag effects
Cons
- Expensive business subscription plans
- No Light enhancement features
- Most features are manual as opposed to being automatic

Filmora WebCame & Screen Recorder
Filmora - WebCame & Screen Recorder
• No-time delay to record webcam and screen while live streaming or gaming
• Edit recording video for marketing replay or adding game commentary
• Cross-platform supported - (Windows, Mac, iOS, Android)
Start Webcam & Screen Record Start Webcam & Screen Record Start Webcam & Screen Record Learn More >
4. SplitCam
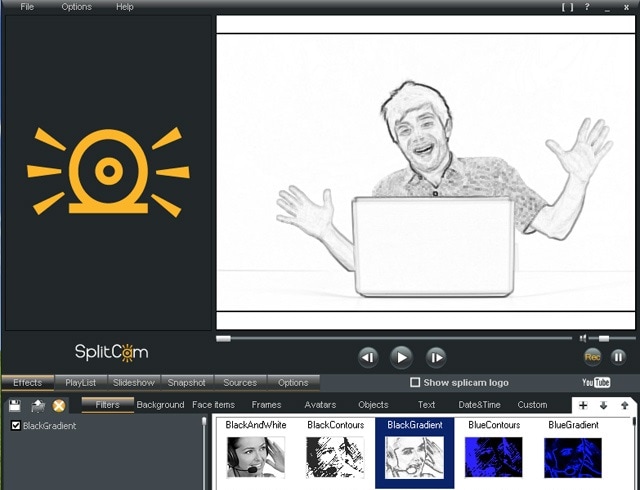
To stream your desktop/laptop screen SplitCam is the most appropriate software. With only the inbuilt virtual webcam, you can share your screen videos to media channels and IMS. Other uses of this software are recording webcam chatting , streaming live videos, and messaging.
Operating systems: Windows 10/8/7
Price: Free
SplitCam is not as popular as the other free webcam software windows 10 like ManyCam and YouCam. This is because it doesn’t integrate with some of the world’s renowned social media platforms- Facebook and Instagram. However, you can use this software to stream, take snapshots, and record videos for YouTube, Skype, Justin.tv, Gtalk, and Windows Live Messenger.
SplitCam is rich in fantastic webcam effects. Haven’t you been surprised to see someone appear to be streaming from the ocean or the Amazon Mountain? This is what you can do with SplitCam. Other cool effects are frames, texts on videos, filters, and facial items like masks and fake face glasses.
Pros
- Open and simple interface
- Integratable with the messaging apps
- Supports a wide range of resolutions ( between 320x180 and 2048x1536)
Cons
- Applicable to a small number of channels
- Supported file formats not defined
5. Bandicam
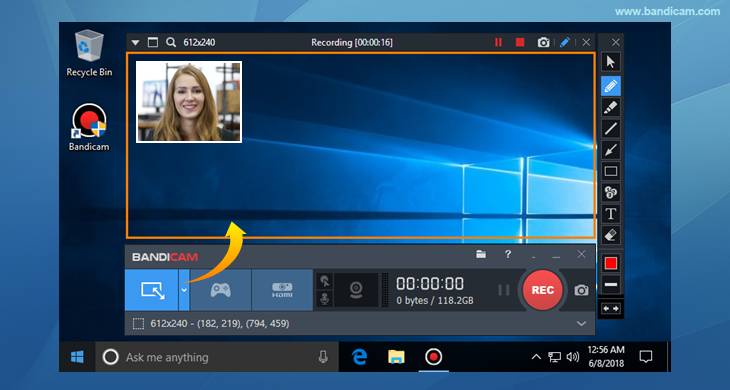
Do you want a recorder for screen recording, recording your gameplay, or capturing videos from devices like smartphones and PlayStation? Look for no other software but BandiCam. You can also merge two or more video files, remove unwanted parts, and select the only part to screen record.
Operating systems: Windows Vista, 10/8/7
Price: Free/paid
Supported file format: AVI, MP4, JPEG, TIF, GIF, PNG
Supported graphics cards: Nvidia NVENC, Nvidia NVENC (),
BandiCam is another HD webcam software Windows 10 with the capability of capturing high compression videos and games on your PC screen videos without compromising the video quality. Don’t forget to record all webinars aired in your niche.
Netflix is becoming more popular each day due to the thrilling videos. With the BandiCam screen recorder, you can record live-streamed videos on Netflix for over 24hrs. These are the tools to edit your recorded video: real-time drawing tool, webcam overlay, sound mixer, and Chroma Key.
Pros
- No hidden features
- Widescreen capture
- Can record 2D/3D videos in HD mode
- Can capture fast-paced videos of up to 144 FPS
Cons
- Not suitable for beginners
- Cannot be used to live stream videos
6. NCH - Video Capture Software

Of all the listed webcam software in this review, this software has the most diverse functions. You can record streaming videos, record your computer screen, record from external devices, and record from a webcam. It’s also perfect for recording audios and simultaneous recording from screen and webcam.
Operating systems: Windows 10, 8, 8.1, 7, XP, Vista 64 bit and Mac OS X 10.5 and above
Price: Free/paid
Supported file formats: MP4, WMV, AVI, MPG, FLV, MOV
Debut Video Capture is the only free webcam recording software for Windows 10 believed to capture or record videos from any external source. It has also preset settings for HD and TV with pre-production enhancement features like color adjustment settings, overlay buttons and frame rate, aspect ratio, and resolution settings.
If you always think of becoming rich, the Express Burn Disc Burner is the tool that will help you make money. Record the most trending videos and use this tool to burn DVDs and CDs.
Pros
- Can record videos for any social media platform
- Supports a wide range of audio and video file formats
- All features are open and easy to use
- Availability of video editing software
Cons
- Only monthly subscriptions for paid plans
- Watermark for the free download
- Difficult to record a full-screen movie
Try Filmora to Smoothly Record WebCame and Screen!
Filmora Web Camera & Screen Recorder can capture any area of the PC screen and webcam. It’s perfect to capture and record while making a live gaming match, marketing promotion, guiding a tour, and more. Plus, you can edit the recording video files in Filmora directly! Worth to have a try!
Start Webcam & Screen Recording Start Webcam & Screen Recording Start Webcam & Screen Recording Learn More >
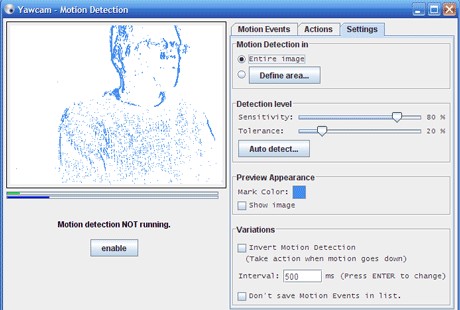
7. YAWCAM
This webcam software can be referred to as the simplest for all beginners with the will to start streaming and recording videos for personal or home use.
Supported file formats: PNG, JPG, MJPEG, GIF, JavaScript
Price: Free
Supported operating systems: Windows 2000/10/8/7/ Vista and XP
YAWCAM is an absolutely free webcam software windows 10. Why is it the simplest software to use? Just download and you will find all features on one page. Simple language commands aligned in a drop-down menu ready to be used with only one click.
Some of the best features include overlay texts and images, scheduler, motion detection, and an inbuilt webserver. For you to use this webcam software, use these supported devices; DirectX compatible webcams, DV-camera, or video capture devices.
Pros
- No watermark
- Easy to use
- Friendly user interface
Cons
- Few transitions and effects
8. Windows Camera
We all trust any app or software by Microsoft over others! If you also do, then you can download Windows Camera and use it to record videos, take snapshots and shoot videos.
Operating system: Windows 10
Price: Free
Supported devices: Xbox One, Windows, mobile
Windows Camera is among the best free webcam software for Windows 10. This is because of the software’s few but easy-to-use and effective features that are expertly designed for PCs and tablets installed with Windows 10.
The automatic photo back combined with the photo-shoot timer makes it perfect for taking selfies and passports. Using the panorama feature, you can take photos of the best scenes and share them on media platforms.
Pros
- Simplicity is its main strength
- Supports resolutions above 1080p
- Good for photographers
Cons
- Has no built-in virtual webcam
- Requires a camera to support 4K videos
9. Fake Webcam

Supported file formats: AVI, MPEG, DVD, VCD, WMV, 3GP, MP4, SVCD, MOV, ASF,
Price: Free /paid
Operating systems: Windows 7/8/10 (32/64 bit)
Fake Webcam is a free webcam software Windows 10 whose name is creatively used to suggest it almost functions like a webcam. This doesn’t fall far from the truth! You can truly use this software to broadcast, add effects and filters, record on full screen, and fake your voice.
To share or stream your photos and videos on Skype, YIM, or Gtalk, using the screen recorder would give the best results. What makes Fake Webcam stand out is the free video converter and the free video toolkit.
Pros
- Free support tools
- Supports all video and audio formats
- Can convert file formats and stream to any channel
- Availability of the screen recorder
- Integratable with almost all instant messengers
Cons
- Major tools not free(Fake Webcam and Screen recorder)
10. IP Camera Viewer
Do you run a supermarket store, mall or you’ve installed security surveillance cameras in your compound? IP Camera Viewer is the most effective webcam software for video monitoring systems.
Supported file formats: JPEG, MPEG-4, MJPEG, and
Price: Free
Operating systems: Windows 10 / 8 / 7 /2012 /Vista and XP
IP Camera Viewer is the most used free webcam recording software for windows 10 as its compatible with almost all IP camera models like Panasonic, Toshiba, Canon, D-Link, Sony, and more the 2000 others. With the capability of viewing and controlling 4 camera feeds at once, you can use this software to monitor your entire compound.
Some of the important advanced IP Camera Viewer functions include listening to webcam audios, adjust image settings, zoom or tilt images, schedule monitoring times, and detect motions.
Pros
- Automatically uploads recorded videos and photos to a server
- Compatible with almost all IP camera models
- Simple and easy to use
Cons
- No inbuilt media player
- Cannot adjust the image or video quality
You may also want to read >>> 10 Best Webcams | A Buyer’s Guide
![]()
A cross-platform for making videos anywhere for all creators

Why your video editing isn’t good enough? How about some creative inspo?
- 100 Million+ Users
- 150+ Countries and Regions
- 4 Million+ Social Media Followers
- 5 Million+ Stock Media for Use
* Secure Download

FAQs about Webcam Software for Windows
1. What is Webcam Software?
A webcam is a video camera that feeds or streams images or video in real-time to or over a computer network. And webcam software enables users to record video or stream video over the Internet.
Webcam software is an application that allows you to capture video from your laptop/desktop webcam and record or stream video over the Internet. You can use them to deliver professional videos, streaming, and online courses easily.
2. Does Windows have built-in webcam software?
Windows 10 has an in-built webcam app called Camera that lets you record videos and take pictures with your webcam. This is definitely better than downloading 3rd party webcam recording software where spyware/malware is rampant.
3. Does a webcam need software?
Yes, if the camera hardware offers depth, low-light support, night vision, etc. If you use any software on the camera, these functions are only available if the driver is installed.
Conclusion
After a keen of all the webcam software above, it’s evident that every developer had an intended purpose. You cannot therefore just randomly wake up and download any without considering its functions, supported devices, file formats, and the auxiliary apps available. All this information is contained herein.
According to some users, there are free webcam software Windows 10 that more often would not show any video images but the audio is absolutely clear. To help your fellow user, what bad experience have you ever had after recording a game using webcam software ? Kindly share your comment or suggestion on our social media platforms.


Richard Bennett
Richard Bennett is a writer and a lover of all things video.
Follow @Richard Bennett
Richard Bennett
Mar 27, 2024• Proven solutions
Which webcam softwarehave you installed on your laptop or desktop? Using the right webcam software to live stream videos, screen record videos, or chat on Skype results in high-quality images, smooth streaming, and high-quality images and videos.
There is a huge number of free webcam software with advanced features yet free for you to download, and use on your PC.
But how would you determine the best webcam software to use?
Before you mounted that webcam on your desktop or laptop, you had a reason. It’s your webcam features and purpose that should guide you to select the right software for the webcam camera.
In this article, we will show you 10 webcam software for Windows in this guide. Included are the most useful factors to consider as you make your choice – complexity of use, free/paid, integrations, editing tools, and more. You will learn:
- Part 1: The Best Webcam & Screen Recorder for Windows and Mac [Video Tutorial]
- Part 2: Top 10 Best Free Webcam Software for Windows
First take a quick look of the 10 best webcam software that is available on your Windows from a video:
For Win 7 or later (64-bit)
Secure Download
For macOS 10.14 or later
Secure Download
Part 1: The Best Webcam & Screen Recorder for Computer
You need a sound and webcam recorder to record your video tutorials, streaming videos, presentations, or any other type of video. Wondershare Filmora is the software to use. Other than its most admired friendly intuitive interface, it’s simple and easy to use-suitable for both beginners and professionals.
For Win 7 or later (64-bit)
Secure Download
For macOS 10.14 or later
Secure Download
Among the outstanding features, you’ll find in Filmora include,
- Fast-paced recording speed of up to 120 fps
- Adverse professional editing tools that are easy to use
- Simultaneous recording from both webcam and computer screen
- Compatible with 50+ different file formats
- Rich title text and tutorial features
It’s free to download. Have a try now! Join in the Wondershare Video Community and get some inspiration from other Filomora users.
Part 2: Top 10 Best Free Webcam Software for Windows
To help you evaluate which webcam software best suits your needs, I’ve featured the strengths, shortcomings, and support services in each software review.
This is the list of the best free webcam software for Windows 10.
| 1 - Logitech Capture | 2 - CyberLink Youcam |
|---|---|
| 3 - ManyCam | 4 - SplitCam |
| 5 - Bandicam | 6 - NCH - Video Capture Software |
| 7 - YAWCAM | 8 - Windows Camera |
| 9 - Fake Webcam | 10 - IP Camera Viewer |
1. Logitech Capture
The multiple source recording feature and direct streaming app are the key strengths of this software. According to its mission statement- All-In-One Content Creation- you can use this software to record, edit, customize, and stream to your favorite channel.
Operating systems: Windows 10/8/7
Price: Free
Supported webcams: 1080P PRO STREAM, BRIO STREAM, C920s HD PRO, C922 PRO STREAM
Logitech Capture is among the few free webcam recording software for Windows 10 with studio controls applicable during recording. You can use this feature to adjust your image, create frames, adjust focus and transitions, and enable ChromaKey as you record.
In case you want to create a picture-in-picture presentation, this software allows you to use two webcams simultaneously. With the source switching and the auto-focus features, you can record the best tutorials or guides that show all dimensions and your image.
Pros
- Rich in transitions and effects
- Portrait optimization for mobile devices
- Its Capture app offers direct streaming to YouTube
- You can take passports or still images
Cons
- Limited to YouTube channel
- Account registration is mandatory
2. CyberLink Youcam
If you are used to video chatting and video recording, then, you’ll have 200+ fun effects to make your real-time videos as interesting as possible. In fact, the seamless app integration feature will keep your live streaming chats without buffering for long.
Operating systems: Windows 10/8/1.8/7
Price: Free/ Paid
Supported file formats: WMV, MP4, AVI
YouCam is the best free webcam software Windows 10 for YouTubers, business professionals, Streamers, home users, and Vloggers. It seamlessly integrates with live streaming media channels like Twitch, Wirecast, OBS Studio, Facebook Live, Xsplit, and YouTube Live.
The YouCam’s AR technology is one of its hidden treasures that will lighten up your skin by applying a natural-looking makeup. If your room is badly light, use the Live Skin Smoothing feature. Just below it is the TrueTheater Enhancement option to help you automatically adjust your facial sharpness and lighting.
Pros
- Hundreds of animated emojis
- Suitable for video conferencing services
- Plenty of interactive colorful particles and distortions
- Availability of face beautification tool
Cons
- Only limited to the Windows operating system
- Very few features for the free plan
3. ManyCam
Downloading this webcam software guarantees you smooth streaming and effortless recording of videos. Also, this software will help you during game steaming, online education, mobile live streaming, and live telehealth communication.
Operating systems: Windows 10/8/7 and macOS X
Price: Free /Paid
Supported file formats: MJPEG, IP, MP4, AVI, MPEG, MOV
ManyCam is a free webcam recording software for windows 10 . It’s among the most widely used software internationally-not for many reasons, but because of its friendly intuitive user interface and live streaming tools for lessons and lecturers.
So, if you are a lecturer/teacher, you can use the Software Development Kit (SDK) to integrate the webcam with any online teaching platform. Among the features designed to facilitate better online teaching include the picture in picture, Chroma Key, multiple video sources, and screen sharing.
Pro
- Ability to stream 4K videos
- Real-time camera control settings
- No watermark even on the free plan
- Screencasting and screen recording feature
- Real-time drop and drag effects
Cons
- Expensive business subscription plans
- No Light enhancement features
- Most features are manual as opposed to being automatic
Filmora WebCame & Screen Recorder
Filmora - WebCame & Screen Recorder
• No-time delay to record webcam and screen while live streaming or gaming
• Edit recording video for marketing replay or adding game commentary
• Cross-platform supported - (Windows, Mac, iOS, Android)
Start Webcam & Screen Record Start Webcam & Screen Record Start Webcam & Screen Record Learn More >
4. SplitCam
To stream your desktop/laptop screen SplitCam is the most appropriate software. With only the inbuilt virtual webcam, you can share your screen videos to media channels and IMS. Other uses of this software are recording webcam chatting , streaming live videos, and messaging.
Operating systems: Windows 10/8/7
Price: Free
SplitCam is not as popular as the other free webcam software windows 10 like ManyCam and YouCam. This is because it doesn’t integrate with some of the world’s renowned social media platforms- Facebook and Instagram. However, you can use this software to stream, take snapshots, and record videos for YouTube, Skype, Justin.tv, Gtalk, and Windows Live Messenger.
SplitCam is rich in fantastic webcam effects. Haven’t you been surprised to see someone appear to be streaming from the ocean or the Amazon Mountain? This is what you can do with SplitCam. Other cool effects are frames, texts on videos, filters, and facial items like masks and fake face glasses.
Pros
- Open and simple interface
- Integratable with the messaging apps
- Supports a wide range of resolutions ( between 320x180 and 2048x1536)
Cons
- Applicable to a small number of channels
- Supported file formats not defined
5. Bandicam
Do you want a recorder for screen recording, recording your gameplay, or capturing videos from devices like smartphones and PlayStation? Look for no other software but BandiCam. You can also merge two or more video files, remove unwanted parts, and select the only part to screen record.
Operating systems: Windows Vista, 10/8/7
Price: Free/paid
Supported file format: AVI, MP4, JPEG, TIF, GIF, PNG
Supported graphics cards: Nvidia NVENC, Nvidia NVENC (),
BandiCam is another HD webcam software Windows 10 with the capability of capturing high compression videos and games on your PC screen videos without compromising the video quality. Don’t forget to record all webinars aired in your niche.
Netflix is becoming more popular each day due to the thrilling videos. With the BandiCam screen recorder, you can record live-streamed videos on Netflix for over 24hrs. These are the tools to edit your recorded video: real-time drawing tool, webcam overlay, sound mixer, and Chroma Key.
Pros
- No hidden features
- Widescreen capture
- Can record 2D/3D videos in HD mode
- Can capture fast-paced videos of up to 144 FPS
Cons
- Not suitable for beginners
- Cannot be used to live stream videos
6. NCH - Video Capture Software
Of all the listed webcam software in this review, this software has the most diverse functions. You can record streaming videos, record your computer screen, record from external devices, and record from a webcam. It’s also perfect for recording audios and simultaneous recording from screen and webcam.
Operating systems: Windows 10, 8, 8.1, 7, XP, Vista 64 bit and Mac OS X 10.5 and above
Price: Free/paid
Supported file formats: MP4, WMV, AVI, MPG, FLV, MOV
Debut Video Capture is the only free webcam recording software for Windows 10 believed to capture or record videos from any external source. It has also preset settings for HD and TV with pre-production enhancement features like color adjustment settings, overlay buttons and frame rate, aspect ratio, and resolution settings.
If you always think of becoming rich, the Express Burn Disc Burner is the tool that will help you make money. Record the most trending videos and use this tool to burn DVDs and CDs.
Pros
- Can record videos for any social media platform
- Supports a wide range of audio and video file formats
- All features are open and easy to use
- Availability of video editing software
Cons
- Only monthly subscriptions for paid plans
- Watermark for the free download
- Difficult to record a full-screen movie
Try Filmora to Smoothly Record WebCame and Screen!
Filmora Web Camera & Screen Recorder can capture any area of the PC screen and webcam. It’s perfect to capture and record while making a live gaming match, marketing promotion, guiding a tour, and more. Plus, you can edit the recording video files in Filmora directly! Worth to have a try!
Start Webcam & Screen Recording Start Webcam & Screen Recording Start Webcam & Screen Recording Learn More >
7. YAWCAM
This webcam software can be referred to as the simplest for all beginners with the will to start streaming and recording videos for personal or home use.
Supported file formats: PNG, JPG, MJPEG, GIF, JavaScript
Price: Free
Supported operating systems: Windows 2000/10/8/7/ Vista and XP
YAWCAM is an absolutely free webcam software windows 10. Why is it the simplest software to use? Just download and you will find all features on one page. Simple language commands aligned in a drop-down menu ready to be used with only one click.
Some of the best features include overlay texts and images, scheduler, motion detection, and an inbuilt webserver. For you to use this webcam software, use these supported devices; DirectX compatible webcams, DV-camera, or video capture devices.
Pros
- No watermark
- Easy to use
- Friendly user interface
Cons
- Few transitions and effects
8. Windows Camera
We all trust any app or software by Microsoft over others! If you also do, then you can download Windows Camera and use it to record videos, take snapshots and shoot videos.
Operating system: Windows 10
Price: Free
Supported devices: Xbox One, Windows, mobile
Windows Camera is among the best free webcam software for Windows 10. This is because of the software’s few but easy-to-use and effective features that are expertly designed for PCs and tablets installed with Windows 10.
The automatic photo back combined with the photo-shoot timer makes it perfect for taking selfies and passports. Using the panorama feature, you can take photos of the best scenes and share them on media platforms.
Pros
- Simplicity is its main strength
- Supports resolutions above 1080p
- Good for photographers
Cons
- Has no built-in virtual webcam
- Requires a camera to support 4K videos
9. Fake Webcam
Supported file formats: AVI, MPEG, DVD, VCD, WMV, 3GP, MP4, SVCD, MOV, ASF,
Price: Free /paid
Operating systems: Windows 7/8/10 (32/64 bit)
Fake Webcam is a free webcam software Windows 10 whose name is creatively used to suggest it almost functions like a webcam. This doesn’t fall far from the truth! You can truly use this software to broadcast, add effects and filters, record on full screen, and fake your voice.
To share or stream your photos and videos on Skype, YIM, or Gtalk, using the screen recorder would give the best results. What makes Fake Webcam stand out is the free video converter and the free video toolkit.
Pros
- Free support tools
- Supports all video and audio formats
- Can convert file formats and stream to any channel
- Availability of the screen recorder
- Integratable with almost all instant messengers
Cons
- Major tools not free(Fake Webcam and Screen recorder)
10. IP Camera Viewer
Do you run a supermarket store, mall or you’ve installed security surveillance cameras in your compound? IP Camera Viewer is the most effective webcam software for video monitoring systems.
Supported file formats: JPEG, MPEG-4, MJPEG, and
Price: Free
Operating systems: Windows 10 / 8 / 7 /2012 /Vista and XP
IP Camera Viewer is the most used free webcam recording software for windows 10 as its compatible with almost all IP camera models like Panasonic, Toshiba, Canon, D-Link, Sony, and more the 2000 others. With the capability of viewing and controlling 4 camera feeds at once, you can use this software to monitor your entire compound.
Some of the important advanced IP Camera Viewer functions include listening to webcam audios, adjust image settings, zoom or tilt images, schedule monitoring times, and detect motions.
Pros
- Automatically uploads recorded videos and photos to a server
- Compatible with almost all IP camera models
- Simple and easy to use
Cons
- No inbuilt media player
- Cannot adjust the image or video quality
You may also want to read >>> 10 Best Webcams | A Buyer’s Guide
![]()
A cross-platform for making videos anywhere for all creators
Why your video editing isn’t good enough? How about some creative inspo?
- 100 Million+ Users
- 150+ Countries and Regions
- 4 Million+ Social Media Followers
- 5 Million+ Stock Media for Use
* Secure Download
FAQs about Webcam Software for Windows
1. What is Webcam Software?
A webcam is a video camera that feeds or streams images or video in real-time to or over a computer network. And webcam software enables users to record video or stream video over the Internet.
Webcam software is an application that allows you to capture video from your laptop/desktop webcam and record or stream video over the Internet. You can use them to deliver professional videos, streaming, and online courses easily.
2. Does Windows have built-in webcam software?
Windows 10 has an in-built webcam app called Camera that lets you record videos and take pictures with your webcam. This is definitely better than downloading 3rd party webcam recording software where spyware/malware is rampant.
3. Does a webcam need software?
Yes, if the camera hardware offers depth, low-light support, night vision, etc. If you use any software on the camera, these functions are only available if the driver is installed.
Conclusion
After a keen of all the webcam software above, it’s evident that every developer had an intended purpose. You cannot therefore just randomly wake up and download any without considering its functions, supported devices, file formats, and the auxiliary apps available. All this information is contained herein.
According to some users, there are free webcam software Windows 10 that more often would not show any video images but the audio is absolutely clear. To help your fellow user, what bad experience have you ever had after recording a game using webcam software ? Kindly share your comment or suggestion on our social media platforms.
Richard Bennett
Richard Bennett is a writer and a lover of all things video.
Follow @Richard Bennett
Conversion Made Easy: How to Pick the Best Video to Audio Converter for Your Needs
5 Rules I Follow When Choose Video to Audio Converter App
An easy yet powerful editor
Numerous effects to choose from
Detailed tutorials provided by the official channel
Suppose you possess a documentary or a film clip of your favorite music track where the voice narration is more crucial and informative than its visuals. In that case, you can save a decent amount of space on your storage device with a practical video to audio converter app.
Keeping in mind all the above complexities, you will learn about our top 8 videos to audio converter apps, including our five must-follow to select the best among them.
In this article
01 [Best 8 Video to Audio Converter App](#Part 1)
02 [5 Ways to Choose Video to Audio Converter App](#Part 2)
Part 1 Best 8 Video to Audio Converter App
01Video to MP3 – Trim, and Convert

Let’s start with a simple yet beautifully designed video to audio converter app with all the options displayed well on the home screen. You can choose a video file from your device, YouTube video, or play previously converted audio files. In addition, you can choose to save the audio files directly to the SD card to avoid cluttering of native storage space.
The app is simple, with conversion done within a few seconds. The app also supports audio bitrates of up to 320 kb/s and offers high-quality MP3 output. This is a Play Store free-to-download app with ads on board. You will need a smartphone with at least Android 4.1 to use the app.
Features
● Compatible with all Video formats such as MP4, AVI, FLV, MKV, MPEG,3GP, M4V, MOV, MPG, etc.
● Save Your MP3 files in Sdcard Folder.
● It supports All ARM(CPU) devices.
Pros
● Easy to use
● Great compatibility
● Fast conversion
Cons
● It May does not work well often
● Pop up ads
● It May does not work well for extensive size content
02Accountlab Video to MP3 Converter

This is a slick video to audio converter app that, in addition to letting you convert videos to audio, the app also acts as a very decent audio/video editor. With good compatibility for audio bitrates of up to 320 kb/s, this video to audio converter app matches some best apps and their features out there. You can easily modify or edit video files and play them back on the app to hone your editing skills.
It has an audio cutter feature to create custom ringtones for your device. Also, it’s a free-to-download app on the Google Play Store but comes with ads. Finally, the app works with Android 2.3.3 or above devices, particularly older Android tablets and smartphones.
Features
● Supports Video formats including WMV, MP4, 3gp, Flv , avi etc.
● Integrated MP3 Cutter for making Ringtone.
● Supports Bitrate 48 kb/s , 64 kb/s , 128 kb/s , 192 kb/s , 256 kb/s , 320 kb/s.
Pros
● Simple user interface
● Fast conversion
● One tap to play music files
Cons
● Lack of batch conversion
● Inefficient video editor
● Not suitable for other features than conversion
03Video MP3 Converter

This is yet another multi-purpose video to audio converter app on our list of top 8. It can help you trim audios and videos in addition to MP3 conversion and edit the converted file’s metadata (artist information, tags, etc.).
The app is also said to be the quickest video to audio converter apps available out there, although we can’t vouch for their claim. The settings and other options on the app are well framed, so it doesn’t take much time to get used to the layout.
Using this app, you can convert videos formats like 3GP, MP4, WEBM, FLV, and WMV. Additionally, this app is entirely free to use and download if you’re OK with a few ads. Finally, the app works on devices running Android 4.1 and more.
Features
● Supported video formats: MP4, 3GP, WEBM, WMV, FLV
● Supported audio formats: MP3, OGG
● Supports editing MP3 metadata
Pros
● Interactive user interface
● Good compatibility
● Fast conversion
Cons
● Lack of other features
● It contains lots of pop up ads
● Loss in quality after conversion
04MP3 Cutter and Merger by InShot

The program lets you do everything that a standard video to audio converter app should, and more. The app not only converts videos into full MP3s but also lets you choose among parameters like frequency, channel (stereo or otherwise), and the volume of the original track.
Users can use their editing skills extensively with the increased audio controls. The app also assists you in trimming and cutting video files, which is an excellent feature.
The user interface is quite innovative here, unlike some of the other apps we’ve mentioned above. The app is free to download on the Google Play Store but is ad-supported and has in-app purchases.
Features
● Video cutter and mute audio
● Merge multiple audios
● Sound boost to increase the volume
Pros
● All in one media converter
● Interactive user interface
● It also contains other editing features
Cons
● Sound quality may ruin after boost
● Not suitable for lengthy projects
● Slow processing
05MP3 Converter – Audio Extractor

This MP3 Converter – Audio Extractor helps convert video to audio iPhone and requires you to choose a file and begin the conversion process. You won’t even have to state the output format because MP3 is the app’s default output format.
After the conversion, there’s an option to preview the file you have created to make sure the quality level is pretty satisfying. However, it doesn’t support adjusting the output file’s bitrate or modifying other settings to increase the quality of the resultant audio.
Moreover, the app provides only modest file-sharing options, and you may have to go for an in-app purchase if you wish to gain access to all the functions that the MP3 Converter – Audio Extractor has to offer.
Features
● It supports most video formats.
● Support to most audio formats.
● Widget to quickly import video or play recent audio
Pros
● Good in cutting/editing music
● Fantastic user interface
● Fast and easy to use
Cons
● The app may take time to launch
● It doesn’t contain advanced editing features
● Need two devices for conversion
06Media Converter – Video to MP3

Despite the audio extraction from video, you can use the inbuilt media player of this video to audio converter app to listen to music or watch videos. Media Converter – Video to MP3 is compatible with various input file formats, and it lets you transform to M4A, MP3, WAV, and other audio file formats.
However, this app lacks more advanced MP4 to MP3 file conversion options since you can’t add tags to them or choose the preferred bitrate of the output files. The app consists of different ads, and you must invest in an in-app purchase for premium features. Even the Media Converter – Video to MP3’s pro version doesn’t offer file-sharing options.
Features
● Audio extraction: Extracts audio from the video, Output format: MP3, M4A, OGG, WAV, FLAC, WMA, AIFF, CAF, ADX, AC3, M4R
● Video format conversion, Output format: MP4, MOV, 3GP, 3G2, ASF, MKV, VOB, MPEG, WMV, FLV, AVI
● Video compression: Video size cropping, clip video
Pros
● Supports all formats
● Interactive user interface
● Good compatibility
Cons
● Lack of advanced features
● Slow audio extraction
● It doesn’t support batch conversion
07Video to MP3 – Convert Audio

This video to audio converter iPhone app helps transform all videos stored on your phone’s camera roll, or you can upload a video from One Drive, Dropbox, iCloud, and various online hosting platforms.
Video to MP3: Convert Audio helps you adjust the beginning and ending points of the new file of audio, which means that you can convert only a section of an MP4 video file to MP3. The output can easily be shared on social media or messaging apps and various other devices using the iTunes File Sharing feature.
Features
● Get custom bitrate, sample rate, volume
● It supports audio track selection
● Specify start and end with any position
Pros
● Accessible converter
● Good user interface
● Advanced premium features
Cons
● A bit confusing
● Slow processing
● Pop up ads
07MP4, MP3 Video Audio Cutter, Trimmer & Converter

It is our fastest pick-in video to audio converter app in the market that assists you in trimming or cutting both audio and video. It can also convert from almost all video formats to audios out there with namely the supported formats like MP3, M4A, M4B, AC3, WAV, OGG, FLAC, MP4, MKV, AVI, 3GP, FLV, MOV, WEBM, M2TS, TS, MTS, MPEG.
Moreover, the app supports batch audio file conversion as well.
Features
● Trim & Cut audio files
● Trim & Cut video files
● Batch file conversion
Pros
● Good user interface
● Good compatibility
● Support to batch conversion
Cons
● Lots of popup ads
● Sometimes slow processing
● Lack of other advanced features
Part 2 5 Ways to Choose Video to Audio Converter App
Before selecting the ideal video to audio converter app or video to audio converter apk, there are different sections or points you need to consider for selection. So, let’s read them out without any further ado!
01Excellent user interface
Of course, the user interface is the primary essential feature you should be looking for in any video to audio converter app out there. Interaction with the interface is all that counts, and any complexity within this process automatically halts the ultimate performance.
02Compatibility with different audio formats
The next important thing is to consider how compatible your app is in reality. Will it be able to convert to different audio formats or not? How many audio formats are supported by the app? So, every time you convert video to audio, you need to check your requirements beforehand so as not to confuse with the formats later on.
03Processing speed
Yes, it would be best not to overlook the processing speed. The processing speed determines the likability of your end project because time is a precious element in the life of everyone. So, consider the time consumed for conversion and how much wastage of time you can afford.
04Platform compatibility
Platform compatibility refers to the devices or operating systems a particular app is comfortable with. Here, we mainly look for compatibility with Windows, Mac, iPhone, and Android. So, the best is what goes well with almost every OS or device or is compatible with both Windows and Mac simultaneously.
05Other features
Other features could represent the additional or advanced features a particular video to audio converter app consists of. It’s also because you may be looking to enhance that extracted audio, mainly on the same platform, again concerning time. This is why finding an all-rounder video to converter app is challenging but not impossible.
Filmora is a go-to alternative to full-fledged post-production applications like Final Cut Pro X, Adobe Premiere Pro, etc., and can be used to create industry-standard outputs.
Some other features that Filmora consists of the following:
● You can create split-screen effects simply with the presets available
● It helps you to add Elements to enhance your video quality
● Includes several transitions presets
Steps to convert video to audio with Filmora:

Step 1: Import the video footage to the ‘Media’ box in Wondershare Filmora Video Editor
Step 2: Drag the clip to the Timeline
Step 3: Trim the video as/if needed
Step 4: Get to the ‘Export’ box
Step 5: Choose ‘MP3’ from the ‘Local’ tab’s ‘Format’ list
Step 6: Hit the ‘EXPORT’ tab to start the conversion process
Supported Audio Formats: Filmora supports all major audio formats as a video to audio converter.
Supported Platforms: Filmora is available for both Mac and Windows computers.
Wondershare Filmora
Get started easily with Filmora’s powerful performance, intuitive interface, and countless effects!
Try It Free Try It Free Try It Free Learn More >
Pros
● It can be an alternative to other expensive apps such as Adobe Premiere Pro, Final Cut Pro X, etc.
● Can create a device or portal-specific videos like iPhone, iPad, Samsung, YouTube, Vimeo, etc.
Cons
● Direct video to audio conversion can produce files only in MP3 format
Key Takeaways from This Episode
● Understanding top 8 tools to convert video to audio
● 5 rules to choose the top-rated video to audio converter app
● Finding the all-rounder video to audio converter: Wondershare Filmora
Suppose you possess a documentary or a film clip of your favorite music track where the voice narration is more crucial and informative than its visuals. In that case, you can save a decent amount of space on your storage device with a practical video to audio converter app.
Keeping in mind all the above complexities, you will learn about our top 8 videos to audio converter apps, including our five must-follow to select the best among them.
In this article
01 [Best 8 Video to Audio Converter App](#Part 1)
02 [5 Ways to Choose Video to Audio Converter App](#Part 2)
Part 1 Best 8 Video to Audio Converter App
01Video to MP3 – Trim, and Convert
Let’s start with a simple yet beautifully designed video to audio converter app with all the options displayed well on the home screen. You can choose a video file from your device, YouTube video, or play previously converted audio files. In addition, you can choose to save the audio files directly to the SD card to avoid cluttering of native storage space.
The app is simple, with conversion done within a few seconds. The app also supports audio bitrates of up to 320 kb/s and offers high-quality MP3 output. This is a Play Store free-to-download app with ads on board. You will need a smartphone with at least Android 4.1 to use the app.
Features
● Compatible with all Video formats such as MP4, AVI, FLV, MKV, MPEG,3GP, M4V, MOV, MPG, etc.
● Save Your MP3 files in Sdcard Folder.
● It supports All ARM(CPU) devices.
Pros
● Easy to use
● Great compatibility
● Fast conversion
Cons
● It May does not work well often
● Pop up ads
● It May does not work well for extensive size content
02Accountlab Video to MP3 Converter
This is a slick video to audio converter app that, in addition to letting you convert videos to audio, the app also acts as a very decent audio/video editor. With good compatibility for audio bitrates of up to 320 kb/s, this video to audio converter app matches some best apps and their features out there. You can easily modify or edit video files and play them back on the app to hone your editing skills.
It has an audio cutter feature to create custom ringtones for your device. Also, it’s a free-to-download app on the Google Play Store but comes with ads. Finally, the app works with Android 2.3.3 or above devices, particularly older Android tablets and smartphones.
Features
● Supports Video formats including WMV, MP4, 3gp, Flv , avi etc.
● Integrated MP3 Cutter for making Ringtone.
● Supports Bitrate 48 kb/s , 64 kb/s , 128 kb/s , 192 kb/s , 256 kb/s , 320 kb/s.
Pros
● Simple user interface
● Fast conversion
● One tap to play music files
Cons
● Lack of batch conversion
● Inefficient video editor
● Not suitable for other features than conversion
03Video MP3 Converter
This is yet another multi-purpose video to audio converter app on our list of top 8. It can help you trim audios and videos in addition to MP3 conversion and edit the converted file’s metadata (artist information, tags, etc.).
The app is also said to be the quickest video to audio converter apps available out there, although we can’t vouch for their claim. The settings and other options on the app are well framed, so it doesn’t take much time to get used to the layout.
Using this app, you can convert videos formats like 3GP, MP4, WEBM, FLV, and WMV. Additionally, this app is entirely free to use and download if you’re OK with a few ads. Finally, the app works on devices running Android 4.1 and more.
Features
● Supported video formats: MP4, 3GP, WEBM, WMV, FLV
● Supported audio formats: MP3, OGG
● Supports editing MP3 metadata
Pros
● Interactive user interface
● Good compatibility
● Fast conversion
Cons
● Lack of other features
● It contains lots of pop up ads
● Loss in quality after conversion
04MP3 Cutter and Merger by InShot
The program lets you do everything that a standard video to audio converter app should, and more. The app not only converts videos into full MP3s but also lets you choose among parameters like frequency, channel (stereo or otherwise), and the volume of the original track.
Users can use their editing skills extensively with the increased audio controls. The app also assists you in trimming and cutting video files, which is an excellent feature.
The user interface is quite innovative here, unlike some of the other apps we’ve mentioned above. The app is free to download on the Google Play Store but is ad-supported and has in-app purchases.
Features
● Video cutter and mute audio
● Merge multiple audios
● Sound boost to increase the volume
Pros
● All in one media converter
● Interactive user interface
● It also contains other editing features
Cons
● Sound quality may ruin after boost
● Not suitable for lengthy projects
● Slow processing
05MP3 Converter – Audio Extractor
This MP3 Converter – Audio Extractor helps convert video to audio iPhone and requires you to choose a file and begin the conversion process. You won’t even have to state the output format because MP3 is the app’s default output format.
After the conversion, there’s an option to preview the file you have created to make sure the quality level is pretty satisfying. However, it doesn’t support adjusting the output file’s bitrate or modifying other settings to increase the quality of the resultant audio.
Moreover, the app provides only modest file-sharing options, and you may have to go for an in-app purchase if you wish to gain access to all the functions that the MP3 Converter – Audio Extractor has to offer.
Features
● It supports most video formats.
● Support to most audio formats.
● Widget to quickly import video or play recent audio
Pros
● Good in cutting/editing music
● Fantastic user interface
● Fast and easy to use
Cons
● The app may take time to launch
● It doesn’t contain advanced editing features
● Need two devices for conversion
06Media Converter – Video to MP3
Despite the audio extraction from video, you can use the inbuilt media player of this video to audio converter app to listen to music or watch videos. Media Converter – Video to MP3 is compatible with various input file formats, and it lets you transform to M4A, MP3, WAV, and other audio file formats.
However, this app lacks more advanced MP4 to MP3 file conversion options since you can’t add tags to them or choose the preferred bitrate of the output files. The app consists of different ads, and you must invest in an in-app purchase for premium features. Even the Media Converter – Video to MP3’s pro version doesn’t offer file-sharing options.
Features
● Audio extraction: Extracts audio from the video, Output format: MP3, M4A, OGG, WAV, FLAC, WMA, AIFF, CAF, ADX, AC3, M4R
● Video format conversion, Output format: MP4, MOV, 3GP, 3G2, ASF, MKV, VOB, MPEG, WMV, FLV, AVI
● Video compression: Video size cropping, clip video
Pros
● Supports all formats
● Interactive user interface
● Good compatibility
Cons
● Lack of advanced features
● Slow audio extraction
● It doesn’t support batch conversion
07Video to MP3 – Convert Audio
This video to audio converter iPhone app helps transform all videos stored on your phone’s camera roll, or you can upload a video from One Drive, Dropbox, iCloud, and various online hosting platforms.
Video to MP3: Convert Audio helps you adjust the beginning and ending points of the new file of audio, which means that you can convert only a section of an MP4 video file to MP3. The output can easily be shared on social media or messaging apps and various other devices using the iTunes File Sharing feature.
Features
● Get custom bitrate, sample rate, volume
● It supports audio track selection
● Specify start and end with any position
Pros
● Accessible converter
● Good user interface
● Advanced premium features
Cons
● A bit confusing
● Slow processing
● Pop up ads
07MP4, MP3 Video Audio Cutter, Trimmer & Converter
It is our fastest pick-in video to audio converter app in the market that assists you in trimming or cutting both audio and video. It can also convert from almost all video formats to audios out there with namely the supported formats like MP3, M4A, M4B, AC3, WAV, OGG, FLAC, MP4, MKV, AVI, 3GP, FLV, MOV, WEBM, M2TS, TS, MTS, MPEG.
Moreover, the app supports batch audio file conversion as well.
Features
● Trim & Cut audio files
● Trim & Cut video files
● Batch file conversion
Pros
● Good user interface
● Good compatibility
● Support to batch conversion
Cons
● Lots of popup ads
● Sometimes slow processing
● Lack of other advanced features
Part 2 5 Ways to Choose Video to Audio Converter App
Before selecting the ideal video to audio converter app or video to audio converter apk, there are different sections or points you need to consider for selection. So, let’s read them out without any further ado!
01Excellent user interface
Of course, the user interface is the primary essential feature you should be looking for in any video to audio converter app out there. Interaction with the interface is all that counts, and any complexity within this process automatically halts the ultimate performance.
02Compatibility with different audio formats
The next important thing is to consider how compatible your app is in reality. Will it be able to convert to different audio formats or not? How many audio formats are supported by the app? So, every time you convert video to audio, you need to check your requirements beforehand so as not to confuse with the formats later on.
03Processing speed
Yes, it would be best not to overlook the processing speed. The processing speed determines the likability of your end project because time is a precious element in the life of everyone. So, consider the time consumed for conversion and how much wastage of time you can afford.
04Platform compatibility
Platform compatibility refers to the devices or operating systems a particular app is comfortable with. Here, we mainly look for compatibility with Windows, Mac, iPhone, and Android. So, the best is what goes well with almost every OS or device or is compatible with both Windows and Mac simultaneously.
05Other features
Other features could represent the additional or advanced features a particular video to audio converter app consists of. It’s also because you may be looking to enhance that extracted audio, mainly on the same platform, again concerning time. This is why finding an all-rounder video to converter app is challenging but not impossible.
Filmora is a go-to alternative to full-fledged post-production applications like Final Cut Pro X, Adobe Premiere Pro, etc., and can be used to create industry-standard outputs.
Some other features that Filmora consists of the following:
● You can create split-screen effects simply with the presets available
● It helps you to add Elements to enhance your video quality
● Includes several transitions presets
Steps to convert video to audio with Filmora:
Step 1: Import the video footage to the ‘Media’ box in Wondershare Filmora Video Editor
Step 2: Drag the clip to the Timeline
Step 3: Trim the video as/if needed
Step 4: Get to the ‘Export’ box
Step 5: Choose ‘MP3’ from the ‘Local’ tab’s ‘Format’ list
Step 6: Hit the ‘EXPORT’ tab to start the conversion process
Supported Audio Formats: Filmora supports all major audio formats as a video to audio converter.
Supported Platforms: Filmora is available for both Mac and Windows computers.
Wondershare Filmora
Get started easily with Filmora’s powerful performance, intuitive interface, and countless effects!
Try It Free Try It Free Try It Free Learn More >
Pros
● It can be an alternative to other expensive apps such as Adobe Premiere Pro, Final Cut Pro X, etc.
● Can create a device or portal-specific videos like iPhone, iPad, Samsung, YouTube, Vimeo, etc.
Cons
● Direct video to audio conversion can produce files only in MP3 format
Key Takeaways from This Episode
● Understanding top 8 tools to convert video to audio
● 5 rules to choose the top-rated video to audio converter app
● Finding the all-rounder video to audio converter: Wondershare Filmora
Extracting Still Images From Videos: 10 Reliable Converters
Video to Image: How to Convert Videos to Photos

Ollie Mattison
Mar 27, 2024• Proven solutions
If a video is recorded at the standard frame rate , each second of that video will contain 24 individual images or frames. Nearly all modern video editing software products grant you access to each frame a video clip contains, which can be quite useful if you want to create a quick preview of the footage you are editing.
Even though converting a video to a photo is not something you can do, creating JPEG on PNG image files from the video you recorded with a smartphone or a professional video camera takes only a few moments of your time. Read on if you would like to learn how to extract still images from video clips in desktop-based and online video converters.
- Part 1: Convert Video to Still Images on Windows on Mac with Offline Software
- Part 2: Convert Video to JPG/PNG Images Online
Part 1: Converting Videos to JPEG and PNG Images with Desktop Video Converters for macOS and Windows
Exporting a single frame of a video clip is an easy task even amateur photo and video editors can perform effortlessly. Mac and PC users have a broad range of options at their disposal if they want to make still images from their videos. Let’s have a look at some of the best video converters you can use to capture still frames and create JPEG or PNG files.
1. Wondershare Filmora
Filmora is a video editing software that also offers the option to capture frames of all video clips you use in your projects after you launch the Filmora video editor, import a video file that contains the frames you would like to save as still images.
To extract still images with the original high quality, you can import and place these videos to Project Media and then double-click it to preview. In the preview window, click the Camera icon located in the lower right corner to take a snapshot. It is worth noting that you can only create PNG files with this video editing software, and you may need to change the photo format if PNG isn’t your choice.

Alternatively, you can use the CTRL+ALT+S keyboard shortcut to take a snapshot of the frame in a video clip. The image you created will be added to the Media tab automatically, and you can proceed to right-click on it and select the Reveal in Explorer option to gain access to the original file.
To extract still image from the video frame by frame, you can add the media asset to the timeline and use the playhead to find the frame you would like to extract from the video. When done, leave the playhead at the location on the timeline where the frame is located, and then click on the Snapshot icon.
Below is the video tutorial about how to convert Video to Images Filmora.
Download Mac Version ](https://tools.techidaily.com/wondershare/filmora/download/ )
2. Adobe Photoshop
This is arguably the best photo editing software ever created that grants you access to all the tools you need to manipulate pictures as you see fit. Adobe Photoshop also enables its users to edit videos, although in a limited capacity. In order to turn a video into a series of separate frames, you just have to import a video file into Adobe Photoshop by clicking on the file menu and selecting the Import option.

The video clip is going to be displayed on the timeline that is located at the bottom of the screen and you just have to specify the segment of that file you would like to break down into frames. You can do this by dragging the handles located above the video clip that allows you to set the start and end of the work area.

When done, head over to the File menu, and select the Render Video option from the Export submenu. After the Render Video window pops up on the screen, you have to change the Adobe Media Encoder option to Photoshop Image Sequence and then click on the Render button. You should keep in mind that the photo editor is going to create separate image files for all the frames that were within the work area you defined, which is why it is important to reduce the work area to the minimum in order to avoid generating hundreds of JPEG images.
3. VLC Media Player
Extracting still frames with VLC media players is a technical process that will require some understanding of the video editing process. Even so, you can still use this open-source software to generate PNG or JPEG files from your videos.

Select the Preferences option from the Tools menu and then click on the Video tab. Make sure that the All option is selected under Show Settings and scroll down until you find the Filters option and expand this menu. Locate the Scene Filter, click on it and then proceed to specify the format in which your images are going to be saved and adjust the Recording Ratio.
Click on the Save button to confirm the changes, then go back to the Filter submenu, and this time you should click on it rather than expand it. Locate the Scene Video filter, make sure that the checkbox next to it is selected, and click OK to complete the process.

Next time you play a video in VLC the media player will automatically capture still frames at the recording ratio you specified.
4. Free Video to JPEG Converter
If you are looking for a quick and free way to create still images from videos, this Windows-based tool is one of the least complicated options PC users have at their disposal. After you open Free Video to JPEG Converter you just have to click on the Add Files button and import a video from which you would like to extract still frames.

You can then specify the frequency at which frames are going to be extracted and see the total number of frames that are going to be created from your video. Afterward, you just have to specify the location at which the still frames are going to be saved and click on the Convert button.
5. Virtual Dub
Before you can start extracting still frames from videos with Virtual Dub, you must first install the FFMpeg plugin pack because this video converter cannot open common video file formats like MP4 or MOV. Installing this plugin can get a little technical, but it is far from being complicated. Afterward, you just have to launch Virtual Dub and import the video you would like to use to create JPEG files by clicking on the File menu and selecting the Open option.

Select the Frame Rate option from the Video menu and make sure that the checkbox next to the Decimate by setting is selected. Insert the frequency at which still frames are going to be captured into the box next to the Decimate by setting and click on the OK button. Head over to the File menu and select the Image Sequence option from the Export submenu. Before you start extracting still frames from a video you just have to select the file format of the output files, and then wait for Virtual Dub to complete the process.
Part 2: Converting Videos to JPEG or PNG Images Online
In case you don’t have access to a video or photo editing software and the process of extracting still frames from videos with VLC Media Player or Virtual Dub is too technical for you, there are a number of online solutions you can try. Here are some of the best web-based platforms you can use to convert videos to JPEG or PNG images.
1. Online-Convert
This file conversion platform enables you to convert audio files, documents, and eBooks, but its video to photo conversion options are not the best. You have to select the Image Converter tool and then choose the output format of the images you want to extract from the video. You can then upload a video file from Dropbox, Google Drive, or your computer’s hard drive.

Before the conversion, you can adjust the Quality Settings and choose if the compression is going to be high, medium, or low, but you must be logged in to save these changes. Click on the Start Conversion button when ready, and wait for the platform to process your video. Each frame of the video you uploaded is going to be converted into a photo and you can choose how many images you want to download or delete.
2. AConvert
Converting virtually any type of file with AConvert is easy, which means that you won’t have much trouble extracting JPEG files from your video. After you arrive at AConvert’s home page, you just have to click on the Image option and then choose if you want to import a file from your computer or cloud storage. The maximum size of the video file you can upload to AConvert is limited to just 200MB.

Once the video file you selected is uploaded to the platform you can choose the output file format and decide if you want to resize the images during the conversion or keep their original size. Click on the Convert Now button and then download the image files once the still frames are extracted from the video.
3. Online Converter
Online Converter offers a variety of image conversion options and it even enables you to convert raw format photos into JPEGs. Its Video to JPEG tool supports nearly all common video file formats, which enables you to extract still frames from videos without having to worry about their compatibility with this tool. You can either upload a video via URL or from a local hard drive, but its size cannot be larger than 200 MB.

The platform lets you choose if you want to cut a video clip, change its frame size or adjust its quality. Once you fine-tune all the settings click on the Convert button to start creating JPEG files from a video and then download the images to your computer.
4. IMG2GO
Editing or converting images with IMG2GO doesn’t require you to have any previous experience, since all the tools this platform offers are easy to use. Convert to JPEG tool can break down an entire video clip into photos in just a few moments. All you have to do is upload a file to the platform, adjust the settings and click on the Start button that is located at the bottom of the page.

The number of JPEG files IMG2GO will generate depends on the duration of the clip, which is the reason why it is better to extract still frames from shorter videos. Once the conversion process is completed you can choose if you want to save the images on the cloud or to a local hard drive.
5. Kapwing
Kapwing offers a collection of video editing tools you can use to merge multiple video clips together, add audio to video files or create subtitles. The Convert Video tool lets create MP3, GIF, JPEG, or MP4 files from a video file.

After you upload a video to Kapwing you just have to click on the JPEG option and use the slider below the Preview Window to specify the frame you want to convert into a photo. Click on the Create button and then proceed to share the image you created on social media or download it to your computer. Keep in mind that all still frames are going to be watermarked if you are not signed in to your Kapwing account.
You may also like: How to Convert SWF to MP4 Free for Windows/Mac/Online >>
Conclusion
Extracting a still frame is a routine task that requires a minimum amount of time or effort regardless of the tool you are using to perform this task. Even so, how fast this process is going to be, depends on the video converter you choose. Which video converter do you use to convert videos to JPEG or PNG images? Leave a comment below and let us know.
Ollie Mattison
Ollie Mattison is a writer and a lover of all things video.
Follow @Ollie Mattison
Ollie Mattison
Mar 27, 2024• Proven solutions
If a video is recorded at the standard frame rate , each second of that video will contain 24 individual images or frames. Nearly all modern video editing software products grant you access to each frame a video clip contains, which can be quite useful if you want to create a quick preview of the footage you are editing.
Even though converting a video to a photo is not something you can do, creating JPEG on PNG image files from the video you recorded with a smartphone or a professional video camera takes only a few moments of your time. Read on if you would like to learn how to extract still images from video clips in desktop-based and online video converters.
- Part 1: Convert Video to Still Images on Windows on Mac with Offline Software
- Part 2: Convert Video to JPG/PNG Images Online
Part 1: Converting Videos to JPEG and PNG Images with Desktop Video Converters for macOS and Windows
Exporting a single frame of a video clip is an easy task even amateur photo and video editors can perform effortlessly. Mac and PC users have a broad range of options at their disposal if they want to make still images from their videos. Let’s have a look at some of the best video converters you can use to capture still frames and create JPEG or PNG files.
1. Wondershare Filmora
Filmora is a video editing software that also offers the option to capture frames of all video clips you use in your projects after you launch the Filmora video editor, import a video file that contains the frames you would like to save as still images.
To extract still images with the original high quality, you can import and place these videos to Project Media and then double-click it to preview. In the preview window, click the Camera icon located in the lower right corner to take a snapshot. It is worth noting that you can only create PNG files with this video editing software, and you may need to change the photo format if PNG isn’t your choice.
Alternatively, you can use the CTRL+ALT+S keyboard shortcut to take a snapshot of the frame in a video clip. The image you created will be added to the Media tab automatically, and you can proceed to right-click on it and select the Reveal in Explorer option to gain access to the original file.
To extract still image from the video frame by frame, you can add the media asset to the timeline and use the playhead to find the frame you would like to extract from the video. When done, leave the playhead at the location on the timeline where the frame is located, and then click on the Snapshot icon.
Below is the video tutorial about how to convert Video to Images Filmora.
Download Mac Version ](https://tools.techidaily.com/wondershare/filmora/download/ )
2. Adobe Photoshop
This is arguably the best photo editing software ever created that grants you access to all the tools you need to manipulate pictures as you see fit. Adobe Photoshop also enables its users to edit videos, although in a limited capacity. In order to turn a video into a series of separate frames, you just have to import a video file into Adobe Photoshop by clicking on the file menu and selecting the Import option.
The video clip is going to be displayed on the timeline that is located at the bottom of the screen and you just have to specify the segment of that file you would like to break down into frames. You can do this by dragging the handles located above the video clip that allows you to set the start and end of the work area.
When done, head over to the File menu, and select the Render Video option from the Export submenu. After the Render Video window pops up on the screen, you have to change the Adobe Media Encoder option to Photoshop Image Sequence and then click on the Render button. You should keep in mind that the photo editor is going to create separate image files for all the frames that were within the work area you defined, which is why it is important to reduce the work area to the minimum in order to avoid generating hundreds of JPEG images.
3. VLC Media Player
Extracting still frames with VLC media players is a technical process that will require some understanding of the video editing process. Even so, you can still use this open-source software to generate PNG or JPEG files from your videos.
Select the Preferences option from the Tools menu and then click on the Video tab. Make sure that the All option is selected under Show Settings and scroll down until you find the Filters option and expand this menu. Locate the Scene Filter, click on it and then proceed to specify the format in which your images are going to be saved and adjust the Recording Ratio.
Click on the Save button to confirm the changes, then go back to the Filter submenu, and this time you should click on it rather than expand it. Locate the Scene Video filter, make sure that the checkbox next to it is selected, and click OK to complete the process.
Next time you play a video in VLC the media player will automatically capture still frames at the recording ratio you specified.
4. Free Video to JPEG Converter
If you are looking for a quick and free way to create still images from videos, this Windows-based tool is one of the least complicated options PC users have at their disposal. After you open Free Video to JPEG Converter you just have to click on the Add Files button and import a video from which you would like to extract still frames.
You can then specify the frequency at which frames are going to be extracted and see the total number of frames that are going to be created from your video. Afterward, you just have to specify the location at which the still frames are going to be saved and click on the Convert button.
5. Virtual Dub
Before you can start extracting still frames from videos with Virtual Dub, you must first install the FFMpeg plugin pack because this video converter cannot open common video file formats like MP4 or MOV. Installing this plugin can get a little technical, but it is far from being complicated. Afterward, you just have to launch Virtual Dub and import the video you would like to use to create JPEG files by clicking on the File menu and selecting the Open option.
Select the Frame Rate option from the Video menu and make sure that the checkbox next to the Decimate by setting is selected. Insert the frequency at which still frames are going to be captured into the box next to the Decimate by setting and click on the OK button. Head over to the File menu and select the Image Sequence option from the Export submenu. Before you start extracting still frames from a video you just have to select the file format of the output files, and then wait for Virtual Dub to complete the process.
Part 2: Converting Videos to JPEG or PNG Images Online
In case you don’t have access to a video or photo editing software and the process of extracting still frames from videos with VLC Media Player or Virtual Dub is too technical for you, there are a number of online solutions you can try. Here are some of the best web-based platforms you can use to convert videos to JPEG or PNG images.
1. Online-Convert
This file conversion platform enables you to convert audio files, documents, and eBooks, but its video to photo conversion options are not the best. You have to select the Image Converter tool and then choose the output format of the images you want to extract from the video. You can then upload a video file from Dropbox, Google Drive, or your computer’s hard drive.
Before the conversion, you can adjust the Quality Settings and choose if the compression is going to be high, medium, or low, but you must be logged in to save these changes. Click on the Start Conversion button when ready, and wait for the platform to process your video. Each frame of the video you uploaded is going to be converted into a photo and you can choose how many images you want to download or delete.
2. AConvert
Converting virtually any type of file with AConvert is easy, which means that you won’t have much trouble extracting JPEG files from your video. After you arrive at AConvert’s home page, you just have to click on the Image option and then choose if you want to import a file from your computer or cloud storage. The maximum size of the video file you can upload to AConvert is limited to just 200MB.
Once the video file you selected is uploaded to the platform you can choose the output file format and decide if you want to resize the images during the conversion or keep their original size. Click on the Convert Now button and then download the image files once the still frames are extracted from the video.
3. Online Converter
Online Converter offers a variety of image conversion options and it even enables you to convert raw format photos into JPEGs. Its Video to JPEG tool supports nearly all common video file formats, which enables you to extract still frames from videos without having to worry about their compatibility with this tool. You can either upload a video via URL or from a local hard drive, but its size cannot be larger than 200 MB.
The platform lets you choose if you want to cut a video clip, change its frame size or adjust its quality. Once you fine-tune all the settings click on the Convert button to start creating JPEG files from a video and then download the images to your computer.
4. IMG2GO
Editing or converting images with IMG2GO doesn’t require you to have any previous experience, since all the tools this platform offers are easy to use. Convert to JPEG tool can break down an entire video clip into photos in just a few moments. All you have to do is upload a file to the platform, adjust the settings and click on the Start button that is located at the bottom of the page.
The number of JPEG files IMG2GO will generate depends on the duration of the clip, which is the reason why it is better to extract still frames from shorter videos. Once the conversion process is completed you can choose if you want to save the images on the cloud or to a local hard drive.
5. Kapwing
Kapwing offers a collection of video editing tools you can use to merge multiple video clips together, add audio to video files or create subtitles. The Convert Video tool lets create MP3, GIF, JPEG, or MP4 files from a video file.
After you upload a video to Kapwing you just have to click on the JPEG option and use the slider below the Preview Window to specify the frame you want to convert into a photo. Click on the Create button and then proceed to share the image you created on social media or download it to your computer. Keep in mind that all still frames are going to be watermarked if you are not signed in to your Kapwing account.
You may also like: How to Convert SWF to MP4 Free for Windows/Mac/Online >>
Conclusion
Extracting a still frame is a routine task that requires a minimum amount of time or effort regardless of the tool you are using to perform this task. Even so, how fast this process is going to be, depends on the video converter you choose. Which video converter do you use to convert videos to JPEG or PNG images? Leave a comment below and let us know.
Ollie Mattison
Ollie Mattison is a writer and a lover of all things video.
Follow @Ollie Mattison
FCPX Skin Retouching: A Plugin-Free Guide to Flawless Complexions
Full Guide: How to Add a Skin Smoother Effect with Final Cut Pro

Liza Brown
Mar 27, 2024• Proven solutions
It’s quite common for vloggers to try to show the best of their states. However, makeup, weather, and the shooting equipment may disagree. So, how to tackle this problem?

Fortunately, we have the best solutions to fix the skin tone issue by using FCPX’s built-in tools or smooth skin plugins. You will learn how to strategically adjust your footage’s look for stylistic purposes and impress your audience with your video-editing skills. Now, let’s understand what a skin smoother effect is before learning how to add it in FCPX.
Part 1: How to Add a Skin Smoother Effect without Plugins in Final Cut Pro?
Smoothening the skin in Final Cut Pro is very simple. Simply select the video, choose Video effects to be applied, and adjust the percentages from the Inspector pane. You will get wrinkle-free skin with an astonishing look. While multiple plugins are also available to apply a skin smoother effect, you can use the built-in features of Final Cut Pro to smoothen the skin and decrease the amount of contrast.
Here’s how you can do this:
step1Choose the starting image and edit the clip into the timeline. Press Option and make a connected copy of the clip by dragging it up. The start and end points should match for syncing. In the Effects Browser, drag Blur > Gaussian Blur to apply the blur effect on the upper clip.

step2Open the Inspector pan and select Compositing from its bottom. Switch the Blend Mode to Lighten and adjust the Opacity slider as per your desired glow. Usually, 40 to 45% is ideal.

step3Now, go to the top of the Inspector and turn on the blue checkbox next to Gaussian. Adjust the blurring effect until you achieve your desired level of skin softening. It is highly recommended to blur using the horizontal setting to soften the skin while keeping the eyes sharp. Here, the glow is controlled by Opacity while skin softening is controlled by the Blue Amount.

For better results, add a Vignette by selecting and combining the two clips into a Compound Clip. From the Effects Browser, select Stylize > Vignette and adjust drag the vignette. Now, customize the compound clip settings in the Inspector pane until you achieve your desired look. Compare the results between two images before and after editing
Part 2: Where to Find Good Skin Smoother Plugins?
Plugins make it easy for beginners and users with limited expertise to add a skin smoother effect in Final Cut Pro X. You can find both free and paid skin smoother plugins for FCPX online. Given below are some popular skin smoothening plugins for Final Cut Pro X.
- Skin Smoother 2
Skin Smoother 2 is a powerful and easy-to-use plugin that allows you to smooth out unwanted skin details and enhance your facial appearance.
Price: $19.99 (One-time Charges)
Software Requirements: FCP 10.2 or later
Features:
- Enhanced control over facial adjustments with fine-tuning giving more natural results;
- Precise color sampling without a need to match up with present skin tones; and
- 3 to 5 times faster rendering.
- Color Finale
Color Finale is a user-friendly, fine-tuned, and fully-featured professional skin smoother plugin purpose bit for FCP.

Price: $152
Software Requirements: FCP 10.4.8 - 10.5.1
Features:
- Color wheels, curves, and LUT utilities;
- A complete professional color toolset for videographers, colorists, and editors; and
- Allows personal preference on the interface.
- Universe
A comprehensive FCP tool with 89 individual plugins to apply the next-generation skin smoothening and facial improvement effects.
Price: $199/year
Software Requirements: FCPX 10.5 or later
Features:
- Advanced transitions and effects and motion graphics tools;
- A variety of cool presents and text generators; and
- Number counters, chromatic aberration, VHS looks, camera shake, glitch effects.
Part 3: How to adopt Skin Smoothing Plugins into FCPX?
Follow these steps to use the Skin Smooth 2 Plugin for Final Cut Pro X:
- Purchase and download the Skin Smoother 2 plugin. Go to downloads, unzip the folder containing the plugin and install it on your computer.
- Open the FCPX, go to Effects, and click on Skin Smoother 2. A list of options will appear. Import the image or video you want to edit.

- To apply the skin-smoothing effect, click on Add Color Mask, and select the areas of the face where the color mask has to be added.
- Adjust the Skin Smoothing, Smoothing Mix, and the Softness of the color mask as per your requirements.
- Finally, click on Add Shape Mask, two circles will appear on the image. Adjust the covering area of both circles for Shape Mask 1 to add a smiling face.


Part 4: How to Smooth Skin in Filmora?
Wondershare Filmora features advanced tuning tools and a variety of video filters and overlays. Learn how to smooth skin or beautify your face in the video with this advanced video-editing software.
- Open Filmora, open New Project and click Import to load your videos to the timeline.
- Double click on the video to open the editing window. Open the Color panel and adjust parameters according to your preference such as white balance, tone, and 3D LUT, etc.
- Open the toolbar, click the Advanced Color Tuning icon, go to the advanced color tuning window, and adjust the white balance, color tint and temperature, HSL, 3D LUT, Vignette, and Light. If you are a beginner, try applying the present templates.
- To set a specific tone or beautify your video, open the Tools tab and click the Color Correction option to change the color tones.
- Open Effects and Transitions and select the skin smooth filter. Hover the cursor over the filter and click the plus icon in the middle to add that effect. You can also apply the effect to the whole clip by dragging and dropping it directly onto the video clip.
Part 5: How to smooth skin in Adobe Pro?
Given below are simple steps to create a face matter, control the skin smoothing, adjust color correction, and correct the skin glow in Adobe Pro by using the Beauty Studio Effect:
- Applying the Beauty Studio effect smoothens all parts of the image including the background. However, it will make your footage look artificial, which is not desired. Hence, turn on the Pixel Chooser, pick two colors with the eye dropper tool. Color A for the darker area and Color B for the lighter area.
- Underneath the Mocha Matte, use the eyedropper tool to select colors on the skin of the subject in your footage.
- Now, click on View Matte/Mask to visualize the image areas where you are applying the skin smoothing effect. The Beauty Studio will affect the smoothing effect in the white area while the black area will remain unsmoothed.
- Adjust the Saturation, Hue, and Luma softness to enhance the appearance of the skin, eyes, and mouth.
- To prevent the rest of the image from getting affected, create a Mocha mask around the face by clicking on the Mocha logo and drawing a mask with the X-Spline tool. Make sure the mask moves as the subject is moved after your track forward and back.
- Beauty Studio offers four levels of skin smoothing. You can adjust these levels as per your situation by lowering the smoothing amount for each level. For better results, adjust the levels at 70 or below.
- For the final touch, adjust the sharpening between 10-20 points, add saturation between 3 to 8 points for color correction, and add 5 to 10 points of glow. Your image is ready, compare the results before and after applying the effect.
Conclusion
Smooth skin with clear facial expressions attracts everyone. You can apply a skin smooth effect in your video by using advanced video editing tools like Final Cut Pro, Adobe Premium, and Wondershare Filmora.
There are two methods to add a skin smooth effect with FCPX: By using in-built software settings, or by using plugins like Skin Smoother 2, Color Finale, and Universe. Use Beauty Studio Effect in Adobe Pro to smooth skin and improve facial appearance. Finally, you can beautify the face in your video by adding transitions, making color adjustments, and applying different effects with Wondershare Filmora.
Liza Brown
Liza Brown is a writer and a lover of all things video.
Follow @Liza Brown
Liza Brown
Mar 27, 2024• Proven solutions
It’s quite common for vloggers to try to show the best of their states. However, makeup, weather, and the shooting equipment may disagree. So, how to tackle this problem?
Fortunately, we have the best solutions to fix the skin tone issue by using FCPX’s built-in tools or smooth skin plugins. You will learn how to strategically adjust your footage’s look for stylistic purposes and impress your audience with your video-editing skills. Now, let’s understand what a skin smoother effect is before learning how to add it in FCPX.
Part 1: How to Add a Skin Smoother Effect without Plugins in Final Cut Pro?
Smoothening the skin in Final Cut Pro is very simple. Simply select the video, choose Video effects to be applied, and adjust the percentages from the Inspector pane. You will get wrinkle-free skin with an astonishing look. While multiple plugins are also available to apply a skin smoother effect, you can use the built-in features of Final Cut Pro to smoothen the skin and decrease the amount of contrast.
Here’s how you can do this:
step1Choose the starting image and edit the clip into the timeline. Press Option and make a connected copy of the clip by dragging it up. The start and end points should match for syncing. In the Effects Browser, drag Blur > Gaussian Blur to apply the blur effect on the upper clip.
step2Open the Inspector pan and select Compositing from its bottom. Switch the Blend Mode to Lighten and adjust the Opacity slider as per your desired glow. Usually, 40 to 45% is ideal.
step3Now, go to the top of the Inspector and turn on the blue checkbox next to Gaussian. Adjust the blurring effect until you achieve your desired level of skin softening. It is highly recommended to blur using the horizontal setting to soften the skin while keeping the eyes sharp. Here, the glow is controlled by Opacity while skin softening is controlled by the Blue Amount.
For better results, add a Vignette by selecting and combining the two clips into a Compound Clip. From the Effects Browser, select Stylize > Vignette and adjust drag the vignette. Now, customize the compound clip settings in the Inspector pane until you achieve your desired look. Compare the results between two images before and after editing
Part 2: Where to Find Good Skin Smoother Plugins?
Plugins make it easy for beginners and users with limited expertise to add a skin smoother effect in Final Cut Pro X. You can find both free and paid skin smoother plugins for FCPX online. Given below are some popular skin smoothening plugins for Final Cut Pro X.
- Skin Smoother 2
Skin Smoother 2 is a powerful and easy-to-use plugin that allows you to smooth out unwanted skin details and enhance your facial appearance.
Price: $19.99 (One-time Charges)
Software Requirements: FCP 10.2 or later
Features:
- Enhanced control over facial adjustments with fine-tuning giving more natural results;
- Precise color sampling without a need to match up with present skin tones; and
- 3 to 5 times faster rendering.
- Color Finale
Color Finale is a user-friendly, fine-tuned, and fully-featured professional skin smoother plugin purpose bit for FCP.
Price: $152
Software Requirements: FCP 10.4.8 - 10.5.1
Features:
- Color wheels, curves, and LUT utilities;
- A complete professional color toolset for videographers, colorists, and editors; and
- Allows personal preference on the interface.
- Universe
A comprehensive FCP tool with 89 individual plugins to apply the next-generation skin smoothening and facial improvement effects.
Price: $199/year
Software Requirements: FCPX 10.5 or later
Features:
- Advanced transitions and effects and motion graphics tools;
- A variety of cool presents and text generators; and
- Number counters, chromatic aberration, VHS looks, camera shake, glitch effects.
Part 3: How to adopt Skin Smoothing Plugins into FCPX?
Follow these steps to use the Skin Smooth 2 Plugin for Final Cut Pro X:
- Purchase and download the Skin Smoother 2 plugin. Go to downloads, unzip the folder containing the plugin and install it on your computer.
- Open the FCPX, go to Effects, and click on Skin Smoother 2. A list of options will appear. Import the image or video you want to edit.
- To apply the skin-smoothing effect, click on Add Color Mask, and select the areas of the face where the color mask has to be added.
- Adjust the Skin Smoothing, Smoothing Mix, and the Softness of the color mask as per your requirements.
- Finally, click on Add Shape Mask, two circles will appear on the image. Adjust the covering area of both circles for Shape Mask 1 to add a smiling face.
Part 4: How to Smooth Skin in Filmora?
Wondershare Filmora features advanced tuning tools and a variety of video filters and overlays. Learn how to smooth skin or beautify your face in the video with this advanced video-editing software.
- Open Filmora, open New Project and click Import to load your videos to the timeline.
- Double click on the video to open the editing window. Open the Color panel and adjust parameters according to your preference such as white balance, tone, and 3D LUT, etc.
- Open the toolbar, click the Advanced Color Tuning icon, go to the advanced color tuning window, and adjust the white balance, color tint and temperature, HSL, 3D LUT, Vignette, and Light. If you are a beginner, try applying the present templates.
- To set a specific tone or beautify your video, open the Tools tab and click the Color Correction option to change the color tones.
- Open Effects and Transitions and select the skin smooth filter. Hover the cursor over the filter and click the plus icon in the middle to add that effect. You can also apply the effect to the whole clip by dragging and dropping it directly onto the video clip.
Part 5: How to smooth skin in Adobe Pro?
Given below are simple steps to create a face matter, control the skin smoothing, adjust color correction, and correct the skin glow in Adobe Pro by using the Beauty Studio Effect:
- Applying the Beauty Studio effect smoothens all parts of the image including the background. However, it will make your footage look artificial, which is not desired. Hence, turn on the Pixel Chooser, pick two colors with the eye dropper tool. Color A for the darker area and Color B for the lighter area.
- Underneath the Mocha Matte, use the eyedropper tool to select colors on the skin of the subject in your footage.
- Now, click on View Matte/Mask to visualize the image areas where you are applying the skin smoothing effect. The Beauty Studio will affect the smoothing effect in the white area while the black area will remain unsmoothed.
- Adjust the Saturation, Hue, and Luma softness to enhance the appearance of the skin, eyes, and mouth.
- To prevent the rest of the image from getting affected, create a Mocha mask around the face by clicking on the Mocha logo and drawing a mask with the X-Spline tool. Make sure the mask moves as the subject is moved after your track forward and back.
- Beauty Studio offers four levels of skin smoothing. You can adjust these levels as per your situation by lowering the smoothing amount for each level. For better results, adjust the levels at 70 or below.
- For the final touch, adjust the sharpening between 10-20 points, add saturation between 3 to 8 points for color correction, and add 5 to 10 points of glow. Your image is ready, compare the results before and after applying the effect.
Conclusion
Smooth skin with clear facial expressions attracts everyone. You can apply a skin smooth effect in your video by using advanced video editing tools like Final Cut Pro, Adobe Premium, and Wondershare Filmora.
There are two methods to add a skin smooth effect with FCPX: By using in-built software settings, or by using plugins like Skin Smoother 2, Color Finale, and Universe. Use Beauty Studio Effect in Adobe Pro to smooth skin and improve facial appearance. Finally, you can beautify the face in your video by adding transitions, making color adjustments, and applying different effects with Wondershare Filmora.
Liza Brown
Liza Brown is a writer and a lover of all things video.
Follow @Liza Brown
Also read:
- In 2024, Final Cut Pro X Audio Fundamentals Working with L-Cuts and J-Cuts
- The Ultimate Guide to Sony Vegas Alternatives for Windows
- Updated Chromebook Hacks Running Windows and Mac Video Editing Software Seamlessly
- Top 10 Online Video Editors That Wont Leave a Mark (or a Fee)
- 2024 Approved Discover the Perfect Twitter Video Size for Your Content
- In 2024, Is There Any Video Editor without Watermark? Here We Have Collected some of the Free Video Editors with No Watermark that You Can Use on Windows PC and Mac Computers
- In 2024, Boost Video Quality Best Brightness Adjustment Tools Online and Offline
- 2024 Approved Beyond GoPro Studio Top Picks for Editing Your Adventure Videos
- New Free Online Movie Creation Top 9 Picks
- GoPro Video Editing for Mac Users Tips, Tricks, and Tutorials
- Updated 8 Best Educational Animation Software for School
- Free Video Looping Apps for Endless Fun
- Ditch Adobe Premiere Rush Top 4 Video Editing Software Alternatives for 2024
- Blur Faces or Backgrounds in Videos Best Apps for iOS and Android
- Final Cut Pro Project Backup A Quick and Simple Tutorial
- Create Epic Gaming Intros Best Tools for PC and Mac Users for 2024
- 10 Free Video Editing Software for Windows 10 Trim, Cut, and More
- Smooth Operator Top Video Stabilizer Apps for 2024
- Discover the Best Top 10 Intro Maker Websites for Creators for 2024
- From Beginner to Expert The Wav Converter Blueprint
- New AVI Video Rotation Made Easy Top 5 Free Solutions
- 2024 Approved Download Royalty-Free Videos From These Top Websites
- Updated Cut, Color, and Deliver The Best Lightweight Video Editing Programs
- In 2024, Get Creative with Free Video Editing Software on Ubuntu Top 10 Picks
- Updated Best Stop Motion Apps for iOS and Android Devices
- Updated Compressor for FCPX Best Practices for Exporting and Delivering Videos
- Updated Free WebM Video Editing Software Top Picks
- Updated 5 Best Free Video Compressor Apps That Reduce Video Sizes on iPhone and iPad
- Updated The Shape of Storytelling Exploring YouTubes Aspect Ratio Options
- New Ditch Pinnacle Studio? Here Are the Best Mac Video Editing Alternatives
- IMovie for PC Explore These 10+ User-Friendly Video Editors
- Free 4K Video Editors Top Picks for Creators
- In 2024, The Ideal LinkedIn Video Aspect Ratios for Effective Posting
- New Cut to Perfection 10 Acclaimed Films Edited Exclusively with Final Cut Pro
- Best Video Invitation Apps for iOS and Android for 2024
- 2024 Approved Aspect Ratio Converter Top 10 Picks
- In 2024, Convert Soundcloud Music to MP3 with Ease Proven Methods
- 2024 Approved Gaming Intro Design Tools Best Options for Windows and Mac
- In 2024, Bring Your Ideas to Life Top 7 Animation Drawing Tools
- In 2024, DVR Showdown TiVo Takes on Comcast
- Best Gaming Intro Makers for Windows and Mac PC for 2024
- Elevate Your Editing Game 10 Best Free Plugins for FCPX
- 10 Best Free Security Camera Software 2023 Reviews
- Best Stop Motion Software Online Creators Ranked
- How to Flash Dead Honor 90 Pro Safely | Dr.fone
- In 2024, A Guide on Starting Private Live Streams on YouTube
- Hassle-Free Ways to Remove FRP Lock from Samsung Galaxy A24 Phones with/without a PC
- How to Spy on Text Messages from Computer & Huawei Nova Y91 | Dr.fone
- In 2024, The Ultimate Guide to Get the Rare Candy on Pokemon Go Fire Red On Vivo Y100i | Dr.fone
- Why does the pokemon go battle league not available On Vivo Y27 5G | Dr.fone
- In 2024, Reasons why Pokémon GPS does not Work On Motorola Edge+ (2023)? | Dr.fone
- Unlocking Made Easy The Best 10 Apps for Unlocking Your Realme 10T 5G Device
- How to Unlock Your Apple iPhone 13 Pro Passcode 4 Easy Methods (With or Without iTunes) | Dr.fone
- How To Unlink Your Apple iPhone 14 From Your Apple ID
- How To Revive Your Bricked Xiaomi Redmi 12 5G in Minutes | Dr.fone
- How To Change Vivo V30 Lock Screen Password?
- In 2024, How to fix iCloud lock on your Apple iPhone 8 and iPad
- How to Fix It Oppo F23 5G Wont Turn On | Dr.fone
- 4 Solutions to Fix Unfortunately Your App Has Stopped Error on Realme 12 5G | Dr.fone
- In 2024, How to Mirror Oppo Find N3 to Mac? | Dr.fone
- How to share/fake gps on Uber for Honor Magic5 Ultimate | Dr.fone
- Prevent Cross-Site Tracking on Tecno Phantom V Fold and Browser | Dr.fone
- How to Stop Life360 from Tracking You On Motorola Moto G14? | Dr.fone
- Top 5 Car Locator Apps for Realme C51 | Dr.fone
- How To Repair iPhone 15 System? | Dr.fone
- Is your Tecno Phantom V Flip working too slow? Heres how you can hard reset it | Dr.fone
- In 2024, 3 Effective Ways to Unlock iCloud Account Without Password On Apple iPhone 6
- How to Hard Reset Samsung Galaxy A05 Without Password | Dr.fone
- In 2024, How to Come up With the Best Pokemon Team On Tecno Camon 30 Pro 5G? | Dr.fone
- Most Asked Questions about Pokemon Go Battle League Rewards On Apple iPhone 7 Plus | Dr.fone
- 3 Solutions to Find Your Vivo Y28 5G Current Location of a Mobile Number | Dr.fone
- Top 7 Skype Hacker to Hack Any Skype Account On your Nokia 150 (2023) | Dr.fone
- How to Soft Reset Realme 11 Pro phone? | Dr.fone
- 2 Ways to Monitor Realme 11X 5G Activity | Dr.fone
- In 2024, Top 10 Meizu Android SIM Unlock APK
- Spoofing Life360 How to Do it on Poco X6? | Dr.fone
- 8 Solutions to Fix Find My Friends Location Not Available On Apple iPhone 11 Pro | Dr.fone
- 11 Ways to Fix it When My Lava Yuva 2 Wont Charge | Dr.fone
- Failed to play MP4 movies with Redmi Note 12T Pro
- Title: In 2024, Capture Perfection Top-Rated Webcam Recording Software for Windows 10
- Author: Giselle
- Created at : 2024-04-25 07:34:45
- Updated at : 2024-04-26 07:34:45
- Link: https://ai-vdieo-software.techidaily.com/in-2024-capture-perfection-top-rated-webcam-recording-software-for-windows-10/
- License: This work is licensed under CC BY-NC-SA 4.0.
