
:max_bytes(150000):strip_icc():format(webp)/the-10-best-password-managers-of-2022-6543213-7650bf3ab2eb41a08dbee8713ce811e3.jpg)
2024 Approved Expert Insights 5 Pro Tips for Getting the Most Out of Your 16X9 Ratio Calculator
Expert Insights: 5 Pro Tips for Getting the Most Out of Your 16X9 Ratio Calculator
5 Facts About 16x9 Ratio Calculator You Didn’t Know
An easy yet powerful editor
Numerous effects to choose from
Detailed tutorials provided by the official channel
This article explains major concepts about 16x9 ratio calculator and applies them even if you are a novice.
Read it to conclude the aspect ratio and the type of editing you need for your videos.
In this article
01 [What is Aspect Ratio?](#Part 1)
02 [What’s 16:9 Ratio Calculator?](#Part 2)
03 [Top 16:9 Resolutions](#Part 3)
04 [How to Calculate 16:9 Aspect Ratios?](#Part 4)
05 [How to Use Aspect Ratio Calculator?](#Part 5)
06 [How to Shift Through Aspect Ratio You Prefer in Filmora?](#Part 6)
Part 1 What is aspect ratio?
Aspect ratio is the proportionality ratio that relates between the width and height of the image. When you set your television screen, you often see something like 16:9 in the aspect ratio. These numbers are not related to the quality of the images whatsoever. They mean that the screen’s width will be almost twice as high as its height.
However, most television screens have an aspect ratio that looks like a square. The same does not apply to most cinema screens found in a hall. Thanks to the electricians who made those screens to be rectangular. That makes sure that you don’t miss out on any movie clip because of the low aspect ratio.
Initially, the aspect ratio mainly got restricted to Mathematical aspects like geometry. With time, the term got introduced in the films where it was used to relate the width and height of various images on screens, hence the16*9 aspect ratio calculator.
Usually, the aspect ratio refers to the long side concerning the shorter side of the shape. For example, it can be represented by two unknowns, x: y. The values do not mean much because numbers can substitute them.
Perhaps you have encountered these common aspect ratios: IMAX (1.43:1), Academy Film standard (1.43:1), and the famous golden video with an aspect ratio of 1.6180:1.
Having adequate knowledge about aspect ratios is of great importance. You will have to use an aspect ratio calculator when you want to resize your image to fit the specific location without cutting some sections.
Part 2 What is the 16:9 aspect ratio calculator?
The most significant similarity is the aspect ratio of 16:9. The 16:9 ratio dates back to 2009, when the ratio introduced was declared to be used globally. To prove it, take a minute and check the aspect ratios of your television screen or smartphone. Also, confirm the next time you go to the cinema to watch a movie.
You can take a beautiful photo with a nice image before posting on social media because of the 16:9 aspect ratio. Nowadays, this aspect ratio is a part of most screens and cameras. Even the HD videos always get recorded in the international format ratio.
The16 * 9 aspect ratiocalculator will help you operate correctly for high-quality images. It also helps in the conversion of inches to centimeters and vice versa. For a digital device, pixels are the most common units of images.
Part 3 Top 16:9 resolutions
These are the most common resolutions that are available. The units are in pixels, in descending order.
● 15360×8640 (16K UHD)
● 7680 × 4320 (8K UHD)
● 5120 × 2880 (5K)
● 3840 × 2160 (4K UHD)
● 3200 × 1800 (QHD+)
● 2560 × 1440 (QHD)
● 1920 × 1080 (Full HD)
● 1600 × 900 (HD+)
● 1366 × 768 (WXGA)
● 1280 × 720 (HD)
● 960 × 540 (qHD)
● 854 × 480 (FWVGA)
● 640 × 360 (nHD)
Part 4 How to calculate the 16:9 Aspect ratio?
First, let’s look at the correct pronunciation of the ratio. You can either say it as 16 by 9 or 16 × 9. It implies 16 units of the longest side for each shortest side. It could also mean 32 by 18 or higher values which can still simplify to 16:9. We can also represent the ratio differently when simplified. In this case, a decimal point separates the ratios. For example, 16:9 is represented as 1.78:1 after being simplified.
Earlier screens and monitors produced old ratios like the 4:3. After the recognition of the 16:9 ratios, have made replacements for them. The16*9 ratio calculatoris also the most common. Have you heard of 720p HD, 1080p HD, and others? All of them are still under the 16:9 ratios but expressed differently. For example, a screen of 1920 × 1080p. Check it out here: 2920/1080 equals 16:9.
First, here’s the formula that we will use in this section.
Width (W) /Height (H) = 1.778
Dividing the width and height gives you 1.778, which is still an aspect ratio of 16:9.
1.778 is a constant in the formula that you can use interchangeably to determine the width or height. Here is a couple of examples to illustrate this.
Example 1:
Ben’s video measures 32 panels wide. Find the number of panels he needs to build a 26:9 display.
W/H = 16/9
32/H = 16/9
H =32 × 9/16
H = 18
Therefore, Ben will need 18 panels to install the display unit.
Example 2
Nancy decides to design an image for a post in the ratio 16:9. If it has 720 pixels, calculate the width of the image needed.
W/H = 19/6
W/720 = 19/6
W = 730 × 19/6
Nancy will need 1280 pixels for her image.
Part 5 How to use an aspect ratio calculator?
These calculations may be easy when you’re used to them. Not interested in many calculations? Use the online aspect ratio calculator instead. That will make it easier and save on time. You will only need to have the width and height of the image that if needed. The 16 *9 ratio calculator will give the remaining distance.
Using the calculator is the most preferred method because it is very precise. Supposing you don’t have any idea about the width or height of your image, just key in the aspect ratio and wait for an instant answer. The aspect ratio will still give the same answer, but the calculator is convenient.
The better part, this calculator provides calculations for landscape and portrait orientation for images. Follow these steps to use the calculator:
Step 1: Go to https://insaneimpact.com/aspect-ratio-calculator/
Step 2: Enter units of width and height in the respective tabs provided and instantly get your aspect ratio.

Part 6 How to shift through aspect ratio you prefer in Filmora?
As you edit videos, adjust them to ensure they fit in an email as an attachment. That will help you upload them easily after you have used some video editing tools. This article elaborates more by using Wondershare Filmora.
Here’s why we recommend Wondershare Filmora Video Editor
The obvious reason is many features that will help you edit the video like a pro. For instance, you can resize, zoom and highlight the best parts of the video. These are some features of Wondershare Filmora’s video editing capabilities.
● Effortlessly resize the sizes of videos and aspect ratios
● Cropping the video to highlight an object
● Addition of effects and more videos
● Uploading edited videos online
● Supports diverse operating systems for smartphones and desktops
Navigating Through Various Aspect Ratios Using Wondershare Filmora

Wondershare Filmora - Best Video Editor for Mac/Windows
5,481,435 people have downloaded it.
Build unique custom animations without breaking a sweat.
Focus on creating epic stories and leave the details to Filmora’s auto features.
Start a creative adventure with drag & drop effects and endless possibilities.
Filmora simplifies advanced features to save you time and effort.
Filmora cuts out repetition so you can move on to your next creative breakthrough.
Different social media platforms will only allow users to upload videos of specified sizes. Therefore, it is imperative to know the right size for your videos. Let me take you through ways of changing an aspect ratio for the image to have the required height and width.
Step 1: Select your projects’ aspect ratio.

Upon opening Wondershare Filmora, a window will pop up on the screen to allow you to select the aspect ratio. There are three options to choose widescreen, standard, and portrait with aspect ratios of 16:9, 4:3, and 1.1, respectively. select the one that you require and click “New Project.”
Step 2: Set the new aspect ratio for the project

Go to File, choose a new project, and then aspect ratio in the editing panel. Please select the one you wish to use and alter it according to your desired format. For instance, you can select a video of 16:9 and reduce it to 1:1.
Step 3: Save the video

Select “Export” to export the video and save it in different formats in the Format tab. Do you feel like playing the video on your phone or any other device? Please move to the device tab and ply it on your smartphone or transfer it into a DVD drive format.
Filmora also provides more advanced features for video editing like rotating, cropping, and scaling. You can also match the colors on your videos, include animations, add effects, track the sounds and even record some background sounds for the video to look good. Go ahead and download for a free trial below to start editing your videos!
Key Takeaways from This Episode
● 1 – A detailed overview of the aspect ratio and aspect ratio calculator.
● 2 – Understanding how to calculate aspect ratios manually and through an aspect ratio calculator.
● 3 – Navigation through different aspect ratios via the wonderful editor, i.e., Wondershare Filmora.
● Finally, a16×9 aspect ratio calculatoris simple to use, provided you follow the steps given. However, an online calculator will make your videos fit in the equipped area. Use Wondershare Filmora for easy editing and changing of the aspect ratio. It is a pro image and video editor and the easiest to use. Start with its trial version by downloading it for free.
This article explains major concepts about 16x9 ratio calculator and applies them even if you are a novice.
Read it to conclude the aspect ratio and the type of editing you need for your videos.
In this article
01 [What is Aspect Ratio?](#Part 1)
02 [What’s 16:9 Ratio Calculator?](#Part 2)
03 [Top 16:9 Resolutions](#Part 3)
04 [How to Calculate 16:9 Aspect Ratios?](#Part 4)
05 [How to Use Aspect Ratio Calculator?](#Part 5)
06 [How to Shift Through Aspect Ratio You Prefer in Filmora?](#Part 6)
Part 1 What is aspect ratio?
Aspect ratio is the proportionality ratio that relates between the width and height of the image. When you set your television screen, you often see something like 16:9 in the aspect ratio. These numbers are not related to the quality of the images whatsoever. They mean that the screen’s width will be almost twice as high as its height.
However, most television screens have an aspect ratio that looks like a square. The same does not apply to most cinema screens found in a hall. Thanks to the electricians who made those screens to be rectangular. That makes sure that you don’t miss out on any movie clip because of the low aspect ratio.
Initially, the aspect ratio mainly got restricted to Mathematical aspects like geometry. With time, the term got introduced in the films where it was used to relate the width and height of various images on screens, hence the16*9 aspect ratio calculator.
Usually, the aspect ratio refers to the long side concerning the shorter side of the shape. For example, it can be represented by two unknowns, x: y. The values do not mean much because numbers can substitute them.
Perhaps you have encountered these common aspect ratios: IMAX (1.43:1), Academy Film standard (1.43:1), and the famous golden video with an aspect ratio of 1.6180:1.
Having adequate knowledge about aspect ratios is of great importance. You will have to use an aspect ratio calculator when you want to resize your image to fit the specific location without cutting some sections.
Part 2 What is the 16:9 aspect ratio calculator?
The most significant similarity is the aspect ratio of 16:9. The 16:9 ratio dates back to 2009, when the ratio introduced was declared to be used globally. To prove it, take a minute and check the aspect ratios of your television screen or smartphone. Also, confirm the next time you go to the cinema to watch a movie.
You can take a beautiful photo with a nice image before posting on social media because of the 16:9 aspect ratio. Nowadays, this aspect ratio is a part of most screens and cameras. Even the HD videos always get recorded in the international format ratio.
The16 * 9 aspect ratiocalculator will help you operate correctly for high-quality images. It also helps in the conversion of inches to centimeters and vice versa. For a digital device, pixels are the most common units of images.
Part 3 Top 16:9 resolutions
These are the most common resolutions that are available. The units are in pixels, in descending order.
● 15360×8640 (16K UHD)
● 7680 × 4320 (8K UHD)
● 5120 × 2880 (5K)
● 3840 × 2160 (4K UHD)
● 3200 × 1800 (QHD+)
● 2560 × 1440 (QHD)
● 1920 × 1080 (Full HD)
● 1600 × 900 (HD+)
● 1366 × 768 (WXGA)
● 1280 × 720 (HD)
● 960 × 540 (qHD)
● 854 × 480 (FWVGA)
● 640 × 360 (nHD)
Part 4 How to calculate the 16:9 Aspect ratio?
First, let’s look at the correct pronunciation of the ratio. You can either say it as 16 by 9 or 16 × 9. It implies 16 units of the longest side for each shortest side. It could also mean 32 by 18 or higher values which can still simplify to 16:9. We can also represent the ratio differently when simplified. In this case, a decimal point separates the ratios. For example, 16:9 is represented as 1.78:1 after being simplified.
Earlier screens and monitors produced old ratios like the 4:3. After the recognition of the 16:9 ratios, have made replacements for them. The16*9 ratio calculatoris also the most common. Have you heard of 720p HD, 1080p HD, and others? All of them are still under the 16:9 ratios but expressed differently. For example, a screen of 1920 × 1080p. Check it out here: 2920/1080 equals 16:9.
First, here’s the formula that we will use in this section.
Width (W) /Height (H) = 1.778
Dividing the width and height gives you 1.778, which is still an aspect ratio of 16:9.
1.778 is a constant in the formula that you can use interchangeably to determine the width or height. Here is a couple of examples to illustrate this.
Example 1:
Ben’s video measures 32 panels wide. Find the number of panels he needs to build a 26:9 display.
W/H = 16/9
32/H = 16/9
H =32 × 9/16
H = 18
Therefore, Ben will need 18 panels to install the display unit.
Example 2
Nancy decides to design an image for a post in the ratio 16:9. If it has 720 pixels, calculate the width of the image needed.
W/H = 19/6
W/720 = 19/6
W = 730 × 19/6
Nancy will need 1280 pixels for her image.
Part 5 How to use an aspect ratio calculator?
These calculations may be easy when you’re used to them. Not interested in many calculations? Use the online aspect ratio calculator instead. That will make it easier and save on time. You will only need to have the width and height of the image that if needed. The 16 *9 ratio calculator will give the remaining distance.
Using the calculator is the most preferred method because it is very precise. Supposing you don’t have any idea about the width or height of your image, just key in the aspect ratio and wait for an instant answer. The aspect ratio will still give the same answer, but the calculator is convenient.
The better part, this calculator provides calculations for landscape and portrait orientation for images. Follow these steps to use the calculator:
Step 1: Go to https://insaneimpact.com/aspect-ratio-calculator/
Step 2: Enter units of width and height in the respective tabs provided and instantly get your aspect ratio.
Part 6 How to shift through aspect ratio you prefer in Filmora?
As you edit videos, adjust them to ensure they fit in an email as an attachment. That will help you upload them easily after you have used some video editing tools. This article elaborates more by using Wondershare Filmora.
Here’s why we recommend Wondershare Filmora Video Editor
The obvious reason is many features that will help you edit the video like a pro. For instance, you can resize, zoom and highlight the best parts of the video. These are some features of Wondershare Filmora’s video editing capabilities.
● Effortlessly resize the sizes of videos and aspect ratios
● Cropping the video to highlight an object
● Addition of effects and more videos
● Uploading edited videos online
● Supports diverse operating systems for smartphones and desktops
Navigating Through Various Aspect Ratios Using Wondershare Filmora
Wondershare Filmora - Best Video Editor for Mac/Windows
5,481,435 people have downloaded it.
Build unique custom animations without breaking a sweat.
Focus on creating epic stories and leave the details to Filmora’s auto features.
Start a creative adventure with drag & drop effects and endless possibilities.
Filmora simplifies advanced features to save you time and effort.
Filmora cuts out repetition so you can move on to your next creative breakthrough.
Different social media platforms will only allow users to upload videos of specified sizes. Therefore, it is imperative to know the right size for your videos. Let me take you through ways of changing an aspect ratio for the image to have the required height and width.
Step 1: Select your projects’ aspect ratio.
Upon opening Wondershare Filmora, a window will pop up on the screen to allow you to select the aspect ratio. There are three options to choose widescreen, standard, and portrait with aspect ratios of 16:9, 4:3, and 1.1, respectively. select the one that you require and click “New Project.”
Step 2: Set the new aspect ratio for the project
Go to File, choose a new project, and then aspect ratio in the editing panel. Please select the one you wish to use and alter it according to your desired format. For instance, you can select a video of 16:9 and reduce it to 1:1.
Step 3: Save the video
Select “Export” to export the video and save it in different formats in the Format tab. Do you feel like playing the video on your phone or any other device? Please move to the device tab and ply it on your smartphone or transfer it into a DVD drive format.
Filmora also provides more advanced features for video editing like rotating, cropping, and scaling. You can also match the colors on your videos, include animations, add effects, track the sounds and even record some background sounds for the video to look good. Go ahead and download for a free trial below to start editing your videos!
Key Takeaways from This Episode
● 1 – A detailed overview of the aspect ratio and aspect ratio calculator.
● 2 – Understanding how to calculate aspect ratios manually and through an aspect ratio calculator.
● 3 – Navigation through different aspect ratios via the wonderful editor, i.e., Wondershare Filmora.
● Finally, a16×9 aspect ratio calculatoris simple to use, provided you follow the steps given. However, an online calculator will make your videos fit in the equipped area. Use Wondershare Filmora for easy editing and changing of the aspect ratio. It is a pro image and video editor and the easiest to use. Start with its trial version by downloading it for free.
QuickTime Video Speed Control: How to Fast Forward and Slow Down
Are you watching a pre-recorded lecture or a video presentation that is too long? You can always save your time by fast-forwarding a video. Different software available in the market let you speed up video clips on your computer or laptop. Amongst hundreds of software available online, QuickTime Player- a creation of Apple Inc.- is easy to operate and works on all active versions of macOS and Windows.
Some features of QuickTime Video Player cannot be overlooked, such as fast-forward, slow down, video compression, and more. Moreover, the application supports multiple video formats, and you can even use 3rd party codecs- unsupported codecs are no more a problem now. Here, in this guide, we’ve provided detailed information about using QuickTime player to speed up a video.
In this article
02 How to Speed Up Videos on QuickTime Player [Windows]?
03 How to Speed Up Videos on Mac with QuickTime Player?
04 Tips for Speeding up Video on QuickTime Player
05 Adjust Video Speed withWondershare Filmora Video Editor
Part 1: What is QuickTime Player?
QuickTime Player is a media player that Apple has developed. This media player or software allows you to play a movie file on your computer. You can also use QuickTime player to speed up a movie file according to your preferences.
Part 2: How to Speed Up Videos on QuickTime Player [Windows]?
Want to speed up an instructional or step-by-step guide to save your time? Worry not! QuickTime video player lets you fast-forward all types of video clips on your windows laptop in a breeze. Using the QuickTime video player, you can speed up your videos from 1/2x to 3x by simply moving the slider. Want to know how to speed up QuickTime player? Follow these steps.
Step 1: Open a movie or music video file on QuickTime Player.
Step 2: Open the Window menu and select the Show A/V Controls option. A dialog box will appear.

Step 3: Adjust the playback speed slider from 1x to 3x.

Step 4: Close the dialog box and play the video.
Related: How to Change Video Playback Speed on Windows 10 ?
Part 3: How to Speed Up Videos on Mac with QuickTime Player?
Whether you’re a Mac or Windows user- QuickTime Video Player has got you covered. The interface and functions of this video player are intuitive and user-friendly for all Mac users.
If Mac doesn’t support any codec or format, you can also download the third-party codecs and use them with the QuickTime video player. Here’s how to speed up a video on Mac:
Step 1: Install QuickTime Player on your Mac computer.
Step 2: Drag the video file into the player or right-click on the video file and select **Open with -**> QuickTime Player app.
Step 3: Click on the Play button to stream the video content.
Note: The Play button will turn into the Pause button in a second.
Step 4: Hold the Option key, click the fast forward button from the player menu to increase the playback speed.

Part 4: Tips for Speeding up Video on QuickTime Player
It is necessary to learn some tips regarding how to speed up video on Mac or Windows using QuickTime Player. Following these tips will let you edit your video efficiently and flawlessly. The tips for speeding up video on QuickTime Player have been mentioned below:
- Make Proper Adjustments
If you want to edit or speed up your video up to 2x without using the fast forward button, you must make adjustments in the editing process. QuickTime Player allows you to apply a 200% speed adjustment for editing each video clip and bring that clip into a new timeline. Then, you should apply the 2x Speed to it. After completing the editing process, you can export that clip.
- Learn Keyboard Shortcuts
You can use shortcut keys to speed up your videos using QuickTime Player. You need to hold the Command key and press the arrow keys to adjust the video speed. For example, hold the Command key and press Right Arrow to fast-forward the Speed of your video. You can also trim the video using the shortcut key or Command + T.
- Control Audio Quality
For your information, the audio quality of the original video is disturbed when you speed up the video up to 2.0x. If you do not want the audio quality to worsen, you should stop speeding up the video until 1.9x.
- Control Playback Speed
You can control the playback QuickTime player speed while the video is playing. You only need to hold the option key and click the fast forward button. On every click, you will notice the Speed increases from 1.0x to 1.1x, 1.1x to 1.2x, and up to so on.
Related: How to Edit Videos with QuickTime Player
Part 5: Adjust Video Speed with Wondershare Filmora
Wondershare Filmora video editor allows you to adjust your video clip’s time duration and Speed. You can download and install this software from your Windows computer and Mac computer. You can create fast or slow-motion videos at any speed by using Wondershare Filmora. In addition, this player supports a wide variety of formats.
You need to follow the following steps to adjust the video speed using Wondershare Filmora:
Method 1: Change video speed with Uniform Speed
Step 1: Install Wondershare Filmora and launch it on your computer. Click on Import Media Files Here to add a video file to this editor.
Note: This editor supports multiple video formats such as MP4 WMV, DAT, TP, TRP, TS, EVO. NSV, MKV, MOD, FLV, M4V, VOB etc. Moreover, you can add videos through the import feature of simple drag and drop the video file.
Step 2: Drag the video to the timeline. Right-click on it, select Speed> Uniform Speed from the menu.

Step 3: At the Uniform Speed tab, move the slider to speed up the video and hit OK to save changes.

Step 4: Click on Export to export the edited video. Click on the Local to save the video in a popular format on your computer.
Method 2: Change video speed with Speed Raming
Step 1: Right-click on the video in the timeline and select Speed -> Speed Ramping from the menu.
Step 2: In the Speed Raming tab, you will see some speed presets which allows you to change the speed smoother quickly. You can also click the Custom option to set the speed points from scratch.

Step 3: Now, to speed up the video, enter the duration less than the original one next to the Duration tab, and hit OK. Save the speed-up video by clicking on Export.
Watch the video tutorial about how to use the Speed Ramping feature in Filmora video editor.
For Win 7 or later (64-bit)
For macOS 10.12 or later
FAQs about Changing Speed on QuickTime Player
Why is my QuickTime player lagging?
Sometimes, you might experience lagging or sluggishness when you speed up the video via QuickTime. It affects the smoothness of the video. Here we’ve stated some errors and their solutions:
Check settings: Always check settings before you speed up any video on QuickTime player. Go to Windows>Check A/V controls and check all the payback setting there.
Codec Faut: Sometimes, an unsupportive codec can also affect the smoothness of the video. You can run your video through MediaInfo or GSpot to identify the codec and install proper plug-ins.
Conclusion
Now you can easily and effortlessly utilize QuickTime player speed up by following the above-mentioned essential tips. No doubt, QuickTime Player is one of the best players that can be used to play video files and edit them. Alternatively, you can also use Wondershare Filmora, another excellent Mac video editor , to speed up your video files to the extent you want.
02 How to Speed Up Videos on QuickTime Player [Windows]?
03 How to Speed Up Videos on Mac with QuickTime Player?
04 Tips for Speeding up Video on QuickTime Player
05 Adjust Video Speed withWondershare Filmora Video Editor
Part 1: What is QuickTime Player?
QuickTime Player is a media player that Apple has developed. This media player or software allows you to play a movie file on your computer. You can also use QuickTime player to speed up a movie file according to your preferences.
Part 2: How to Speed Up Videos on QuickTime Player [Windows]?
Want to speed up an instructional or step-by-step guide to save your time? Worry not! QuickTime video player lets you fast-forward all types of video clips on your windows laptop in a breeze. Using the QuickTime video player, you can speed up your videos from 1/2x to 3x by simply moving the slider. Want to know how to speed up QuickTime player? Follow these steps.
Step 1: Open a movie or music video file on QuickTime Player.
Step 2: Open the Window menu and select the Show A/V Controls option. A dialog box will appear.
Step 3: Adjust the playback speed slider from 1x to 3x.
Step 4: Close the dialog box and play the video.
Related: How to Change Video Playback Speed on Windows 10 ?
Part 3: How to Speed Up Videos on Mac with QuickTime Player?
Whether you’re a Mac or Windows user- QuickTime Video Player has got you covered. The interface and functions of this video player are intuitive and user-friendly for all Mac users.
If Mac doesn’t support any codec or format, you can also download the third-party codecs and use them with the QuickTime video player. Here’s how to speed up a video on Mac:
Step 1: Install QuickTime Player on your Mac computer.
Step 2: Drag the video file into the player or right-click on the video file and select **Open with -**> QuickTime Player app.
Step 3: Click on the Play button to stream the video content.
Note: The Play button will turn into the Pause button in a second.
Step 4: Hold the Option key, click the fast forward button from the player menu to increase the playback speed.
Part 4: Tips for Speeding up Video on QuickTime Player
It is necessary to learn some tips regarding how to speed up video on Mac or Windows using QuickTime Player. Following these tips will let you edit your video efficiently and flawlessly. The tips for speeding up video on QuickTime Player have been mentioned below:
- Make Proper Adjustments
If you want to edit or speed up your video up to 2x without using the fast forward button, you must make adjustments in the editing process. QuickTime Player allows you to apply a 200% speed adjustment for editing each video clip and bring that clip into a new timeline. Then, you should apply the 2x Speed to it. After completing the editing process, you can export that clip.
- Learn Keyboard Shortcuts
You can use shortcut keys to speed up your videos using QuickTime Player. You need to hold the Command key and press the arrow keys to adjust the video speed. For example, hold the Command key and press Right Arrow to fast-forward the Speed of your video. You can also trim the video using the shortcut key or Command + T.
- Control Audio Quality
For your information, the audio quality of the original video is disturbed when you speed up the video up to 2.0x. If you do not want the audio quality to worsen, you should stop speeding up the video until 1.9x.
- Control Playback Speed
You can control the playback QuickTime player speed while the video is playing. You only need to hold the option key and click the fast forward button. On every click, you will notice the Speed increases from 1.0x to 1.1x, 1.1x to 1.2x, and up to so on.
Related: How to Edit Videos with QuickTime Player
Part 5: Adjust Video Speed with Wondershare Filmora
Wondershare Filmora video editor allows you to adjust your video clip’s time duration and Speed. You can download and install this software from your Windows computer and Mac computer. You can create fast or slow-motion videos at any speed by using Wondershare Filmora. In addition, this player supports a wide variety of formats.
You need to follow the following steps to adjust the video speed using Wondershare Filmora:
Method 1: Change video speed with Uniform Speed
Step 1: Install Wondershare Filmora and launch it on your computer. Click on Import Media Files Here to add a video file to this editor.
Note: This editor supports multiple video formats such as MP4 WMV, DAT, TP, TRP, TS, EVO. NSV, MKV, MOD, FLV, M4V, VOB etc. Moreover, you can add videos through the import feature of simple drag and drop the video file.
Step 2: Drag the video to the timeline. Right-click on it, select Speed> Uniform Speed from the menu.
Step 3: At the Uniform Speed tab, move the slider to speed up the video and hit OK to save changes.
Step 4: Click on Export to export the edited video. Click on the Local to save the video in a popular format on your computer.
Method 2: Change video speed with Speed Raming
Step 1: Right-click on the video in the timeline and select Speed -> Speed Ramping from the menu.
Step 2: In the Speed Raming tab, you will see some speed presets which allows you to change the speed smoother quickly. You can also click the Custom option to set the speed points from scratch.
Step 3: Now, to speed up the video, enter the duration less than the original one next to the Duration tab, and hit OK. Save the speed-up video by clicking on Export.
Watch the video tutorial about how to use the Speed Ramping feature in Filmora video editor.
For Win 7 or later (64-bit)
For macOS 10.12 or later
FAQs about Changing Speed on QuickTime Player
Why is my QuickTime player lagging?
Sometimes, you might experience lagging or sluggishness when you speed up the video via QuickTime. It affects the smoothness of the video. Here we’ve stated some errors and their solutions:
Check settings: Always check settings before you speed up any video on QuickTime player. Go to Windows>Check A/V controls and check all the payback setting there.
Codec Faut: Sometimes, an unsupportive codec can also affect the smoothness of the video. You can run your video through MediaInfo or GSpot to identify the codec and install proper plug-ins.
Conclusion
Now you can easily and effortlessly utilize QuickTime player speed up by following the above-mentioned essential tips. No doubt, QuickTime Player is one of the best players that can be used to play video files and edit them. Alternatively, you can also use Wondershare Filmora, another excellent Mac video editor , to speed up your video files to the extent you want.
The Ultimate List of Free Online Glitch Effect Software
The Best Free Online Glitch Effect Generators

Ollie Mattison
Mar 27, 2024• Proven solutions
The Glitch Art movement is gaining a lot of attention on social media, as the photos and videos that contain glitches gather thousands of views and likes. Some video editing software products don’t have preset glitch effects, and creating this effect from scratch can be a time-consuming task.
Online glitch effect generators enable you to add glitch effects to both photos and videos even if you have no previous video editing experience, which makes them a great option for all social media content creators who want to go through the editing process as quickly as possible. That’s why in this article we are going to take you through some of the best free online glitch effect generators you can use to edit photos and videos.
Add Glitch Effect to Video with Filmora Video Editor
 Download Mac Version ](https://tools.techidaily.com/wondershare/filmora/download/ )
Check the guide to adding glitch effects to video with Filmora.
The Best Free Online Glitch Effect Generators
With so many online glitch effect generators to choose from, finding the one that fits all your needs may be difficult. We’ve selected some of the best online glitch effect generators you can use for free to create content for your social media channels. Let’s take a look at what they have to offer
1. GFTO
GFTO is an online text generator that offers hundreds of text templates, including the Glitch Text template. Customizing this template is easy as you just have to replace the generic text and adjust its on-screen position. Furthermore, you can choose the text’s color and size or select one of the available fonts.
![]()
The platform also lets you upload your own fonts, apply gradients, and change the text style. Optionally, you can add an outline to the text, pick the color of the text edges, or change the background. Once you are done editing the text you can save it to your computer as a PNG file and use it as an opening title for your video.
Pros
- Rich font selection
- Powerful text editing tools
- Allows users to upload their fonts
- Offers a broad range of text templates
Cons
- Outdated website design
- No photo or video editing features
2. EPHOTO 360
If you are looking for a tool that allows you to automatically generate the content you can share on TikTok, then you should consider using EPHOTO 360. You can use this glitch effect generator for free and you don’t even need an account in order to start making new content. Simply locate the Tik Tok Text Effects Online Generator option that is located in the Text Effect category and click on it.

Once the new page loads, you just have to insert the text into the text boxes and click on the GO button. EPHOTO 360 will then generate the image containing the text you entered. You can then choose if you want to save the picture to your computer, share it on social media, or copy the image’s link. However, all photos you create with EPHOTO 360 are going to be watermarked.
Pros
- A simple way of producing content for TikTok
- All images are exported as JPEG files
- Features hundreds of text templates
- Good file-sharing capabilities
Cons
- All images are generated automatically
- EPHOTO 360 watermarks all pictures
3. Photo Mosh
Photo Mosh grants you access to 27 different glitch effects you can apply to photos or short videos. The platform lets you choose if you want to create a JPEG, GIF, or WEBM file, although the videos you record with Photo Mosh cannot last more than a few seconds.

Applying the effects is easy, as you just have to expand the effect you want to use, click on the ON checkbox, and adjust the effect’s settings. All changes you make are visible in the preview screen so that you can see the results. In case you want to apply random effects to an image or video you uploaded, you just have to click on the Mosh button. All photos or short videos you create with this platform can be saved on your computer’s hard drive.
Pros
- Offers a variety of glitch effects
- Easy way to edit photos and short videos
- Mosh button enables the platform’s users to create random results
- Allow users to save videos in WEBM file format
Cons
- No file-sharing capabilities
- Creates low-resolution files
4. Glitchatron
Adding a glitch to a photo with Glitchatron is a straightforward task that can be completed in just a few moments. Once you’ve uploaded the photo to which you want to apply a glitch effect, you should choose from Low, Medium, High, Extreme, and Destroyed glitch level options.

Glitchatron also lets you apply a circular or triangular mask to the photo or add a text overlay. You can insert the text, adjust its size, pick an alignment option, or decide if you want the text to be black or white. However, other color options are unavailable, and you can’t change the font. You can save the photo in PNG file format to your computer or share it on Facebook, Twitter, and other popular social media networks.
Pros
- No photo editing skills required
- Users can adjust the intensity of the glitch effect
- Text overlays are available
- Good social sharing capabilities
Cons
- Text can be either black or white
- No photo editing tools
5. ImageGlitcher
You shouldn’t expect great results from this online glitch generator, as the website is poorly designed and it offers only a few basic glitch adjustment options. The size of the photo you upload to the website has an impact on how it is going to be displayed, which means that photos in large resolutions may be difficult to preview.

Furthermore, you can only adjust Glitchiness and Brightness options, while you can also toggle the Scan Line option on and off. You can’t do much else with ImageGlitcher, not even share your creations on social media. Applying the glitch effect to a photo may take a while, and the website might crash in the process. That’s why you shouldn’t use ImageGlitcher unless it is your only option to glitch a photo.
Pros
- It is free
- Support images saved in JPEG format
Cons
- Website crashes easily
- Only basic glitch effect settings
- Poorly designed and difficult to navigate
- Only works with photos that have resolution lower than 1024x1024
6. Image Glitch Tool
Image Glitch Tool is a simple glitch effect generator that allows you to upload a photo and adjust the effect’s settings quickly. The photo you upload to this platform is going to be displayed in the Preview Window, and the platform will also resize the photo automatically in case it exceeds its size limitations to avoid errors.

What’s more, Image Glitch Tool enables you to take photos with a webcam and apply glitch effect to them just moments after you captured them. The Amount, Seed, Iterations, and Quality sliders allow you to fine-tune the glitch effect so that it fits the image you are editing. However, creating a text overlay with this online glitch generator is not possible as you can only use it to apply the glitch effect to photos.
Pros
- Intuitive and functional design
- Allows users to take photos with a webcam
- Photos are adjusted automatically to the platform’s size requirements
- All photos can be uploaded to Imgur directly from Image Glitch Tool
Cons
- Doesn’t support video files
- Offers just one glitch effect
7. Mara
Mara is an online photo editing platform that lets its users crop photos, create image overlays, sharpen images, and much more. Its Glitcher feature provides an easy way to apply a glitch effect to a photo. You can upload a photo from your computer, via an URL or from Dropbox.

The photo will open in the Glitcher window as soon as you upload it, so you can use the Seed, Amount, Iterations, and Quality sliders to create a glitch effect. In addition, you can transfer the photo you’re editing with the Glitcher tool to other tools Mara photo editing platform offers and use them to polish the photo to which you applied the glitch effect. Besides saving the photo to your computer, you can also share it to Facebook and other social media platforms.
Pros
- Powerful glitch tool
- Customizing the glitch effect is easy and fun
- Mara is equipped with a broad range of photo editing tools
- Excellent social sharing options
Cons
- A limited selection of glitch effects
- Adding a text layer is only possible if you use Glitcher in combination with other tools
8. HTML5 Image Glitcher
You don’t need a lot of photo editing experience in order to create a glitch effect with this tool. Before you upload a photo, you should decide if you want to keep the file’s actual size or resize it to a lower resolution. Also, this tool lets you choose if you want to create a JPEG, PNG, or WEBP file.

Once you’ve adjusted these settings you can proceed to select how damaged the photo is going to be, and you should pick the 1-hit option if you want the damage to be minimal or 1000-hits option if you want the damage to be severe. The results will be displayed in the Preview Window immediately so that you can adjust this setting accordingly. You can save the photo you created by either clicking on Download JPEG or Download PNG file.
Pros
- Users can choose the resolution of the photos they upload
- The glitch effect generator is easy to use
- Adjusting the intensity of the glitch effect is easy
- Supports all common picture file formats
Cons
- No social sharing options
- Offers only basic glitch effect settings
Conclusion
Creating a glitch on a photo or even in a short video with any of the glitch effect generators we mentioned in this article is a routine task you can perform in just a few clicks. Each of these online glitch effect generators can help you produce captivating content for your social media accounts that is going to attract a lot of attention. Which online glitch effect generator are you going to choose? Leave a comment and let us know.
Ollie Mattison
Ollie Mattison is a writer and a lover of all things video.
Follow @Ollie Mattison
Ollie Mattison
Mar 27, 2024• Proven solutions
The Glitch Art movement is gaining a lot of attention on social media, as the photos and videos that contain glitches gather thousands of views and likes. Some video editing software products don’t have preset glitch effects, and creating this effect from scratch can be a time-consuming task.
Online glitch effect generators enable you to add glitch effects to both photos and videos even if you have no previous video editing experience, which makes them a great option for all social media content creators who want to go through the editing process as quickly as possible. That’s why in this article we are going to take you through some of the best free online glitch effect generators you can use to edit photos and videos.
Add Glitch Effect to Video with Filmora Video Editor
Download Mac Version ](https://tools.techidaily.com/wondershare/filmora/download/ )
Check the guide to adding glitch effects to video with Filmora.
The Best Free Online Glitch Effect Generators
With so many online glitch effect generators to choose from, finding the one that fits all your needs may be difficult. We’ve selected some of the best online glitch effect generators you can use for free to create content for your social media channels. Let’s take a look at what they have to offer
1. GFTO
GFTO is an online text generator that offers hundreds of text templates, including the Glitch Text template. Customizing this template is easy as you just have to replace the generic text and adjust its on-screen position. Furthermore, you can choose the text’s color and size or select one of the available fonts.
![]()
The platform also lets you upload your own fonts, apply gradients, and change the text style. Optionally, you can add an outline to the text, pick the color of the text edges, or change the background. Once you are done editing the text you can save it to your computer as a PNG file and use it as an opening title for your video.
Pros
- Rich font selection
- Powerful text editing tools
- Allows users to upload their fonts
- Offers a broad range of text templates
Cons
- Outdated website design
- No photo or video editing features
2. EPHOTO 360
If you are looking for a tool that allows you to automatically generate the content you can share on TikTok, then you should consider using EPHOTO 360. You can use this glitch effect generator for free and you don’t even need an account in order to start making new content. Simply locate the Tik Tok Text Effects Online Generator option that is located in the Text Effect category and click on it.
Once the new page loads, you just have to insert the text into the text boxes and click on the GO button. EPHOTO 360 will then generate the image containing the text you entered. You can then choose if you want to save the picture to your computer, share it on social media, or copy the image’s link. However, all photos you create with EPHOTO 360 are going to be watermarked.
Pros
- A simple way of producing content for TikTok
- All images are exported as JPEG files
- Features hundreds of text templates
- Good file-sharing capabilities
Cons
- All images are generated automatically
- EPHOTO 360 watermarks all pictures
3. Photo Mosh
Photo Mosh grants you access to 27 different glitch effects you can apply to photos or short videos. The platform lets you choose if you want to create a JPEG, GIF, or WEBM file, although the videos you record with Photo Mosh cannot last more than a few seconds.
Applying the effects is easy, as you just have to expand the effect you want to use, click on the ON checkbox, and adjust the effect’s settings. All changes you make are visible in the preview screen so that you can see the results. In case you want to apply random effects to an image or video you uploaded, you just have to click on the Mosh button. All photos or short videos you create with this platform can be saved on your computer’s hard drive.
Pros
- Offers a variety of glitch effects
- Easy way to edit photos and short videos
- Mosh button enables the platform’s users to create random results
- Allow users to save videos in WEBM file format
Cons
- No file-sharing capabilities
- Creates low-resolution files
4. Glitchatron
Adding a glitch to a photo with Glitchatron is a straightforward task that can be completed in just a few moments. Once you’ve uploaded the photo to which you want to apply a glitch effect, you should choose from Low, Medium, High, Extreme, and Destroyed glitch level options.
Glitchatron also lets you apply a circular or triangular mask to the photo or add a text overlay. You can insert the text, adjust its size, pick an alignment option, or decide if you want the text to be black or white. However, other color options are unavailable, and you can’t change the font. You can save the photo in PNG file format to your computer or share it on Facebook, Twitter, and other popular social media networks.
Pros
- No photo editing skills required
- Users can adjust the intensity of the glitch effect
- Text overlays are available
- Good social sharing capabilities
Cons
- Text can be either black or white
- No photo editing tools
5. ImageGlitcher
You shouldn’t expect great results from this online glitch generator, as the website is poorly designed and it offers only a few basic glitch adjustment options. The size of the photo you upload to the website has an impact on how it is going to be displayed, which means that photos in large resolutions may be difficult to preview.
Furthermore, you can only adjust Glitchiness and Brightness options, while you can also toggle the Scan Line option on and off. You can’t do much else with ImageGlitcher, not even share your creations on social media. Applying the glitch effect to a photo may take a while, and the website might crash in the process. That’s why you shouldn’t use ImageGlitcher unless it is your only option to glitch a photo.
Pros
- It is free
- Support images saved in JPEG format
Cons
- Website crashes easily
- Only basic glitch effect settings
- Poorly designed and difficult to navigate
- Only works with photos that have resolution lower than 1024x1024
6. Image Glitch Tool
Image Glitch Tool is a simple glitch effect generator that allows you to upload a photo and adjust the effect’s settings quickly. The photo you upload to this platform is going to be displayed in the Preview Window, and the platform will also resize the photo automatically in case it exceeds its size limitations to avoid errors.
What’s more, Image Glitch Tool enables you to take photos with a webcam and apply glitch effect to them just moments after you captured them. The Amount, Seed, Iterations, and Quality sliders allow you to fine-tune the glitch effect so that it fits the image you are editing. However, creating a text overlay with this online glitch generator is not possible as you can only use it to apply the glitch effect to photos.
Pros
- Intuitive and functional design
- Allows users to take photos with a webcam
- Photos are adjusted automatically to the platform’s size requirements
- All photos can be uploaded to Imgur directly from Image Glitch Tool
Cons
- Doesn’t support video files
- Offers just one glitch effect
7. Mara
Mara is an online photo editing platform that lets its users crop photos, create image overlays, sharpen images, and much more. Its Glitcher feature provides an easy way to apply a glitch effect to a photo. You can upload a photo from your computer, via an URL or from Dropbox.
The photo will open in the Glitcher window as soon as you upload it, so you can use the Seed, Amount, Iterations, and Quality sliders to create a glitch effect. In addition, you can transfer the photo you’re editing with the Glitcher tool to other tools Mara photo editing platform offers and use them to polish the photo to which you applied the glitch effect. Besides saving the photo to your computer, you can also share it to Facebook and other social media platforms.
Pros
- Powerful glitch tool
- Customizing the glitch effect is easy and fun
- Mara is equipped with a broad range of photo editing tools
- Excellent social sharing options
Cons
- A limited selection of glitch effects
- Adding a text layer is only possible if you use Glitcher in combination with other tools
8. HTML5 Image Glitcher
You don’t need a lot of photo editing experience in order to create a glitch effect with this tool. Before you upload a photo, you should decide if you want to keep the file’s actual size or resize it to a lower resolution. Also, this tool lets you choose if you want to create a JPEG, PNG, or WEBP file.
Once you’ve adjusted these settings you can proceed to select how damaged the photo is going to be, and you should pick the 1-hit option if you want the damage to be minimal or 1000-hits option if you want the damage to be severe. The results will be displayed in the Preview Window immediately so that you can adjust this setting accordingly. You can save the photo you created by either clicking on Download JPEG or Download PNG file.
Pros
- Users can choose the resolution of the photos they upload
- The glitch effect generator is easy to use
- Adjusting the intensity of the glitch effect is easy
- Supports all common picture file formats
Cons
- No social sharing options
- Offers only basic glitch effect settings
Conclusion
Creating a glitch on a photo or even in a short video with any of the glitch effect generators we mentioned in this article is a routine task you can perform in just a few clicks. Each of these online glitch effect generators can help you produce captivating content for your social media accounts that is going to attract a lot of attention. Which online glitch effect generator are you going to choose? Leave a comment and let us know.
Ollie Mattison
Ollie Mattison is a writer and a lover of all things video.
Follow @Ollie Mattison
To Help You Evaluate Which Webcam Software Best Suits Your Needs, I’ve Featured Pros, Cons, Etc in This List of the Best Free Webcam Software for Windows 10
10 Best Webcam Recording Software for Windows 10

Richard Bennett
Mar 27, 2024• Proven solutions
Which webcam softwarehave you installed on your laptop or desktop? Using the right webcam software to live stream videos, screen record videos, or chat on Skype results in high-quality images, smooth streaming, and high-quality images and videos.
There is a huge number of free webcam software with advanced features yet free for you to download, and use on your PC.
But how would you determine the best webcam software to use?
Before you mounted that webcam on your desktop or laptop, you had a reason. It’s your webcam features and purpose that should guide you to select the right software for the webcam camera.
In this article, we will show you 10 webcam software for Windows in this guide. Included are the most useful factors to consider as you make your choice – complexity of use, free/paid, integrations, editing tools, and more. You will learn:
- Part 1: The Best Webcam & Screen Recorder for Windows and Mac [Video Tutorial]
- Part 2: Top 10 Best Free Webcam Software for Windows
First take a quick look of the 10 best webcam software that is available on your Windows from a video:
For Win 7 or later (64-bit)
 Secure Download
For macOS 10.14 or later
Secure Download
Part 1: The Best Webcam & Screen Recorder for Computer
You need a sound and webcam recorder to record your video tutorials, streaming videos, presentations, or any other type of video. Wondershare Filmora is the software to use. Other than its most admired friendly intuitive interface, it’s simple and easy to use-suitable for both beginners and professionals.
For Win 7 or later (64-bit)
Secure Download
For macOS 10.14 or later
Secure Download
Among the outstanding features, you’ll find in Filmora include,
- Fast-paced recording speed of up to 120 fps
- Adverse professional editing tools that are easy to use
- Simultaneous recording from both webcam and computer screen
- Compatible with 50+ different file formats
- Rich title text and tutorial features
It’s free to download. Have a try now! Join in the Wondershare Video Community and get some inspiration from other Filomora users.
Part 2: Top 10 Best Free Webcam Software for Windows
To help you evaluate which webcam software best suits your needs, I’ve featured the strengths, shortcomings, and support services in each software review.
This is the list of the best free webcam software for Windows 10.
| 1 - Logitech Capture | 2 - CyberLink Youcam |
|---|---|
| 3 - ManyCam | 4 - SplitCam |
| 5 - Bandicam | 6 - NCH - Video Capture Software |
| 7 - YAWCAM | 8 - Windows Camera |
| 9 - Fake Webcam | 10 - IP Camera Viewer |
1. Logitech Capture
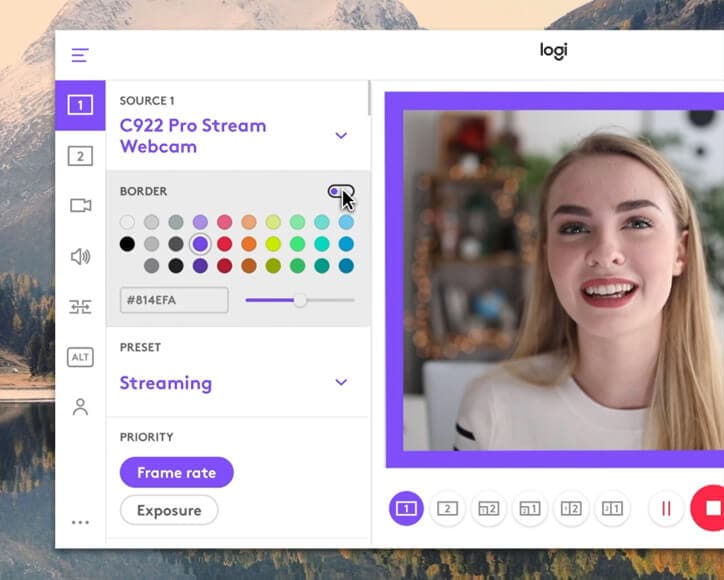
The multiple source recording feature and direct streaming app are the key strengths of this software. According to its mission statement- All-In-One Content Creation- you can use this software to record, edit, customize, and stream to your favorite channel.
Operating systems: Windows 10/8/7
Price: Free
Supported webcams: 1080P PRO STREAM, BRIO STREAM, C920s HD PRO, C922 PRO STREAM
Logitech Capture is among the few free webcam recording software for Windows 10 with studio controls applicable during recording. You can use this feature to adjust your image, create frames, adjust focus and transitions, and enable ChromaKey as you record.
In case you want to create a picture-in-picture presentation, this software allows you to use two webcams simultaneously. With the source switching and the auto-focus features, you can record the best tutorials or guides that show all dimensions and your image.
Pros
- Rich in transitions and effects
- Portrait optimization for mobile devices
- Its Capture app offers direct streaming to YouTube
- You can take passports or still images
Cons
- Limited to YouTube channel
- Account registration is mandatory
2. CyberLink Youcam
If you are used to video chatting and video recording, then, you’ll have 200+ fun effects to make your real-time videos as interesting as possible. In fact, the seamless app integration feature will keep your live streaming chats without buffering for long.
Operating systems: Windows 10/8/1.8/7
Price: Free/ Paid
Supported file formats: WMV, MP4, AVI
YouCam is the best free webcam software Windows 10 for YouTubers, business professionals, Streamers, home users, and Vloggers. It seamlessly integrates with live streaming media channels like Twitch, Wirecast, OBS Studio, Facebook Live, Xsplit, and YouTube Live.
The YouCam’s AR technology is one of its hidden treasures that will lighten up your skin by applying a natural-looking makeup. If your room is badly light, use the Live Skin Smoothing feature. Just below it is the TrueTheater Enhancement option to help you automatically adjust your facial sharpness and lighting.
Pros
- Hundreds of animated emojis
- Suitable for video conferencing services
- Plenty of interactive colorful particles and distortions
- Availability of face beautification tool
Cons
- Only limited to the Windows operating system
- Very few features for the free plan
3. ManyCam
Downloading this webcam software guarantees you smooth streaming and effortless recording of videos. Also, this software will help you during game steaming, online education, mobile live streaming, and live telehealth communication.
Operating systems: Windows 10/8/7 and macOS X
Price: Free /Paid
Supported file formats: MJPEG, IP, MP4, AVI, MPEG, MOV
ManyCam is a free webcam recording software for windows 10 . It’s among the most widely used software internationally-not for many reasons, but because of its friendly intuitive user interface and live streaming tools for lessons and lecturers.
So, if you are a lecturer/teacher, you can use the Software Development Kit (SDK) to integrate the webcam with any online teaching platform. Among the features designed to facilitate better online teaching include the picture in picture, Chroma Key, multiple video sources, and screen sharing.
Pro
- Ability to stream 4K videos
- Real-time camera control settings
- No watermark even on the free plan
- Screencasting and screen recording feature
- Real-time drop and drag effects
Cons
- Expensive business subscription plans
- No Light enhancement features
- Most features are manual as opposed to being automatic

Filmora WebCame & Screen Recorder
Filmora - WebCame & Screen Recorder
• No-time delay to record webcam and screen while live streaming or gaming
• Edit recording video for marketing replay or adding game commentary
• Cross-platform supported - (Windows, Mac, iOS, Android)
Start Webcam & Screen Record Start Webcam & Screen Record Start Webcam & Screen Record Learn More >
4. SplitCam
To stream your desktop/laptop screen SplitCam is the most appropriate software. With only the inbuilt virtual webcam, you can share your screen videos to media channels and IMS. Other uses of this software are recording webcam chatting , streaming live videos, and messaging.
Operating systems: Windows 10/8/7
Price: Free
SplitCam is not as popular as the other free webcam software windows 10 like ManyCam and YouCam. This is because it doesn’t integrate with some of the world’s renowned social media platforms- Facebook and Instagram. However, you can use this software to stream, take snapshots, and record videos for YouTube, Skype, Justin.tv, Gtalk, and Windows Live Messenger.
SplitCam is rich in fantastic webcam effects. Haven’t you been surprised to see someone appear to be streaming from the ocean or the Amazon Mountain? This is what you can do with SplitCam. Other cool effects are frames, texts on videos, filters, and facial items like masks and fake face glasses.
Pros
- Open and simple interface
- Integratable with the messaging apps
- Supports a wide range of resolutions ( between 320x180 and 2048x1536)
Cons
- Applicable to a small number of channels
- Supported file formats not defined
5. Bandicam
Do you want a recorder for screen recording, recording your gameplay, or capturing videos from devices like smartphones and PlayStation? Look for no other software but BandiCam. You can also merge two or more video files, remove unwanted parts, and select the only part to screen record.
Operating systems: Windows Vista, 10/8/7
Price: Free/paid
Supported file format: AVI, MP4, JPEG, TIF, GIF, PNG
Supported graphics cards: Nvidia NVENC, Nvidia NVENC (),
BandiCam is another HD webcam software Windows 10 with the capability of capturing high compression videos and games on your PC screen videos without compromising the video quality. Don’t forget to record all webinars aired in your niche.
Netflix is becoming more popular each day due to the thrilling videos. With the BandiCam screen recorder, you can record live-streamed videos on Netflix for over 24hrs. These are the tools to edit your recorded video: real-time drawing tool, webcam overlay, sound mixer, and Chroma Key.
Pros
- No hidden features
- Widescreen capture
- Can record 2D/3D videos in HD mode
- Can capture fast-paced videos of up to 144 FPS
Cons
- Not suitable for beginners
- Cannot be used to live stream videos
6. NCH - Video Capture Software

Of all the listed webcam software in this review, this software has the most diverse functions. You can record streaming videos, record your computer screen, record from external devices, and record from a webcam. It’s also perfect for recording audios and simultaneous recording from screen and webcam.
Operating systems: Windows 10, 8, 8.1, 7, XP, Vista 64 bit and Mac OS X 10.5 and above
Price: Free/paid
Supported file formats: MP4, WMV, AVI, MPG, FLV, MOV
Debut Video Capture is the only free webcam recording software for Windows 10 believed to capture or record videos from any external source. It has also preset settings for HD and TV with pre-production enhancement features like color adjustment settings, overlay buttons and frame rate, aspect ratio, and resolution settings.
If you always think of becoming rich, the Express Burn Disc Burner is the tool that will help you make money. Record the most trending videos and use this tool to burn DVDs and CDs.
Pros
- Can record videos for any social media platform
- Supports a wide range of audio and video file formats
- All features are open and easy to use
- Availability of video editing software
Cons
- Only monthly subscriptions for paid plans
- Watermark for the free download
- Difficult to record a full-screen movie
Try Filmora to Smoothly Record WebCame and Screen!
Filmora Web Camera & Screen Recorder can capture any area of the PC screen and webcam. It’s perfect to capture and record while making a live gaming match, marketing promotion, guiding a tour, and more. Plus, you can edit the recording video files in Filmora directly! Worth to have a try!
Start Webcam & Screen Recording Start Webcam & Screen Recording Start Webcam & Screen Recording Learn More >
7. YAWCAM
This webcam software can be referred to as the simplest for all beginners with the will to start streaming and recording videos for personal or home use.
Supported file formats: PNG, JPG, MJPEG, GIF, JavaScript
Price: Free
Supported operating systems: Windows 2000/10/8/7/ Vista and XP
YAWCAM is an absolutely free webcam software windows 10. Why is it the simplest software to use? Just download and you will find all features on one page. Simple language commands aligned in a drop-down menu ready to be used with only one click.
Some of the best features include overlay texts and images, scheduler, motion detection, and an inbuilt webserver. For you to use this webcam software, use these supported devices; DirectX compatible webcams, DV-camera, or video capture devices.
Pros
- No watermark
- Easy to use
- Friendly user interface
Cons
- Few transitions and effects
8. Windows Camera
We all trust any app or software by Microsoft over others! If you also do, then you can download Windows Camera and use it to record videos, take snapshots and shoot videos.
Operating system: Windows 10
Price: Free
Supported devices: Xbox One, Windows, mobile
Windows Camera is among the best free webcam software for Windows 10. This is because of the software’s few but easy-to-use and effective features that are expertly designed for PCs and tablets installed with Windows 10.
The automatic photo back combined with the photo-shoot timer makes it perfect for taking selfies and passports. Using the panorama feature, you can take photos of the best scenes and share them on media platforms.
Pros
- Simplicity is its main strength
- Supports resolutions above 1080p
- Good for photographers
Cons
- Has no built-in virtual webcam
- Requires a camera to support 4K videos
9. Fake Webcam

Supported file formats: AVI, MPEG, DVD, VCD, WMV, 3GP, MP4, SVCD, MOV, ASF,
Price: Free /paid
Operating systems: Windows 7/8/10 (32/64 bit)
Fake Webcam is a free webcam software Windows 10 whose name is creatively used to suggest it almost functions like a webcam. This doesn’t fall far from the truth! You can truly use this software to broadcast, add effects and filters, record on full screen, and fake your voice.
To share or stream your photos and videos on Skype, YIM, or Gtalk, using the screen recorder would give the best results. What makes Fake Webcam stand out is the free video converter and the free video toolkit.
Pros
- Free support tools
- Supports all video and audio formats
- Can convert file formats and stream to any channel
- Availability of the screen recorder
- Integratable with almost all instant messengers
Cons
- Major tools not free(Fake Webcam and Screen recorder)
10. IP Camera Viewer
Do you run a supermarket store, mall or you’ve installed security surveillance cameras in your compound? IP Camera Viewer is the most effective webcam software for video monitoring systems.
Supported file formats: JPEG, MPEG-4, MJPEG, and
Price: Free
Operating systems: Windows 10 / 8 / 7 /2012 /Vista and XP
IP Camera Viewer is the most used free webcam recording software for windows 10 as its compatible with almost all IP camera models like Panasonic, Toshiba, Canon, D-Link, Sony, and more the 2000 others. With the capability of viewing and controlling 4 camera feeds at once, you can use this software to monitor your entire compound.
Some of the important advanced IP Camera Viewer functions include listening to webcam audios, adjust image settings, zoom or tilt images, schedule monitoring times, and detect motions.
Pros
- Automatically uploads recorded videos and photos to a server
- Compatible with almost all IP camera models
- Simple and easy to use
Cons
- No inbuilt media player
- Cannot adjust the image or video quality
You may also want to read >>> 10 Best Webcams | A Buyer’s Guide
![]()
A cross-platform for making videos anywhere for all creators

Why your video editing isn’t good enough? How about some creative inspo?
- 100 Million+ Users
- 150+ Countries and Regions
- 4 Million+ Social Media Followers
- 5 Million+ Stock Media for Use
* Secure Download

FAQs about Webcam Software for Windows
1. What is Webcam Software?
A webcam is a video camera that feeds or streams images or video in real-time to or over a computer network. And webcam software enables users to record video or stream video over the Internet.
Webcam software is an application that allows you to capture video from your laptop/desktop webcam and record or stream video over the Internet. You can use them to deliver professional videos, streaming, and online courses easily.
2. Does Windows have built-in webcam software?
Windows 10 has an in-built webcam app called Camera that lets you record videos and take pictures with your webcam. This is definitely better than downloading 3rd party webcam recording software where spyware/malware is rampant.
3. Does a webcam need software?
Yes, if the camera hardware offers depth, low-light support, night vision, etc. If you use any software on the camera, these functions are only available if the driver is installed.
Conclusion
After a keen of all the webcam software above, it’s evident that every developer had an intended purpose. You cannot therefore just randomly wake up and download any without considering its functions, supported devices, file formats, and the auxiliary apps available. All this information is contained herein.
According to some users, there are free webcam software Windows 10 that more often would not show any video images but the audio is absolutely clear. To help your fellow user, what bad experience have you ever had after recording a game using webcam software ? Kindly share your comment or suggestion on our social media platforms.

Richard Bennett
Richard Bennett is a writer and a lover of all things video.
Follow @Richard Bennett
Richard Bennett
Mar 27, 2024• Proven solutions
Which webcam softwarehave you installed on your laptop or desktop? Using the right webcam software to live stream videos, screen record videos, or chat on Skype results in high-quality images, smooth streaming, and high-quality images and videos.
There is a huge number of free webcam software with advanced features yet free for you to download, and use on your PC.
But how would you determine the best webcam software to use?
Before you mounted that webcam on your desktop or laptop, you had a reason. It’s your webcam features and purpose that should guide you to select the right software for the webcam camera.
In this article, we will show you 10 webcam software for Windows in this guide. Included are the most useful factors to consider as you make your choice – complexity of use, free/paid, integrations, editing tools, and more. You will learn:
- Part 1: The Best Webcam & Screen Recorder for Windows and Mac [Video Tutorial]
- Part 2: Top 10 Best Free Webcam Software for Windows
First take a quick look of the 10 best webcam software that is available on your Windows from a video:
For Win 7 or later (64-bit)
Secure Download
For macOS 10.14 or later
Secure Download
Part 1: The Best Webcam & Screen Recorder for Computer
You need a sound and webcam recorder to record your video tutorials, streaming videos, presentations, or any other type of video. Wondershare Filmora is the software to use. Other than its most admired friendly intuitive interface, it’s simple and easy to use-suitable for both beginners and professionals.
For Win 7 or later (64-bit)
Secure Download
For macOS 10.14 or later
Secure Download
Among the outstanding features, you’ll find in Filmora include,
- Fast-paced recording speed of up to 120 fps
- Adverse professional editing tools that are easy to use
- Simultaneous recording from both webcam and computer screen
- Compatible with 50+ different file formats
- Rich title text and tutorial features
It’s free to download. Have a try now! Join in the Wondershare Video Community and get some inspiration from other Filomora users.
Part 2: Top 10 Best Free Webcam Software for Windows
To help you evaluate which webcam software best suits your needs, I’ve featured the strengths, shortcomings, and support services in each software review.
This is the list of the best free webcam software for Windows 10.
| 1 - Logitech Capture | 2 - CyberLink Youcam |
|---|---|
| 3 - ManyCam | 4 - SplitCam |
| 5 - Bandicam | 6 - NCH - Video Capture Software |
| 7 - YAWCAM | 8 - Windows Camera |
| 9 - Fake Webcam | 10 - IP Camera Viewer |
1. Logitech Capture
The multiple source recording feature and direct streaming app are the key strengths of this software. According to its mission statement- All-In-One Content Creation- you can use this software to record, edit, customize, and stream to your favorite channel.
Operating systems: Windows 10/8/7
Price: Free
Supported webcams: 1080P PRO STREAM, BRIO STREAM, C920s HD PRO, C922 PRO STREAM
Logitech Capture is among the few free webcam recording software for Windows 10 with studio controls applicable during recording. You can use this feature to adjust your image, create frames, adjust focus and transitions, and enable ChromaKey as you record.
In case you want to create a picture-in-picture presentation, this software allows you to use two webcams simultaneously. With the source switching and the auto-focus features, you can record the best tutorials or guides that show all dimensions and your image.
Pros
- Rich in transitions and effects
- Portrait optimization for mobile devices
- Its Capture app offers direct streaming to YouTube
- You can take passports or still images
Cons
- Limited to YouTube channel
- Account registration is mandatory
2. CyberLink Youcam
If you are used to video chatting and video recording, then, you’ll have 200+ fun effects to make your real-time videos as interesting as possible. In fact, the seamless app integration feature will keep your live streaming chats without buffering for long.
Operating systems: Windows 10/8/1.8/7
Price: Free/ Paid
Supported file formats: WMV, MP4, AVI
YouCam is the best free webcam software Windows 10 for YouTubers, business professionals, Streamers, home users, and Vloggers. It seamlessly integrates with live streaming media channels like Twitch, Wirecast, OBS Studio, Facebook Live, Xsplit, and YouTube Live.
The YouCam’s AR technology is one of its hidden treasures that will lighten up your skin by applying a natural-looking makeup. If your room is badly light, use the Live Skin Smoothing feature. Just below it is the TrueTheater Enhancement option to help you automatically adjust your facial sharpness and lighting.
Pros
- Hundreds of animated emojis
- Suitable for video conferencing services
- Plenty of interactive colorful particles and distortions
- Availability of face beautification tool
Cons
- Only limited to the Windows operating system
- Very few features for the free plan
3. ManyCam
Downloading this webcam software guarantees you smooth streaming and effortless recording of videos. Also, this software will help you during game steaming, online education, mobile live streaming, and live telehealth communication.
Operating systems: Windows 10/8/7 and macOS X
Price: Free /Paid
Supported file formats: MJPEG, IP, MP4, AVI, MPEG, MOV
ManyCam is a free webcam recording software for windows 10 . It’s among the most widely used software internationally-not for many reasons, but because of its friendly intuitive user interface and live streaming tools for lessons and lecturers.
So, if you are a lecturer/teacher, you can use the Software Development Kit (SDK) to integrate the webcam with any online teaching platform. Among the features designed to facilitate better online teaching include the picture in picture, Chroma Key, multiple video sources, and screen sharing.
Pro
- Ability to stream 4K videos
- Real-time camera control settings
- No watermark even on the free plan
- Screencasting and screen recording feature
- Real-time drop and drag effects
Cons
- Expensive business subscription plans
- No Light enhancement features
- Most features are manual as opposed to being automatic
Filmora WebCame & Screen Recorder
Filmora - WebCame & Screen Recorder
• No-time delay to record webcam and screen while live streaming or gaming
• Edit recording video for marketing replay or adding game commentary
• Cross-platform supported - (Windows, Mac, iOS, Android)
Start Webcam & Screen Record Start Webcam & Screen Record Start Webcam & Screen Record Learn More >
4. SplitCam
To stream your desktop/laptop screen SplitCam is the most appropriate software. With only the inbuilt virtual webcam, you can share your screen videos to media channels and IMS. Other uses of this software are recording webcam chatting , streaming live videos, and messaging.
Operating systems: Windows 10/8/7
Price: Free
SplitCam is not as popular as the other free webcam software windows 10 like ManyCam and YouCam. This is because it doesn’t integrate with some of the world’s renowned social media platforms- Facebook and Instagram. However, you can use this software to stream, take snapshots, and record videos for YouTube, Skype, Justin.tv, Gtalk, and Windows Live Messenger.
SplitCam is rich in fantastic webcam effects. Haven’t you been surprised to see someone appear to be streaming from the ocean or the Amazon Mountain? This is what you can do with SplitCam. Other cool effects are frames, texts on videos, filters, and facial items like masks and fake face glasses.
Pros
- Open and simple interface
- Integratable with the messaging apps
- Supports a wide range of resolutions ( between 320x180 and 2048x1536)
Cons
- Applicable to a small number of channels
- Supported file formats not defined
5. Bandicam
Do you want a recorder for screen recording, recording your gameplay, or capturing videos from devices like smartphones and PlayStation? Look for no other software but BandiCam. You can also merge two or more video files, remove unwanted parts, and select the only part to screen record.
Operating systems: Windows Vista, 10/8/7
Price: Free/paid
Supported file format: AVI, MP4, JPEG, TIF, GIF, PNG
Supported graphics cards: Nvidia NVENC, Nvidia NVENC (),
BandiCam is another HD webcam software Windows 10 with the capability of capturing high compression videos and games on your PC screen videos without compromising the video quality. Don’t forget to record all webinars aired in your niche.
Netflix is becoming more popular each day due to the thrilling videos. With the BandiCam screen recorder, you can record live-streamed videos on Netflix for over 24hrs. These are the tools to edit your recorded video: real-time drawing tool, webcam overlay, sound mixer, and Chroma Key.
Pros
- No hidden features
- Widescreen capture
- Can record 2D/3D videos in HD mode
- Can capture fast-paced videos of up to 144 FPS
Cons
- Not suitable for beginners
- Cannot be used to live stream videos
6. NCH - Video Capture Software
Of all the listed webcam software in this review, this software has the most diverse functions. You can record streaming videos, record your computer screen, record from external devices, and record from a webcam. It’s also perfect for recording audios and simultaneous recording from screen and webcam.
Operating systems: Windows 10, 8, 8.1, 7, XP, Vista 64 bit and Mac OS X 10.5 and above
Price: Free/paid
Supported file formats: MP4, WMV, AVI, MPG, FLV, MOV
Debut Video Capture is the only free webcam recording software for Windows 10 believed to capture or record videos from any external source. It has also preset settings for HD and TV with pre-production enhancement features like color adjustment settings, overlay buttons and frame rate, aspect ratio, and resolution settings.
If you always think of becoming rich, the Express Burn Disc Burner is the tool that will help you make money. Record the most trending videos and use this tool to burn DVDs and CDs.
Pros
- Can record videos for any social media platform
- Supports a wide range of audio and video file formats
- All features are open and easy to use
- Availability of video editing software
Cons
- Only monthly subscriptions for paid plans
- Watermark for the free download
- Difficult to record a full-screen movie
Try Filmora to Smoothly Record WebCame and Screen!
Filmora Web Camera & Screen Recorder can capture any area of the PC screen and webcam. It’s perfect to capture and record while making a live gaming match, marketing promotion, guiding a tour, and more. Plus, you can edit the recording video files in Filmora directly! Worth to have a try!
Start Webcam & Screen Recording Start Webcam & Screen Recording Start Webcam & Screen Recording Learn More >
7. YAWCAM
This webcam software can be referred to as the simplest for all beginners with the will to start streaming and recording videos for personal or home use.
Supported file formats: PNG, JPG, MJPEG, GIF, JavaScript
Price: Free
Supported operating systems: Windows 2000/10/8/7/ Vista and XP
YAWCAM is an absolutely free webcam software windows 10. Why is it the simplest software to use? Just download and you will find all features on one page. Simple language commands aligned in a drop-down menu ready to be used with only one click.
Some of the best features include overlay texts and images, scheduler, motion detection, and an inbuilt webserver. For you to use this webcam software, use these supported devices; DirectX compatible webcams, DV-camera, or video capture devices.
Pros
- No watermark
- Easy to use
- Friendly user interface
Cons
- Few transitions and effects
8. Windows Camera
We all trust any app or software by Microsoft over others! If you also do, then you can download Windows Camera and use it to record videos, take snapshots and shoot videos.
Operating system: Windows 10
Price: Free
Supported devices: Xbox One, Windows, mobile
Windows Camera is among the best free webcam software for Windows 10. This is because of the software’s few but easy-to-use and effective features that are expertly designed for PCs and tablets installed with Windows 10.
The automatic photo back combined with the photo-shoot timer makes it perfect for taking selfies and passports. Using the panorama feature, you can take photos of the best scenes and share them on media platforms.
Pros
- Simplicity is its main strength
- Supports resolutions above 1080p
- Good for photographers
Cons
- Has no built-in virtual webcam
- Requires a camera to support 4K videos
9. Fake Webcam
Supported file formats: AVI, MPEG, DVD, VCD, WMV, 3GP, MP4, SVCD, MOV, ASF,
Price: Free /paid
Operating systems: Windows 7/8/10 (32/64 bit)
Fake Webcam is a free webcam software Windows 10 whose name is creatively used to suggest it almost functions like a webcam. This doesn’t fall far from the truth! You can truly use this software to broadcast, add effects and filters, record on full screen, and fake your voice.
To share or stream your photos and videos on Skype, YIM, or Gtalk, using the screen recorder would give the best results. What makes Fake Webcam stand out is the free video converter and the free video toolkit.
Pros
- Free support tools
- Supports all video and audio formats
- Can convert file formats and stream to any channel
- Availability of the screen recorder
- Integratable with almost all instant messengers
Cons
- Major tools not free(Fake Webcam and Screen recorder)
10. IP Camera Viewer
Do you run a supermarket store, mall or you’ve installed security surveillance cameras in your compound? IP Camera Viewer is the most effective webcam software for video monitoring systems.
Supported file formats: JPEG, MPEG-4, MJPEG, and
Price: Free
Operating systems: Windows 10 / 8 / 7 /2012 /Vista and XP
IP Camera Viewer is the most used free webcam recording software for windows 10 as its compatible with almost all IP camera models like Panasonic, Toshiba, Canon, D-Link, Sony, and more the 2000 others. With the capability of viewing and controlling 4 camera feeds at once, you can use this software to monitor your entire compound.
Some of the important advanced IP Camera Viewer functions include listening to webcam audios, adjust image settings, zoom or tilt images, schedule monitoring times, and detect motions.
Pros
- Automatically uploads recorded videos and photos to a server
- Compatible with almost all IP camera models
- Simple and easy to use
Cons
- No inbuilt media player
- Cannot adjust the image or video quality
You may also want to read >>> 10 Best Webcams | A Buyer’s Guide
![]()
A cross-platform for making videos anywhere for all creators
Why your video editing isn’t good enough? How about some creative inspo?
- 100 Million+ Users
- 150+ Countries and Regions
- 4 Million+ Social Media Followers
- 5 Million+ Stock Media for Use
* Secure Download
FAQs about Webcam Software for Windows
1. What is Webcam Software?
A webcam is a video camera that feeds or streams images or video in real-time to or over a computer network. And webcam software enables users to record video or stream video over the Internet.
Webcam software is an application that allows you to capture video from your laptop/desktop webcam and record or stream video over the Internet. You can use them to deliver professional videos, streaming, and online courses easily.
2. Does Windows have built-in webcam software?
Windows 10 has an in-built webcam app called Camera that lets you record videos and take pictures with your webcam. This is definitely better than downloading 3rd party webcam recording software where spyware/malware is rampant.
3. Does a webcam need software?
Yes, if the camera hardware offers depth, low-light support, night vision, etc. If you use any software on the camera, these functions are only available if the driver is installed.
Conclusion
After a keen of all the webcam software above, it’s evident that every developer had an intended purpose. You cannot therefore just randomly wake up and download any without considering its functions, supported devices, file formats, and the auxiliary apps available. All this information is contained herein.
According to some users, there are free webcam software Windows 10 that more often would not show any video images but the audio is absolutely clear. To help your fellow user, what bad experience have you ever had after recording a game using webcam software ? Kindly share your comment or suggestion on our social media platforms.
Richard Bennett
Richard Bennett is a writer and a lover of all things video.
Follow @Richard Bennett
Also read:
- Updated Best of the Best 2024S Top 4K/8K Video Editing Tools
- The Ultimate List 10 Best Free Online Subtitle Creators
- In 2024, After Effects vs Adobe Premiere A Beginners Guide to Video Post-Production
- 2024 Approved Best of the Web Vertical Video Editors for Mobile-First Content
- Get Adobe Premiere Pro CS6 for Mac at No Cost 2023 Update
- New Create a Sense of Speed Motion Blur in Final Cut Pro
- The Best of the Rest Windows Movie Maker Substitute Tools
- The Lowdown on VN Video Editor for PC A Brief but Informative Review
- Fast and Furious Best Video Editing Tools for 2024
- Updated Finding the Ideal AIFF Converter A Beginners Guide to Conversion Success
- Updated Free Image Resources for Entrepreneurs and Small Businesses
- New Convert Soundcloud to MP3 Like a Pro Expert Advice
- Updated 5 Best Free Video Compressor Apps That Reduce Video Sizes on iPhone and iPad
- In 2024, Alternatives to PowerDirector Top Mobile Video Editing Software
- Aspect Ratio Explained How It Shapes Your YouTube Videos Aesthetic for 2024
- Best Free Green Screen Apps for Mobile Devices (Updated 2023)
- New Edit MP4 Files with Ease Best Windows 8 Video Editor
- 2024 Approved Free Online Video Editing Made Easy A Jaycut User Guide
- In 2024, Free Online Video Editing Tools with Background Music Options
- Updated Unleash Your Creativity Best Video Dubbing Apps
- 7 Best Filmmaking Software You Should Know (Low Budget) for 2024
- Updated Elevate Your Storytelling Advanced Nikon Video Editing Techniques
- Get the Most Out of Your GoPro Mac Video Editing Essentials
- In 2024, Best Image Aspect Ratio Converters on the Web
- In 2024, Download Windows Movie Maker for Free A Beginners Guide to Video Editing
- Updated Editing Videos on Mac? Try VN Video Editor or These Alternatives
- Updated Edit Like a Pro Top-Rated Free 4K Video Editing Software
- Video on the Go How to Speed Up Playback in QuickTime Player
- In 2024, Capture Perfection Top-Rated Webcam Recording Software for Windows 10
- Customize Your Videos Speed in Camtasia A Beginners Guide
- VHS-Inspired Video Editing Simplified Techniques for FCP
- New Fixing the Shake Essential Techniques for Smoother Videos in AE
- Effortless Reaction Videos Tips and Tricks Using Filmora 2023 Edition
- New Desktop Video Editing GoPro Quik and Beyond
- New Mastering Audio Transitions in FCPX L-Cuts and J-Cuts Explained
- Updated The Ultimate Guide to Video Editing on Windows 10
- Updated 2024 Approved Techniques You Never Heard of for Learning AI Marketing YouTube
- Windows Video Editing How to Create Stunning 3D Visuals for 2024
- Updated In 2024, AI Has Influenced All Video Editors to Speed up Editing. This Article Discusses the Significance of AI Slow Motion and the Tools that Offer It
- In 2024, 10 Amazing Wallpaper Collage Ideas and Photos
- A Detailed VPNa Fake GPS Location Free Review On Oppo Reno 11 Pro 5G | Dr.fone
- How to Soft Reset Honor X50 phone? | Dr.fone
- In 2024, How To Do Oppo Find N3 Screen Sharing | Dr.fone
- How to Send and Fake Live Location on Facebook Messenger Of your Apple iPhone 15 Pro | Dr.fone
- In 2024, How to Unlock Nokia C12 Pattern Lock if Forgotten? 6 Ways
- How To Fix Part of the Touch Screen Not Working on Nokia 105 Classic | Dr.fone
- In 2024, A Perfect Guide To Remove or Disable Google Smart Lock On Realme
- New 2024 Approved Ideal Soundtrack Choices Selecting Songs to Elevate Your Montage Masterpiece
- Ultimate Guide from Tecno Camon 20 Pro 5G FRP Bypass
- In 2024, How Do You Get Sun Stone Evolutions in Pokémon For Motorola Moto G23? | Dr.fone
- How to Show Wi-Fi Password on Vivo Y36
- Updated 2024 Approved The Ultimate List of Free 4K Video Editing Tools
- Title: 2024 Approved Expert Insights 5 Pro Tips for Getting the Most Out of Your 16X9 Ratio Calculator
- Author: Giselle
- Created at : 2024-05-19 07:46:51
- Updated at : 2024-05-20 07:46:51
- Link: https://ai-vdieo-software.techidaily.com/2024-approved-expert-insights-5-pro-tips-for-getting-the-most-out-of-your-16x9-ratio-calculator/
- License: This work is licensed under CC BY-NC-SA 4.0.
