
:max_bytes(150000):strip_icc():format(webp)/GettyImages-1353420724-65161751b9924195880d3273e327cb54.jpg)
2024 Approved Top 8 Video Editing Apps for 4K Proxy Video Editing
: Top 8 Video Editing Apps for 4K Proxy Video Editing
Top 8 Video Editing Apps for 4K Proxy Video Editing

Max Wales
Mar 27, 2024• Proven solutions
Shooting videos in high resolutions can help you create visually impressive content your followers on social media are going to adore. The only trouble is that the size of 4K videos can slow you down during the video editing process if your computer doesn’t have enough RAM memory or processing power. Additionally, quite a few inexpensive or free video editing apps don’t allow their users to create low-resolution proxy files that make the process of editing 4K videos much faster. That’s why in this article we are going to take you through the best 8 video editors you can use for 4K proxy video editing.
The Best Video Editing Apps for Proxy Editing in 2020
Some of the video editing apps we featured in this article can only run on computers that already have the advanced hardware setups. However, even if you have a computer setup that can easily support processing of the 4K video files, proxy editing can still be useful as it can reduce the amount of time you will have to spend on performing complex video editing tasks. Let’s take a look at some of the best video editors that support proxy editing.
1. Filmora
Price: Free version available, subscription plans start at $49.99 per year
Compatibility: macOS, Windows


The wide range of video editing options, support for nearly all popular video file formats or quick and simple exporting process are only a few reasons why Filmora is one of the best video editors you can use this year. Creating proxy files in Filmora is not a difficult task, because the software generates them automatically for you. You just have to choose between the 1280x720p or 1920x1080p resolutions and Filmora will create proxies for all media files that are larger than the resolution you’ve selected. However, the amount of time Filmora is going to need to create proxies depends on your computer’s processing power, but also on the size and the number of the RAW files you imported into a project.
2. Adobe Premiere Pro CC
Price: $20,99 per month, different subscription plans available
Compatibility: Windows, macOS
This is probably one of the best, if not the best non-linear video editing software ever created, so it is hardly surprising that you can easily create proxy files for all videos you use in a project you create in Adobe Premiere Pro. So, to create proxy files you just need to open the folder that contains those files from the Media Browser and then click on the Ingest button. You should then click on the wrench tool and pick the Create Proxies option from the drop-down menu located next to the Ingest option. Afterward, you should select one of the available resolution presets and proceed to import the footage into the project. However, before you can start editing with proxies you have to click on the Toggle Proxy button.
3. Final Cut Pro X
Price: Free trial available, $299,99
Compatibility: macOS
Transcoding media with FCPX doesn’t require too much effort, as the software offers a couple of options that make the editing process faster. You can opt to generate optimized media files by transcoding the original video clips into Apple ProRes 422 codec format that shortens the amount of time needed for rendering and provides excellent quality of color that is required for compositing. The proxy media files will also be created by transcoding the videos to Apple ProRes 422 codec format that retains original aspect ratio and frame rate of the video clips you transcoded. It is also worth noting that FCPX transcodes all mp3 files you import into a project to MOV audio files.
4. Vegas Pro
Price: Subscription plans start from $249,00
Compatibility: Windows
This video editor is often overlooked in conversations about the most powerful video editing apps, but the tools it offers are powerful enough to enable you to edit videos at a professional level. Creating proxy files in Vegas Pro is remarkably easy, as you just have to import the files into a new project, select each file you want to transcode and then choose the Create Video Proxy option from the right-click menu. Just keep in mind that you must create proxy files before you do any actual editing because otherwise, the transcoding process is not going work.
5. Blender
Price: Free
Compatibility: Linux, macOS, Windows
Blender is a 3D modeling and VFX software that lets you track objects or use 3D painting tools among numerous other options. Even though creating proxies with this app is not a particularly complicated process, you still have to be familiar with Blender in order to make full use of its transcoding options. The software allows you to generate proxy files whose size is only 25% of the video’s original size, although you can also create proxies that have 50% and 75% of the video’s original size. After you’ve adjusted the transcoding settings you should simply click on the Rebuild Proxy and Timecode Indices button.
6. Shotcut
Price: Free
Compatibility: Windows, macOS, Linux
Despite the fact that this cross-platform video editor supports 4K and ProRes files that can cause it to lag at times, creating proxies in Shotcut is a highly technical process. In case you decide to make a proxy file by yourself, you will have to export a version of the file that is two or four times smaller than the original. You must also remember that you have to go through the entire process of creating proxies before you make any edits. The trick to creating proxies in Shotcut is to make a project file with the larger version of the video, then replace the larger version of the file with a smaller version of that same video file, before you actually start editing. Once you’ve completed the editing process, you can then once again add the larger source file to the project and export your video in high resolution.
7. Lightworks
Price: Free trial available, subscription plans start at $24,99 per month
Compatibility: Linux, macOS, Windows
The process of creating proxies in Lightworks is rather simple since you just have to import the video files you’d like to edit into the software and make sure they are selected before you right-click on them. Once the right-click menu appears on the screen you should click on the Media submenu and select the Make Proxies option. The amount of time Lightworks is going to need to generate the proxy files depends on the number of the source files and their size. You can then proceed to add the proxies to the timeline, edit them and Lightworks will automatically use the source files instead of proxies during the rendering process.
8. HitFilm Express
Price: Free
Compatibility: macOS, Windows
Once you create a new project and import all video clips you want to use in that project into the editor you should just go to the Assets menu that is located in the Media panel and click on the Make Proxy option. You will be able to continue editing while the transcoding process is still in progress, and after the source files are transcoded they will be replaced by proxies. However, making adjustments to a proxy version of a composite shot will invalidate that proxy file, which is why it is important to make all edits on that shot before you create its proxy.
Conclusion
Reducing the size of video clips you use in your projects is going to save you a lot of time during the video editing process. Each video editing software we featured in this article allows its users to generate proxy files effortlessly. Which video editor are you going to be using for proxy video editing? Leave a comment below and let us know.
Max Wales
Max Wales is a writer and a lover of all things video.
Follow @Max Wales
Max Wales
Mar 27, 2024• Proven solutions
Shooting videos in high resolutions can help you create visually impressive content your followers on social media are going to adore. The only trouble is that the size of 4K videos can slow you down during the video editing process if your computer doesn’t have enough RAM memory or processing power. Additionally, quite a few inexpensive or free video editing apps don’t allow their users to create low-resolution proxy files that make the process of editing 4K videos much faster. That’s why in this article we are going to take you through the best 8 video editors you can use for 4K proxy video editing.
The Best Video Editing Apps for Proxy Editing in 2020
Some of the video editing apps we featured in this article can only run on computers that already have the advanced hardware setups. However, even if you have a computer setup that can easily support processing of the 4K video files, proxy editing can still be useful as it can reduce the amount of time you will have to spend on performing complex video editing tasks. Let’s take a look at some of the best video editors that support proxy editing.
1. Filmora
Price: Free version available, subscription plans start at $49.99 per year
Compatibility: macOS, Windows
The wide range of video editing options, support for nearly all popular video file formats or quick and simple exporting process are only a few reasons why Filmora is one of the best video editors you can use this year. Creating proxy files in Filmora is not a difficult task, because the software generates them automatically for you. You just have to choose between the 1280x720p or 1920x1080p resolutions and Filmora will create proxies for all media files that are larger than the resolution you’ve selected. However, the amount of time Filmora is going to need to create proxies depends on your computer’s processing power, but also on the size and the number of the RAW files you imported into a project.
2. Adobe Premiere Pro CC
Price: $20,99 per month, different subscription plans available
Compatibility: Windows, macOS
This is probably one of the best, if not the best non-linear video editing software ever created, so it is hardly surprising that you can easily create proxy files for all videos you use in a project you create in Adobe Premiere Pro. So, to create proxy files you just need to open the folder that contains those files from the Media Browser and then click on the Ingest button. You should then click on the wrench tool and pick the Create Proxies option from the drop-down menu located next to the Ingest option. Afterward, you should select one of the available resolution presets and proceed to import the footage into the project. However, before you can start editing with proxies you have to click on the Toggle Proxy button.
3. Final Cut Pro X
Price: Free trial available, $299,99
Compatibility: macOS
Transcoding media with FCPX doesn’t require too much effort, as the software offers a couple of options that make the editing process faster. You can opt to generate optimized media files by transcoding the original video clips into Apple ProRes 422 codec format that shortens the amount of time needed for rendering and provides excellent quality of color that is required for compositing. The proxy media files will also be created by transcoding the videos to Apple ProRes 422 codec format that retains original aspect ratio and frame rate of the video clips you transcoded. It is also worth noting that FCPX transcodes all mp3 files you import into a project to MOV audio files.
4. Vegas Pro
Price: Subscription plans start from $249,00
Compatibility: Windows
This video editor is often overlooked in conversations about the most powerful video editing apps, but the tools it offers are powerful enough to enable you to edit videos at a professional level. Creating proxy files in Vegas Pro is remarkably easy, as you just have to import the files into a new project, select each file you want to transcode and then choose the Create Video Proxy option from the right-click menu. Just keep in mind that you must create proxy files before you do any actual editing because otherwise, the transcoding process is not going work.
5. Blender
Price: Free
Compatibility: Linux, macOS, Windows
Blender is a 3D modeling and VFX software that lets you track objects or use 3D painting tools among numerous other options. Even though creating proxies with this app is not a particularly complicated process, you still have to be familiar with Blender in order to make full use of its transcoding options. The software allows you to generate proxy files whose size is only 25% of the video’s original size, although you can also create proxies that have 50% and 75% of the video’s original size. After you’ve adjusted the transcoding settings you should simply click on the Rebuild Proxy and Timecode Indices button.
6. Shotcut
Price: Free
Compatibility: Windows, macOS, Linux
Despite the fact that this cross-platform video editor supports 4K and ProRes files that can cause it to lag at times, creating proxies in Shotcut is a highly technical process. In case you decide to make a proxy file by yourself, you will have to export a version of the file that is two or four times smaller than the original. You must also remember that you have to go through the entire process of creating proxies before you make any edits. The trick to creating proxies in Shotcut is to make a project file with the larger version of the video, then replace the larger version of the file with a smaller version of that same video file, before you actually start editing. Once you’ve completed the editing process, you can then once again add the larger source file to the project and export your video in high resolution.
7. Lightworks
Price: Free trial available, subscription plans start at $24,99 per month
Compatibility: Linux, macOS, Windows
The process of creating proxies in Lightworks is rather simple since you just have to import the video files you’d like to edit into the software and make sure they are selected before you right-click on them. Once the right-click menu appears on the screen you should click on the Media submenu and select the Make Proxies option. The amount of time Lightworks is going to need to generate the proxy files depends on the number of the source files and their size. You can then proceed to add the proxies to the timeline, edit them and Lightworks will automatically use the source files instead of proxies during the rendering process.
8. HitFilm Express
Price: Free
Compatibility: macOS, Windows
Once you create a new project and import all video clips you want to use in that project into the editor you should just go to the Assets menu that is located in the Media panel and click on the Make Proxy option. You will be able to continue editing while the transcoding process is still in progress, and after the source files are transcoded they will be replaced by proxies. However, making adjustments to a proxy version of a composite shot will invalidate that proxy file, which is why it is important to make all edits on that shot before you create its proxy.
Conclusion
Reducing the size of video clips you use in your projects is going to save you a lot of time during the video editing process. Each video editing software we featured in this article allows its users to generate proxy files effortlessly. Which video editor are you going to be using for proxy video editing? Leave a comment below and let us know.
Max Wales
Max Wales is a writer and a lover of all things video.
Follow @Max Wales
Aspect Ratio Essentials: Boosting Mobile Engagement with Vertical Design
Best Practices for Creating Phone Aspect Ratio Vertical on Your Smartphone
An easy yet powerful editor
Numerous effects to choose from
Detailed tutorials provided by the official channel
When you’re taking a snapshot of someone or something and posting it to social media, you’ll need to decide if it’ll be a portrait or a landscape orientation. And that’s where the knowledge regarding the phone aspect ratio vertical comes in!

This post will dive into the rise of the phone aspect ratio vertical, including best practices on using phone ratio calculator and mobile vertical video size based on its final viewing platforms such as YouTube, Instagram, or broadcast.
In this article
01 [Why Vertical Videos Are in the Frame?](#Part 1)
02 [Different Aspect Ratios on Mobile Screens](#Part 2)
03 [Tips to Shoot a Vertical Video](#Part 3)
04 [Top 6 Practices for Creating Phone Aspect Ratio Vertical on Your Smartphone](#Part 4)
Part 1 Why Vertical Videos Are in the Frame?
Did you know that there are six aspect ratios in total for videos and photos that marketers and creators use? These aspect ratios are 9:16, 16:9, 1:1, 4:3, 3:2, 21:9. The first way to choose the right aspect ratio for your video is whether the video needs to be vertical or horizontal.
A video that’s portrait or vertical mode is taller than it is wide. The entire screen is devoted to vertical video capturing while gaining attention.
Smartphones are to be held vertically, and although you can view media always horizontally, it’s far simpler for watchers to consume media while keeping their mobile phones upright.
Vertical videos are available in different sizes, but the most standard instances come in the 9:16 aspect ratio. While the traditional format of watching videos on phones has been horizontal with an aspect ratio of 16:9, vertical videos are taller than more comprehensive, hence the reversed aspect ratio. And, this is the main reason you see vertical videos in the frame, and thus, they need to be fixed or rightly shot in terms of ideal phone aspect ratio vertical.
Part 2 Different Aspect Ratios on Mobile Screens
The aspect ratio also measures how tall or wide a display is. Still, it shouldn’t be mistaken for ‘display/screen size’ calculated by diagonally measuring throughout the screen.
The phone aspect ratio vertical is commonly written in proportions with the more petite figure on the right side and the more prominent figure on the left-hand side. It’s also sometimes called a decimal, the more prominent figure divided by, the more petite figure.
It means that a display aspect ratio of 16:9 can also be called an aspect ratio of 1.78, i.e., 16/9.
Types of Aspect ratio
● 16:9 Aspect Ratio
16:9 is one of the most common aspect ratios used on smartphones. Sometimes showcased as 1.78 or 4²:3², the aspect ratio has become typical for smartphones and other devices since 2010.
It generally means there will be 16 pixels in one direction for every 9 pixels in the other for a device with a 16:9 display.

Devices with a 16:9 aspect ratio are usually broad, and they became the standard aspect ratio for smartphones because most contents are also available in the exact format. So you would enjoy videos and gaming in full widescreen quality on a 16:9 aspect ratio device.
On the other hand, you’ll experience the “Letterboxing effect“ on devices that aren’t available in 16:9 aspect ratios and where black bars/bands appear at the bottom and the top of the content you are wandering.

● 18:9 Aspect ratio
This 18:9 aspect ratio was born out of the need to maximize the size of displays without increasing the dimensions of phone sizes.
The narrow design of 18:9 aspect ratio devices assisted for better one-hand grip, smooth multitasking, enhanced usability, and more screen real estate, etc. Yet, because contents are highly present in the 16:9 aspect ratio, there will be “black bands” at the top, bottom or to your display’s right or left.

The 18:9 aspect ratio allows for convenient usage of smartphones, provided we put the content-cropping and letterboxing aside.
● 19:9 Aspect ratio
19:9 is another smartphone aspect ratio that is becoming increasingly famous and used by top OEMs like Samsung, Huawei, ASUS, and Apple on their flagship devices.
The smartphones with a 19:9 aspect ratio are available with increased height and 19 pixels in single direction for every 9 pixels in the other. Similar to 18:9, devices with a 19:9 aspect ratio generally have pretty non-existent and slimmer bezels, but you’ll enjoy vast screen real estate with the latter.
Understanding iPhone Vertical Video Dimensions
Apple boasts a 16:9 screen for the versions of iPhone 5 onwards. Most Google/Android phones already had a 16:9 screen at that point. Thus, to export a vertical video, you would want it to be 9:16. (16:9 standing up!) and it’s the ideal size for iPhone vertical video dimensions.
The highest quality vertical video’s output is 720 Horizontal by 1280 vertical for 1080p (1080X1920).
The highest quality vertical video’s output is 576 horizontal by 1024 vertical for 720p (720X1280).
Vertical Phone Aspect Ratio for Video
Let’s now understand the mobile vertical video size! Vertical video is pretty higher than it is wide. Instead of being shown in a landscape orientation or widescreen format, the way video has traditionally intended for television and cinema and television, and the vertical video rotated by 90 degrees.

Hold your phone upright and record video in a 9:16 aspect ratio. Hence, the name vertical video is said to be!
It’s because if you horizontally hold your phone, the viewable screen area is 16:9 aspect ratio. The same standard is for most HDTV, video production, and cinema screen sizes.
Part 3 Tips to Shoot a Vertical Video
Besides using the photo ratio calculator, we’d like to enlist some tips on getting started with your phone aspect ratio vertical shooting.
1 – High production quality is not essential
Yes, the content is the king, and people or the end customers may not notice your video quality than the content. So, don’t be afraid when you start and move ahead with your DIY budget.
2 – Use the Ideal Dimensions
Whether it’s iPhone vertical video dimensions or other Android and Windows devices, you need to use the ideal dimensions already discussed above.
3 – Engage your audience better
You can incorporate little details within the video and engage your audience better. You can also add captions and burn them within the video.
4 – Optimize vertical videos
You can optimize vertical videos for viewing without sound. Try watching your videos without audio to see if they still make sense without that context. You likely won’t achieve the same excellent results made possible with good video marketing if they don’t.
5 – Capture Attention
Yes, you need to attract the audience and capture their attention within seconds. And, it’s the only or one of the best tricks t get your audience hooked for the long term. Don’t underestimate the significance of storytelling, and you can thus add them for creative looks.
Part 4 Top 6 Practices for Creating Phone Aspect Ratio Vertical on Your Smartphone
Are you looking to capture the video in the correct phone aspect ratio vertical? In this section, we will discuss a few helpful tips that will assist you in shooting a better vertical video in any condition you want to sort.
1 – Shoot in the desired or ideal aspect ratio
Any video bigger than the aspect ratio of 1:1 is vertical video.
It’s possible to create vertical videos two ways:
● By framing a camera in portrait mode.
● By rendering it vertically by scaling or cutting the video.
2 – Split the screen
You can use the tall height of the vertical frame to stack horizontal clips on top of each other creatively.
Clips can be related in appearance and content or appear to mend into one another. Various music videos have also used this technique.
You can also try merging various diagonal lines or clips for a unique look.
3 - Fill the vertical space
You can quickly fill vacant space in the frame automatically by getting closer to the subject.

When the camera is angled down and raised high, you automatically get a deep frame for filming long shots that fill space.
The above-the-head perspective provides an attractive and latest POV that serves the exact purpose.

4 - Try not to shake (or use a gimbal or a selfie stick)
While watching a video, jerking camera movements are almost always disturbing and distracting. This must be avoided quickly from side to side when creating vertical videos with minimized space on sides.
While a normal 360-degree or pan rotation is outstanding (and even crucial), cameras cannot manage the data amount they must process once they begin to move too quickly.
Slow down when in doubt!

5 - Remember to resize as per the platform
You don’t essentially have to shoot everything at eye level or arm’s length when you shoot videos vertically.
Changing your angles and shot length will assist make your videos more interactive, and you can create something compelling out of them within the video frame.
Screen recordings are usually horizontal, but they will be vertically viewed when you upload them to Instagram. They also make sure the edges did not get cut off while uploading them and the writing is still legible.
6 - Add graphics, fun text, GIFs, or stickers
Use text that complements visuals. Make sure your text isn’t highlighting your subject. Any graphics elements, such as stickers or emojis, should follow this exact approach.
Line them up where they’ll improve your video and scale them up as required.
Pro Tip: Use Wondershare Filmora Video Editor to get your desired phone aspect ratio vertical

Wondershare Filmora - Best Video Editor for Mac/Windows
5,481,435 people have downloaded it.
Build unique custom animations without breaking a sweat.
Focus on creating epic stories and leave the details to Filmora’s auto features.
Start a creative adventure with drag & drop effects and endless possibilities.
Filmora simplifies advanced features to save you time and effort.
Filmora cuts out repetition so you can move on to your next creative breakthrough.
Filmora provides various functions to resize your video, which means you can change video bitrate or directly crop your video when exporting. Despite resizing a video, you can also zoom your video to highlight the best section of your video. Here are certain features or functions of Filmora to resize a video. Download it now and have a try!
● Resize the video size and aspect ratio of video;
● Crop/trim/cut video to highlight an object within the video;
● Add multiple video effects
● Export the edited video portion to a mobile device, DVD, or YouTube;
● Supported OS: Mac OS X (above 10.10) and Windows (Windows 10 included).
Resize Video by Cropping
Step 1: Upload the video to the program
Firstly, upload your media via the “Import” tab or drag and drop it from the Windows File Explorer tab to the User’s Album.
Thereafter, drag videos from the User’s Album to the Timeline.

Step 2: Crop the video
You can aim at a specific part of the video by cropping and resizing your video display dimensions. Hit the added video on Timeline, a “Crop, and Zoom” button to cut the video. It will appear in the options menu.
Hit it to bring up the editing panel and crop videos.

Hit the Crop tab. Just hover the mouse to move and resize the marquee to decide how to crop the original video.
You have five options while video cropping at the bottom to assist you: Custom, 16:9, 4:3, 1:1, and 9:16 aspect radio.
Select Aspect Ratio of Project
After you launch Filmora, you can select the project aspect ratio. There are options among 16:9 (widescreen), 4:3 (standard), 9:16 (portrait), 1:1 (Instagram). Select the one you desire and begin by clicking the New Project.

Key Takeaways from This Episode
● Understanding phone aspect ratio vertical on both the Windows and iPhone.
● Different types of mobile vertical video sizes.
● Best six practices to shoot the video in the proper phone aspect ratio vertical.
When you’re taking a snapshot of someone or something and posting it to social media, you’ll need to decide if it’ll be a portrait or a landscape orientation. And that’s where the knowledge regarding the phone aspect ratio vertical comes in!
This post will dive into the rise of the phone aspect ratio vertical, including best practices on using phone ratio calculator and mobile vertical video size based on its final viewing platforms such as YouTube, Instagram, or broadcast.
In this article
01 [Why Vertical Videos Are in the Frame?](#Part 1)
02 [Different Aspect Ratios on Mobile Screens](#Part 2)
03 [Tips to Shoot a Vertical Video](#Part 3)
04 [Top 6 Practices for Creating Phone Aspect Ratio Vertical on Your Smartphone](#Part 4)
Part 1 Why Vertical Videos Are in the Frame?
Did you know that there are six aspect ratios in total for videos and photos that marketers and creators use? These aspect ratios are 9:16, 16:9, 1:1, 4:3, 3:2, 21:9. The first way to choose the right aspect ratio for your video is whether the video needs to be vertical or horizontal.
A video that’s portrait or vertical mode is taller than it is wide. The entire screen is devoted to vertical video capturing while gaining attention.
Smartphones are to be held vertically, and although you can view media always horizontally, it’s far simpler for watchers to consume media while keeping their mobile phones upright.
Vertical videos are available in different sizes, but the most standard instances come in the 9:16 aspect ratio. While the traditional format of watching videos on phones has been horizontal with an aspect ratio of 16:9, vertical videos are taller than more comprehensive, hence the reversed aspect ratio. And, this is the main reason you see vertical videos in the frame, and thus, they need to be fixed or rightly shot in terms of ideal phone aspect ratio vertical.
Part 2 Different Aspect Ratios on Mobile Screens
The aspect ratio also measures how tall or wide a display is. Still, it shouldn’t be mistaken for ‘display/screen size’ calculated by diagonally measuring throughout the screen.
The phone aspect ratio vertical is commonly written in proportions with the more petite figure on the right side and the more prominent figure on the left-hand side. It’s also sometimes called a decimal, the more prominent figure divided by, the more petite figure.
It means that a display aspect ratio of 16:9 can also be called an aspect ratio of 1.78, i.e., 16/9.
Types of Aspect ratio
● 16:9 Aspect Ratio
16:9 is one of the most common aspect ratios used on smartphones. Sometimes showcased as 1.78 or 4²:3², the aspect ratio has become typical for smartphones and other devices since 2010.
It generally means there will be 16 pixels in one direction for every 9 pixels in the other for a device with a 16:9 display.
Devices with a 16:9 aspect ratio are usually broad, and they became the standard aspect ratio for smartphones because most contents are also available in the exact format. So you would enjoy videos and gaming in full widescreen quality on a 16:9 aspect ratio device.
On the other hand, you’ll experience the “Letterboxing effect“ on devices that aren’t available in 16:9 aspect ratios and where black bars/bands appear at the bottom and the top of the content you are wandering.
● 18:9 Aspect ratio
This 18:9 aspect ratio was born out of the need to maximize the size of displays without increasing the dimensions of phone sizes.
The narrow design of 18:9 aspect ratio devices assisted for better one-hand grip, smooth multitasking, enhanced usability, and more screen real estate, etc. Yet, because contents are highly present in the 16:9 aspect ratio, there will be “black bands” at the top, bottom or to your display’s right or left.
The 18:9 aspect ratio allows for convenient usage of smartphones, provided we put the content-cropping and letterboxing aside.
● 19:9 Aspect ratio
19:9 is another smartphone aspect ratio that is becoming increasingly famous and used by top OEMs like Samsung, Huawei, ASUS, and Apple on their flagship devices.
The smartphones with a 19:9 aspect ratio are available with increased height and 19 pixels in single direction for every 9 pixels in the other. Similar to 18:9, devices with a 19:9 aspect ratio generally have pretty non-existent and slimmer bezels, but you’ll enjoy vast screen real estate with the latter.
Understanding iPhone Vertical Video Dimensions
Apple boasts a 16:9 screen for the versions of iPhone 5 onwards. Most Google/Android phones already had a 16:9 screen at that point. Thus, to export a vertical video, you would want it to be 9:16. (16:9 standing up!) and it’s the ideal size for iPhone vertical video dimensions.
The highest quality vertical video’s output is 720 Horizontal by 1280 vertical for 1080p (1080X1920).
The highest quality vertical video’s output is 576 horizontal by 1024 vertical for 720p (720X1280).
Vertical Phone Aspect Ratio for Video
Let’s now understand the mobile vertical video size! Vertical video is pretty higher than it is wide. Instead of being shown in a landscape orientation or widescreen format, the way video has traditionally intended for television and cinema and television, and the vertical video rotated by 90 degrees.
Hold your phone upright and record video in a 9:16 aspect ratio. Hence, the name vertical video is said to be!
It’s because if you horizontally hold your phone, the viewable screen area is 16:9 aspect ratio. The same standard is for most HDTV, video production, and cinema screen sizes.
Part 3 Tips to Shoot a Vertical Video
Besides using the photo ratio calculator, we’d like to enlist some tips on getting started with your phone aspect ratio vertical shooting.
1 – High production quality is not essential
Yes, the content is the king, and people or the end customers may not notice your video quality than the content. So, don’t be afraid when you start and move ahead with your DIY budget.
2 – Use the Ideal Dimensions
Whether it’s iPhone vertical video dimensions or other Android and Windows devices, you need to use the ideal dimensions already discussed above.
3 – Engage your audience better
You can incorporate little details within the video and engage your audience better. You can also add captions and burn them within the video.
4 – Optimize vertical videos
You can optimize vertical videos for viewing without sound. Try watching your videos without audio to see if they still make sense without that context. You likely won’t achieve the same excellent results made possible with good video marketing if they don’t.
5 – Capture Attention
Yes, you need to attract the audience and capture their attention within seconds. And, it’s the only or one of the best tricks t get your audience hooked for the long term. Don’t underestimate the significance of storytelling, and you can thus add them for creative looks.
Part 4 Top 6 Practices for Creating Phone Aspect Ratio Vertical on Your Smartphone
Are you looking to capture the video in the correct phone aspect ratio vertical? In this section, we will discuss a few helpful tips that will assist you in shooting a better vertical video in any condition you want to sort.
1 – Shoot in the desired or ideal aspect ratio
Any video bigger than the aspect ratio of 1:1 is vertical video.
It’s possible to create vertical videos two ways:
● By framing a camera in portrait mode.
● By rendering it vertically by scaling or cutting the video.
2 – Split the screen
You can use the tall height of the vertical frame to stack horizontal clips on top of each other creatively.
Clips can be related in appearance and content or appear to mend into one another. Various music videos have also used this technique.
You can also try merging various diagonal lines or clips for a unique look.
3 - Fill the vertical space
You can quickly fill vacant space in the frame automatically by getting closer to the subject.
When the camera is angled down and raised high, you automatically get a deep frame for filming long shots that fill space.
The above-the-head perspective provides an attractive and latest POV that serves the exact purpose.
4 - Try not to shake (or use a gimbal or a selfie stick)
While watching a video, jerking camera movements are almost always disturbing and distracting. This must be avoided quickly from side to side when creating vertical videos with minimized space on sides.
While a normal 360-degree or pan rotation is outstanding (and even crucial), cameras cannot manage the data amount they must process once they begin to move too quickly.
Slow down when in doubt!
5 - Remember to resize as per the platform
You don’t essentially have to shoot everything at eye level or arm’s length when you shoot videos vertically.
Changing your angles and shot length will assist make your videos more interactive, and you can create something compelling out of them within the video frame.
Screen recordings are usually horizontal, but they will be vertically viewed when you upload them to Instagram. They also make sure the edges did not get cut off while uploading them and the writing is still legible.
6 - Add graphics, fun text, GIFs, or stickers
Use text that complements visuals. Make sure your text isn’t highlighting your subject. Any graphics elements, such as stickers or emojis, should follow this exact approach.
Line them up where they’ll improve your video and scale them up as required.
Pro Tip: Use Wondershare Filmora Video Editor to get your desired phone aspect ratio vertical
Wondershare Filmora - Best Video Editor for Mac/Windows
5,481,435 people have downloaded it.
Build unique custom animations without breaking a sweat.
Focus on creating epic stories and leave the details to Filmora’s auto features.
Start a creative adventure with drag & drop effects and endless possibilities.
Filmora simplifies advanced features to save you time and effort.
Filmora cuts out repetition so you can move on to your next creative breakthrough.
Filmora provides various functions to resize your video, which means you can change video bitrate or directly crop your video when exporting. Despite resizing a video, you can also zoom your video to highlight the best section of your video. Here are certain features or functions of Filmora to resize a video. Download it now and have a try!
● Resize the video size and aspect ratio of video;
● Crop/trim/cut video to highlight an object within the video;
● Add multiple video effects
● Export the edited video portion to a mobile device, DVD, or YouTube;
● Supported OS: Mac OS X (above 10.10) and Windows (Windows 10 included).
Resize Video by Cropping
Step 1: Upload the video to the program
Firstly, upload your media via the “Import” tab or drag and drop it from the Windows File Explorer tab to the User’s Album.
Thereafter, drag videos from the User’s Album to the Timeline.
Step 2: Crop the video
You can aim at a specific part of the video by cropping and resizing your video display dimensions. Hit the added video on Timeline, a “Crop, and Zoom” button to cut the video. It will appear in the options menu.
Hit it to bring up the editing panel and crop videos.
Hit the Crop tab. Just hover the mouse to move and resize the marquee to decide how to crop the original video.
You have five options while video cropping at the bottom to assist you: Custom, 16:9, 4:3, 1:1, and 9:16 aspect radio.
Select Aspect Ratio of Project
After you launch Filmora, you can select the project aspect ratio. There are options among 16:9 (widescreen), 4:3 (standard), 9:16 (portrait), 1:1 (Instagram). Select the one you desire and begin by clicking the New Project.
Key Takeaways from This Episode
● Understanding phone aspect ratio vertical on both the Windows and iPhone.
● Different types of mobile vertical video sizes.
● Best six practices to shoot the video in the proper phone aspect ratio vertical.
Create Stunning Animations with These Free Tools for Windows and Mac
Best 12 Free Download Animation Software for Windows and Mac

Shanoon Cox
Mar 27, 2024• Proven solutions
In your search for quality animation software, you may have found that many of the programs cost a lot of money no matter it is 2D animation software or 3D animation editor. The good news is that you can choose free animation tools to make different animation types easily.
That is why we created a list of the best animation software on both Mac and Windows. Whether you are a professional editor or just a beginner to start making animation, you will find the tools listed below are easy to use without watermark and won’t cost money to improve your skills.
The best part is you will find these free animation programs are also very useful for content creation on Mac and Windows. Besides, we have listed the pros and cons of each software. Keep reading!
- Part 1: Best Free Animation Software for Mac
- Part 2: Best Free Animation Software for Windows
- Part 3: FAQ about Animation Software for Windows and Mac
Here we have made a table of 12 free animation software without watermark on Windows and macOS. Take a look.
6 Free Animation Software for macOS
5K-3DMiddleIt is a great tool for 3D artists6KritaDifficultPerfect software for 2D animation
| Number | Software | Difficulty Level | Highlight |
|---|---|---|---|
| 1 | Synfig Studio | Easy | Calculate vector shape to animation automatically |
| 2 | Pencil2D Animation | Easiest | Straightforward interface for beginners |
| 3 | Tupi | Middle | Its community is active to offer solutions |
| 4 | Blender | Difficult | It is a powerful animation tool to render and make modeling |
6 Free Animation Software for Windows
| Number | Software | Difficulty Level | Highlight |
|---|---|---|---|
| 1 | DAZ Studio | Difficult | For professional users with the fast animation process |
| 2 | Terragen | Middle | It can make realistic CG environments |
| 3 | Anim8or | Difficult | 3D animation is Anim8or’s main function |
| 4 | Seamless3d | Easy | It has many features for 3d modeling |
| 5 | OpenToonz | Middle | Make cartoon animation with plugins |
| 6 | Stykz | Easy | Quickly make animation if you have used Pivot StickFigure Animator |
Best Animation Software on Windows and Mac - Filmora
Looking for a simple while powerful Mac video editing tool ? We recommend using Wondershare Filmora. You can use it to create 2D/3D animated texts, shapes, or anything you like for YouTube videos.
The keyframing features will help you make animation effects smooth and precise. When exporting, you can also make it transparent.
Besides, various title templates and transitions are also available for you. Download it now to have a try! Or learn more from Wondershare Video Community .
Key features
- Create various shapes that you like
- Add keyframing to make it move
- Fine-tuning to make it smooth
- Add visual effects/text/color before export it

You can even create photo cut animation which has been very trendy on Tiktok and Instagram. Here is a video to present you how you can do it in Filmora.
Part 1 Best Free Animation Software for Mac
Listed below is free animation software on Mac. Take a look.
01 Synfig Studio - Mac Software to Animate Video
Difficulty Level: Easy
Pro: You can create many layers once a time and sync audio for your animation.
Con: This one needs much time to learn, especially for beginners.
An open-source 2D animation software that works on Macs, Synfig Studio delivers multiple players while you are creating content. Whether you want to add geometric, filters, distortions, or transformations, it is all possible! And thanks to the high-end bone system, you can create cut-out videos using bitmap images!
The thoughtful part is there are two download versions on the homepage: the stable version and the development version. If you want to enjoy a stable and smooth animation editing experience, choose the stable one. However, the development package gives you access to the use of the latest features.
For a novice, you can learn Synfig from step by step guide in Wikipedia and video tutorials. Four languages are available including English, Russian, Dutch, and French for a video course.
You can free download its latest version 1.3.11. The upcoming version is 1.4.
Features:
- It offers support for many layers within the animation.
- The program’s bone system means that you can easily create animations with bitmap images or vector artwork.
- It allows you to sync your creative work with any sound that you want. Has a full-featured audio editor.
02 Pencil2D Animation - Animation Program for 2D Pencil Lover
Difficulty Level: Easiest
Pro: Easy to start and make animation as the interface is user-friendly for many people.
Con: You need to set your preference every time to open it up, so it takes up some time
Pencil2D Animation is one of the simplest 2D hand-drawn tools available. It will work flawlessly on Mac computers. It is ideal for beginners, as the commands and interface are very easy to understand.
Whether you want to create a simple one, or you want something with many layers for videos on YouTube, you can use Pencil2D animation to get it done. Its timeline is easy to use at first glance. You can add and duplicate different frames on a different track.
The frequency of releasing the new version is very fast as Pencil2D is committed to bringing the lasted features to each user. The newest version is v0.6.4 (as of August 2019). Its user guide is informative with video tutorials, FAQs, and manual material.
Features:
- Lightweight and minimalistic design that makes it very easy for beginners.
- Features raster and vector workflows, with easy switching between them. You can paint and sketch as you want!
- Will run on all platforms - Mac, Windows, and Linux.
- Completely free and open source.
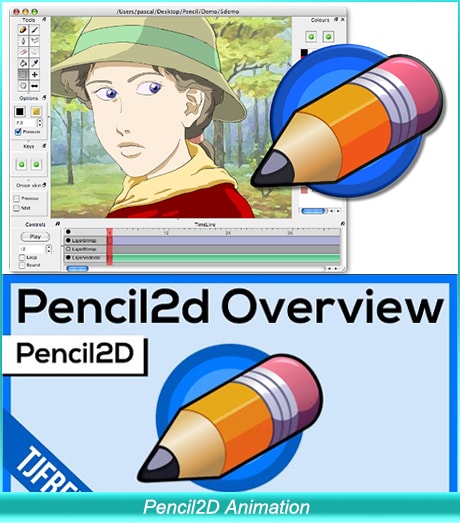
03 TupiTube - Free Animation Application for Mac Users
Difficulty Level: Middle
Pro: It supports vector illustrations. Besides, various formats are available.
Con: If you want to make 3D animation, it will fail. You can only make 2D effects.
A free software application for YouTube, Tupi will allow you to create 2D animations to your heart’s content. The tool was started by animators who wanted to create something that others could use.
It is an open-source tool, which means that users can make tweaks to the program if they have some interesting ideas. The program works on both Windows and Mac. You need to use Tupi and Papagayo to make lip-sync animation with different mouth shapes.
It also offers a solution for schools with related features including academic license, technical support, and ads-free, so many schools choose to use this one to teach kids how to make an animation video.
Features:
- Support for vector illustrations. You can add rectangles, lines, polygons, and other shapes as you please. To fill areas, just use the paint bucket.
- You can import raster images using this program.
- You can export all your finished images into different file formats.
- Support for tweeting positions, scale, shear, and rotations.

04 Blender - Need Some Time to Learn This Animation Tool
Difficulty Level: Difficult
Pro: Really powerful software that you can make for professional users.
Con: It is not easy to make image animation as it focuses on 3D.
Blender is an open-source 3D animation creation suite without a watermark. If you find that 2D is a little bit limiting, we think that you will be very happy with what this free program offers. You can take your projects to a whole new level when you can use this program on your Mac.
You can use Blender to make a video game, modeling, and high-quality animation. However, it involves a steep learning curve. Luckily, there are many tutorials to guide you through the journey. You can also ask for help in the Blender community that millions of talented people like you are there.
Features:
- Creating renders is no problem with this program.
- Modeling, such as sculpting, retopology, and creating curves is not an issue either.
- VFX and animation features are better than any option on the market.
- It offers powerful simulation tools.
- Integration with pipeline tools is easy.
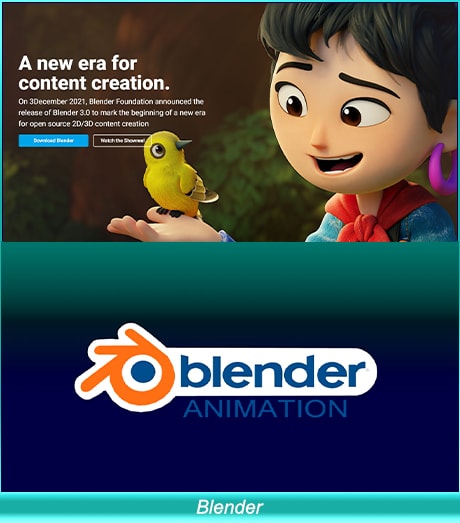
05 K-3D - Best for Animation and Modeling in 3D
Difficulty Level: Middle
Pro: Ideal for designing simple 3D animations and models.
Con: It has an old-fashioned interface. Also, the built-render (RenderMan) feature is difficult to use by beginners.
K-3D is an animation and 3D modeling software. You can download this tool for free on your Mac. Besides, you can also install and run it on your Windows and Linux systems. If you look at the design, you will find that the software is quite old. But don’t judge a book by its cover. Why so? It is because K-3D is one of the strongest and most versatile tools for 3D artists with many options.
For example, K-3D offers extremely systematic and methodological workflows. You can easily adjust the properties of the features in real-time and get instant results. It has a node-oriented visualization pipeline to enjoy more freedom. That means you can create animation using a variety of combinations.
One of the best things about K-3D is that it has three subdivisions of animation. You can work on your model on one side while showing the other side in a mirrored form. Then, experience the final result combined together. And in case you need to make the changes to the end results, you can simply work on the first subdivision and savor automatic changes to the results.
K-3D has an advanced redo and undo mechanism to ensure you can go back or move forward to make corrections or amendments without limits. Additionally, the tool is developed keeping in mind all the industrial standards. For instance, it has complete support and integration of native RenderMan™ to its user interface. This is an excellent feature because most free animation software for Mac requires third-party render plugins.
Features:
- Parametric workflow.
- 2D and 3D animation tools.
- Allows Python and K3DScript scripting.
06 Krita - For Professional 2D Animators
Difficulty Level: Difficult
Pro: Advanced tools with numerous animation options and online training material.
Con: Not suitable for beginners.
If you love 2D animation, then you’ll surely love Krita. It is entirely free software available on Mac, Windows, and Linux. Also, it offers a full platform for drawing and frame-by-frame animation.
The number one reason for adoring Krita is its brush library. There are more than 100 professional brushes to give you a wide range of effects. Moreover, the strokes are pretty amazing and similar to Adobe Photoshop or Adobe Illustrator.
Another great thing about Krita is the brush stabilization feature designed for shaky hands. You can add a stabilizer to your chosen brush to smoothen its flow. Besides, there’s a special Dynamic Brush tool to make animation more fun. At the same time, you can also customize your brushes through different brush engines, including filter engines, color smudge engines, and many more.
Apart from the basic brush options, the preloaded vector tools are next to admire. These tools help you make great comic panels. All you need to do is choose and drag the word bubble template on your canvas. Then, make changes with the anchor point to make new shapes. At the same time, you can also add text to your animation by using the text tool.
Last but not least, there’s a wrap-around mode to create seamless patterns and textures. That means the image or drawing makes its own references along the x-axis and y-axis. This gives you the freedom to continue painting and enjoy updates to your animation instantly.
Features:
- HDR painting.
- PSD support.
- Python scripting.
- Selection and transformation tools.
- Proper group, filter, vector, and file layer management.
- Complete color management for extraordinary results.
- Drawing assistant to help you with straight lines and vanishing points.
Part 2 Best Free Animation Software for Windows
Below is free animation software on Windows. Keep reading.
01 Anireel - Easy to Use Animation Software
Difficulty Level: Easy
Anireel is a simple yet powerful Video Creativity tool used to make 2D animated explainer videos. Developed by Wondershare, one of the most popular Windows software and tool developers, Anireel uses rich, ready-to-use, and diverse assets to help one effortlessly make animated videos.
Features:
- There are tons of drag and drop characters, actions, props, text, and audio assets.
- Easy Text-to-Speech conversion via deep studying technology.
- Animate integrated and imported assets.
- Tons of templates that match many script types.

02 DAZ Studio - Free Software for 3D Lovers
Difficulty Level: Difficult
Pro: You can make game animation for fun. It also supports GPU accelerated real-time rendering.
Con: It has a high demand for the device, but owns a steep learning curve.
Daz 3d is a powerful and completely free 3D creation tool that will let you create the short videos that you want. Whether you are using this for business or pleasure, you will find the program is very easy to understand. Within a day, you will be completely used to its interface.
3D effects are the core focus of DAZ Studio. You can build a model, render, and pose animation within the skin texture level. It has a high requirement for the device. For Windows 64 bits, its recommended RAM is 3G.
Features:
- Options for 3D morphing, animation, and rendering.
- GPU accelerated real-time rendering, which delivers the best results.
- Interactive tutorials to help you become a better 3D artist.
- Everything you make is yours, royalty-free!
03 Terragen - Use It to Make CG Animation
Difficulty Level: Middle
Pro: The recently updated version is the best one. Ray-traced preview is a great function to help us make animation.
Con: The interface looks complicated, but it gets easy to know after you are familiar with it.
A completely free program that you can download and install on all Windows computers and tablets, Terragen is the ideal program for you to create the 3D animations and environments that you want. If you want a photo-realistic CG environment, using Terragen is the best way to do it!
Releasing imagination instantly, Terragen Creative is the one tool you’d like to consider. You can use it to make beautiful scenery.
For advanced tools, you can choose FBX to make animation quickly. The featured image gallery on its homepage will give you a deep understanding of the final outcome you can achieve with Terragen.
Features:
- Ray-traced preview. Without watermark after exporting
- Photo-realistic clouds and ozone simulation
- Rendering is twice as fast as the previous version of the program.
- Adding terrain, objects, and shader to your final product is very easy with the intuitive interface.
04 Anim8or - Free Tool to Make 3D Modeling
Difficulty Level: Difficult
Pro: Anim8or supports 3D modeler and TrueType fonts to meet advanced needs.
Con: Beginners will find it difficult to learn.
Anim8or is a free 3D modeling program that will let you create the unique work that you want. It is a personal project from an animator, but the program does get regular updates and troubleshooting.
It is not going to give you the same features as something like Studio Max or Maya, but you will get the basics. Beginners who are getting into animations will love this program.
Anim8or is a great tool to step into 3D animation ff you think other software is too different to start. In some way, it means you need to give up some advanced features. But all in all, it’s still recommended for you.
Features:
- A full 3D modeler that allows you to create spheres, cylinders, platonic solids, and any other objects that you want.
- Features support for TrueType fonts.
- Easy to create 3D scenes and output them as video files or images.
05 Seamless3d - Open-source Free Software
Difficulty Level: Easy
Pro: It is an open-source 3D modeling package. The good thing is the handy infinite Undo/Redo operation.
Con: Some advanced features are missing like drawing.
Seamless3d, an open-source 3D modeling software that you can download, is among the best animation worktables if you want to create specialized images, animated videos, or 3D characters.
It supports FFmpeg video format, so you can use AVI, MP4, and more. Besides, the forum is not active compared with before, but you still can find answers from many tutorials .
Features:
- It comes with infinite undo and redo options for complete flexibility to correct mistakes.
- It allows for partitioned and seamless texture mapping for YouTube videos.
- Has a specialized tree view interface.

06 OpenToonz - Support Plug in to Make Animation Freely
Difficulty Level: Middle
Pro: It is open-source software, so you can change the code freely.
Con: The plug-in effects are limited.
This animation program is made for beginners on Windows. It is among the best 2D animation software in the market. You can use plug-in effects to change image style, add lights, and distort details. It supports Windows 7/8/10 only for 64 bit.
Features:
- You can add provisional colors to make your animation more colorful.
- Smooth correction without frame losing.
- Compatible with black-and-white, colored, or without binarization scanning.
7 Stykz - Simple to Use Animation Program for Beginners
Difficulty Level: Easy
Pro: It is the best stick figure animation if you want to make this kind of video.
Con: The UI is not modern to use and needs time to adapt to using it.
Stykz is completely free to use and without a watermark. If you have used Pivot StickFigure Animator, then you will find Stykz is similar to it, but you can import the previous .stk files to animate it again. You can use it to make animation smooth frame by frame.
With its frame-based feature, Stykz is easy to customize each frame. You can change previous and current frames to get what you want. You can download it to have a try considering its easy-to-use features.
Features:
- There is some animes file on this website, so you can have a reference.
- Edit animation in the software without using another editing window.
- You can share the final work with others including information.
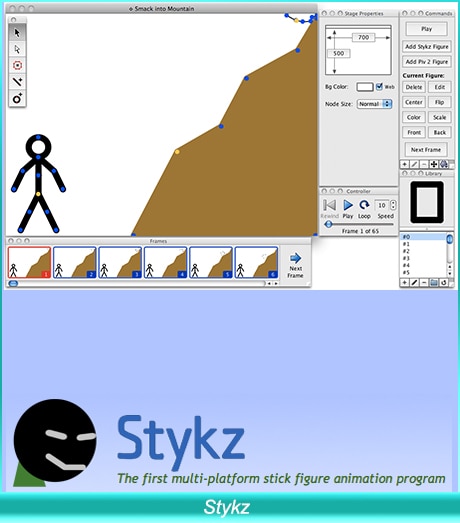
Part 3 FAQ about Animation Software for Windows and Mac
01 Are Macs good for animation?
To be frank, Mac is a better choice to make animation if you want to have a smooth animation experience. For example, screen resolution is a crucial factor to make excellent animation. The good is Mac’s screen will never let you disappointed.
02 What is the best animation software for Mac?
The best animation software on mac includes Synfig Studio, Pencil2D Animation, Tupi, Blender, and more. Mentioned are free-to-use. Maya is also worth considering animation software if you are a professional user. Maya offers a 1-month free trial. After it is ended, the paid plans are month, 1-year, and 3-year.
03 Can you animate in Photoshop?
Yes, you can make basic animation in Photoshop. However, it only supports frame-based animation making. In this case, you need to use other professional software to make animation. But, you still can use Photoshop to meet your needs if you are a beginner.
Conclusion
With any of these free animation maker programs on Mac and Windows, you will have an easy time creating your next 2D or 3D video. Ensure you choose the program that has the features and compatibility that you desire. Then it is up to your creative mind to come up with stunning animations! If you want to make animation easily, you can also find inspiration through classical animated cartoon types with examples .
Shanoon Cox
Shanoon Cox is a writer and a lover of all things video.
Follow @Shanoon Cox
Shanoon Cox
Mar 27, 2024• Proven solutions
In your search for quality animation software, you may have found that many of the programs cost a lot of money no matter it is 2D animation software or 3D animation editor. The good news is that you can choose free animation tools to make different animation types easily.
That is why we created a list of the best animation software on both Mac and Windows. Whether you are a professional editor or just a beginner to start making animation, you will find the tools listed below are easy to use without watermark and won’t cost money to improve your skills.
The best part is you will find these free animation programs are also very useful for content creation on Mac and Windows. Besides, we have listed the pros and cons of each software. Keep reading!
- Part 1: Best Free Animation Software for Mac
- Part 2: Best Free Animation Software for Windows
- Part 3: FAQ about Animation Software for Windows and Mac
Here we have made a table of 12 free animation software without watermark on Windows and macOS. Take a look.
6 Free Animation Software for macOS
5K-3DMiddleIt is a great tool for 3D artists6KritaDifficultPerfect software for 2D animation
| Number | Software | Difficulty Level | Highlight |
|---|---|---|---|
| 1 | Synfig Studio | Easy | Calculate vector shape to animation automatically |
| 2 | Pencil2D Animation | Easiest | Straightforward interface for beginners |
| 3 | Tupi | Middle | Its community is active to offer solutions |
| 4 | Blender | Difficult | It is a powerful animation tool to render and make modeling |
6 Free Animation Software for Windows
| Number | Software | Difficulty Level | Highlight |
|---|---|---|---|
| 1 | DAZ Studio | Difficult | For professional users with the fast animation process |
| 2 | Terragen | Middle | It can make realistic CG environments |
| 3 | Anim8or | Difficult | 3D animation is Anim8or’s main function |
| 4 | Seamless3d | Easy | It has many features for 3d modeling |
| 5 | OpenToonz | Middle | Make cartoon animation with plugins |
| 6 | Stykz | Easy | Quickly make animation if you have used Pivot StickFigure Animator |
Best Animation Software on Windows and Mac - Filmora
Looking for a simple while powerful Mac video editing tool ? We recommend using Wondershare Filmora. You can use it to create 2D/3D animated texts, shapes, or anything you like for YouTube videos.
The keyframing features will help you make animation effects smooth and precise. When exporting, you can also make it transparent.
Besides, various title templates and transitions are also available for you. Download it now to have a try! Or learn more from Wondershare Video Community .
Key features
- Create various shapes that you like
- Add keyframing to make it move
- Fine-tuning to make it smooth
- Add visual effects/text/color before export it
You can even create photo cut animation which has been very trendy on Tiktok and Instagram. Here is a video to present you how you can do it in Filmora.
Part 1 Best Free Animation Software for Mac
Listed below is free animation software on Mac. Take a look.
01 Synfig Studio - Mac Software to Animate Video
Difficulty Level: Easy
Pro: You can create many layers once a time and sync audio for your animation.
Con: This one needs much time to learn, especially for beginners.
An open-source 2D animation software that works on Macs, Synfig Studio delivers multiple players while you are creating content. Whether you want to add geometric, filters, distortions, or transformations, it is all possible! And thanks to the high-end bone system, you can create cut-out videos using bitmap images!
The thoughtful part is there are two download versions on the homepage: the stable version and the development version. If you want to enjoy a stable and smooth animation editing experience, choose the stable one. However, the development package gives you access to the use of the latest features.
For a novice, you can learn Synfig from step by step guide in Wikipedia and video tutorials. Four languages are available including English, Russian, Dutch, and French for a video course.
You can free download its latest version 1.3.11. The upcoming version is 1.4.
Features:
- It offers support for many layers within the animation.
- The program’s bone system means that you can easily create animations with bitmap images or vector artwork.
- It allows you to sync your creative work with any sound that you want. Has a full-featured audio editor.
02 Pencil2D Animation - Animation Program for 2D Pencil Lover
Difficulty Level: Easiest
Pro: Easy to start and make animation as the interface is user-friendly for many people.
Con: You need to set your preference every time to open it up, so it takes up some time
Pencil2D Animation is one of the simplest 2D hand-drawn tools available. It will work flawlessly on Mac computers. It is ideal for beginners, as the commands and interface are very easy to understand.
Whether you want to create a simple one, or you want something with many layers for videos on YouTube, you can use Pencil2D animation to get it done. Its timeline is easy to use at first glance. You can add and duplicate different frames on a different track.
The frequency of releasing the new version is very fast as Pencil2D is committed to bringing the lasted features to each user. The newest version is v0.6.4 (as of August 2019). Its user guide is informative with video tutorials, FAQs, and manual material.
Features:
- Lightweight and minimalistic design that makes it very easy for beginners.
- Features raster and vector workflows, with easy switching between them. You can paint and sketch as you want!
- Will run on all platforms - Mac, Windows, and Linux.
- Completely free and open source.
03 TupiTube - Free Animation Application for Mac Users
Difficulty Level: Middle
Pro: It supports vector illustrations. Besides, various formats are available.
Con: If you want to make 3D animation, it will fail. You can only make 2D effects.
A free software application for YouTube, Tupi will allow you to create 2D animations to your heart’s content. The tool was started by animators who wanted to create something that others could use.
It is an open-source tool, which means that users can make tweaks to the program if they have some interesting ideas. The program works on both Windows and Mac. You need to use Tupi and Papagayo to make lip-sync animation with different mouth shapes.
It also offers a solution for schools with related features including academic license, technical support, and ads-free, so many schools choose to use this one to teach kids how to make an animation video.
Features:
- Support for vector illustrations. You can add rectangles, lines, polygons, and other shapes as you please. To fill areas, just use the paint bucket.
- You can import raster images using this program.
- You can export all your finished images into different file formats.
- Support for tweeting positions, scale, shear, and rotations.
04 Blender - Need Some Time to Learn This Animation Tool
Difficulty Level: Difficult
Pro: Really powerful software that you can make for professional users.
Con: It is not easy to make image animation as it focuses on 3D.
Blender is an open-source 3D animation creation suite without a watermark. If you find that 2D is a little bit limiting, we think that you will be very happy with what this free program offers. You can take your projects to a whole new level when you can use this program on your Mac.
You can use Blender to make a video game, modeling, and high-quality animation. However, it involves a steep learning curve. Luckily, there are many tutorials to guide you through the journey. You can also ask for help in the Blender community that millions of talented people like you are there.
Features:
- Creating renders is no problem with this program.
- Modeling, such as sculpting, retopology, and creating curves is not an issue either.
- VFX and animation features are better than any option on the market.
- It offers powerful simulation tools.
- Integration with pipeline tools is easy.
05 K-3D - Best for Animation and Modeling in 3D
Difficulty Level: Middle
Pro: Ideal for designing simple 3D animations and models.
Con: It has an old-fashioned interface. Also, the built-render (RenderMan) feature is difficult to use by beginners.
K-3D is an animation and 3D modeling software. You can download this tool for free on your Mac. Besides, you can also install and run it on your Windows and Linux systems. If you look at the design, you will find that the software is quite old. But don’t judge a book by its cover. Why so? It is because K-3D is one of the strongest and most versatile tools for 3D artists with many options.
For example, K-3D offers extremely systematic and methodological workflows. You can easily adjust the properties of the features in real-time and get instant results. It has a node-oriented visualization pipeline to enjoy more freedom. That means you can create animation using a variety of combinations.
One of the best things about K-3D is that it has three subdivisions of animation. You can work on your model on one side while showing the other side in a mirrored form. Then, experience the final result combined together. And in case you need to make the changes to the end results, you can simply work on the first subdivision and savor automatic changes to the results.
K-3D has an advanced redo and undo mechanism to ensure you can go back or move forward to make corrections or amendments without limits. Additionally, the tool is developed keeping in mind all the industrial standards. For instance, it has complete support and integration of native RenderMan™ to its user interface. This is an excellent feature because most free animation software for Mac requires third-party render plugins.
Features:
- Parametric workflow.
- 2D and 3D animation tools.
- Allows Python and K3DScript scripting.
06 Krita - For Professional 2D Animators
Difficulty Level: Difficult
Pro: Advanced tools with numerous animation options and online training material.
Con: Not suitable for beginners.
If you love 2D animation, then you’ll surely love Krita. It is entirely free software available on Mac, Windows, and Linux. Also, it offers a full platform for drawing and frame-by-frame animation.
The number one reason for adoring Krita is its brush library. There are more than 100 professional brushes to give you a wide range of effects. Moreover, the strokes are pretty amazing and similar to Adobe Photoshop or Adobe Illustrator.
Another great thing about Krita is the brush stabilization feature designed for shaky hands. You can add a stabilizer to your chosen brush to smoothen its flow. Besides, there’s a special Dynamic Brush tool to make animation more fun. At the same time, you can also customize your brushes through different brush engines, including filter engines, color smudge engines, and many more.
Apart from the basic brush options, the preloaded vector tools are next to admire. These tools help you make great comic panels. All you need to do is choose and drag the word bubble template on your canvas. Then, make changes with the anchor point to make new shapes. At the same time, you can also add text to your animation by using the text tool.
Last but not least, there’s a wrap-around mode to create seamless patterns and textures. That means the image or drawing makes its own references along the x-axis and y-axis. This gives you the freedom to continue painting and enjoy updates to your animation instantly.
Features:
- HDR painting.
- PSD support.
- Python scripting.
- Selection and transformation tools.
- Proper group, filter, vector, and file layer management.
- Complete color management for extraordinary results.
- Drawing assistant to help you with straight lines and vanishing points.
Part 2 Best Free Animation Software for Windows
Below is free animation software on Windows. Keep reading.
01 Anireel - Easy to Use Animation Software
Difficulty Level: Easy
Anireel is a simple yet powerful Video Creativity tool used to make 2D animated explainer videos. Developed by Wondershare, one of the most popular Windows software and tool developers, Anireel uses rich, ready-to-use, and diverse assets to help one effortlessly make animated videos.
Features:
- There are tons of drag and drop characters, actions, props, text, and audio assets.
- Easy Text-to-Speech conversion via deep studying technology.
- Animate integrated and imported assets.
- Tons of templates that match many script types.
02 DAZ Studio - Free Software for 3D Lovers
Difficulty Level: Difficult
Pro: You can make game animation for fun. It also supports GPU accelerated real-time rendering.
Con: It has a high demand for the device, but owns a steep learning curve.
Daz 3d is a powerful and completely free 3D creation tool that will let you create the short videos that you want. Whether you are using this for business or pleasure, you will find the program is very easy to understand. Within a day, you will be completely used to its interface.
3D effects are the core focus of DAZ Studio. You can build a model, render, and pose animation within the skin texture level. It has a high requirement for the device. For Windows 64 bits, its recommended RAM is 3G.
Features:
- Options for 3D morphing, animation, and rendering.
- GPU accelerated real-time rendering, which delivers the best results.
- Interactive tutorials to help you become a better 3D artist.
- Everything you make is yours, royalty-free!
03 Terragen - Use It to Make CG Animation
Difficulty Level: Middle
Pro: The recently updated version is the best one. Ray-traced preview is a great function to help us make animation.
Con: The interface looks complicated, but it gets easy to know after you are familiar with it.
A completely free program that you can download and install on all Windows computers and tablets, Terragen is the ideal program for you to create the 3D animations and environments that you want. If you want a photo-realistic CG environment, using Terragen is the best way to do it!
Releasing imagination instantly, Terragen Creative is the one tool you’d like to consider. You can use it to make beautiful scenery.
For advanced tools, you can choose FBX to make animation quickly. The featured image gallery on its homepage will give you a deep understanding of the final outcome you can achieve with Terragen.
Features:
- Ray-traced preview. Without watermark after exporting
- Photo-realistic clouds and ozone simulation
- Rendering is twice as fast as the previous version of the program.
- Adding terrain, objects, and shader to your final product is very easy with the intuitive interface.
04 Anim8or - Free Tool to Make 3D Modeling
Difficulty Level: Difficult
Pro: Anim8or supports 3D modeler and TrueType fonts to meet advanced needs.
Con: Beginners will find it difficult to learn.
Anim8or is a free 3D modeling program that will let you create the unique work that you want. It is a personal project from an animator, but the program does get regular updates and troubleshooting.
It is not going to give you the same features as something like Studio Max or Maya, but you will get the basics. Beginners who are getting into animations will love this program.
Anim8or is a great tool to step into 3D animation ff you think other software is too different to start. In some way, it means you need to give up some advanced features. But all in all, it’s still recommended for you.
Features:
- A full 3D modeler that allows you to create spheres, cylinders, platonic solids, and any other objects that you want.
- Features support for TrueType fonts.
- Easy to create 3D scenes and output them as video files or images.
05 Seamless3d - Open-source Free Software
Difficulty Level: Easy
Pro: It is an open-source 3D modeling package. The good thing is the handy infinite Undo/Redo operation.
Con: Some advanced features are missing like drawing.
Seamless3d, an open-source 3D modeling software that you can download, is among the best animation worktables if you want to create specialized images, animated videos, or 3D characters.
It supports FFmpeg video format, so you can use AVI, MP4, and more. Besides, the forum is not active compared with before, but you still can find answers from many tutorials .
Features:
- It comes with infinite undo and redo options for complete flexibility to correct mistakes.
- It allows for partitioned and seamless texture mapping for YouTube videos.
- Has a specialized tree view interface.
06 OpenToonz - Support Plug in to Make Animation Freely
Difficulty Level: Middle
Pro: It is open-source software, so you can change the code freely.
Con: The plug-in effects are limited.
This animation program is made for beginners on Windows. It is among the best 2D animation software in the market. You can use plug-in effects to change image style, add lights, and distort details. It supports Windows 7/8/10 only for 64 bit.
Features:
- You can add provisional colors to make your animation more colorful.
- Smooth correction without frame losing.
- Compatible with black-and-white, colored, or without binarization scanning.
7 Stykz - Simple to Use Animation Program for Beginners
Difficulty Level: Easy
Pro: It is the best stick figure animation if you want to make this kind of video.
Con: The UI is not modern to use and needs time to adapt to using it.
Stykz is completely free to use and without a watermark. If you have used Pivot StickFigure Animator, then you will find Stykz is similar to it, but you can import the previous .stk files to animate it again. You can use it to make animation smooth frame by frame.
With its frame-based feature, Stykz is easy to customize each frame. You can change previous and current frames to get what you want. You can download it to have a try considering its easy-to-use features.
Features:
- There is some animes file on this website, so you can have a reference.
- Edit animation in the software without using another editing window.
- You can share the final work with others including information.
Part 3 FAQ about Animation Software for Windows and Mac
01 Are Macs good for animation?
To be frank, Mac is a better choice to make animation if you want to have a smooth animation experience. For example, screen resolution is a crucial factor to make excellent animation. The good is Mac’s screen will never let you disappointed.
02 What is the best animation software for Mac?
The best animation software on mac includes Synfig Studio, Pencil2D Animation, Tupi, Blender, and more. Mentioned are free-to-use. Maya is also worth considering animation software if you are a professional user. Maya offers a 1-month free trial. After it is ended, the paid plans are month, 1-year, and 3-year.
03 Can you animate in Photoshop?
Yes, you can make basic animation in Photoshop. However, it only supports frame-based animation making. In this case, you need to use other professional software to make animation. But, you still can use Photoshop to meet your needs if you are a beginner.
Conclusion
With any of these free animation maker programs on Mac and Windows, you will have an easy time creating your next 2D or 3D video. Ensure you choose the program that has the features and compatibility that you desire. Then it is up to your creative mind to come up with stunning animations! If you want to make animation easily, you can also find inspiration through classical animated cartoon types with examples .
Shanoon Cox
Shanoon Cox is a writer and a lover of all things video.
Follow @Shanoon Cox
Top 16 AVI Video Cutters: Trim/Cut AVI Videos [Windows, MAC, Android, iPhone, and Online]
With the growing fame of video-sharing and social media applications like Twitter, Instagram, and TikTok, the demand for simple and fast video cutting and trimming tools has dramatically increased. Nowadays, you don’t have to play with complex video editing tools to produce high-quality videos.
Thanks to several user-friendly editing software to make things easy for everybody. However, finding the right programs to trim/cut videos is still challenging, especially in AVI format.
But, guess what? These top 16 AVI video cutters for Windows, MAC, Android, iPhone, and online will make video cutting and trimming fun, especially when you learn to do it using Filmora.
In this Article
Part 1: Best AVI Video Cutter to Trim/Cut AVI Video on Windows and MAC – Filmora Video Cutter [with steps}
Part 2: Top 3 Free AVI Video Cutter on Windows
Part 3: Top 3 Free AVI Video Cutter on MAC
Part 4: Top 3 Free AVI Video Cutter on Android
Part 5: Top 3 Free AVI Video Cutter on iPhone
Part 6: Top 3 Free AVI Video Cutter Online
Part 7: Bottom Line
Part 8: FAQs
Part 1: Best AVI Video Cutter to Trim/Cut AVI Video on Windows and MAC – Filmora Video Cutter [with steps]
Filmora by Wondershare is a star video editor with outstanding outcomes. Whether you have a MAC or Windows PC, you can download Filmora regardless of your operating system. The program best serves those who intend to make high-quality videos. The software provides editing support for all video formats, including AVI.
Although Filmora is an affordable editor with tons of audio and video editing options, you can still download the software for free and create projects if watermarks don’t bother you. Moreover, you can count this tool’s capabilities in cropping, resizing, and Chroma screen support. But that’s not the only sweet fruit.
In fact, Filmora is equipped with many jaw-dropping features, including preset templates, auto beat sync, split-screen, speed ramping, motion tracking, keyframing, creative transitions, titles, filters, and much more. And the best part is, you can learn and understand Filmora in no time. That’s why the program is loved and supported by all types of users.
So does Filmora helps cut and trim AVI videos? Yes! It does if you follow these steps correctly.
Step 1: Download Filmora Video Editor
First, download Filmora Video Editor by choosing your operating system, as seen in the screenshot below.
Run the setup and let it finish without any pause or break.
Step 2: Import Your Video to Filmora Video Editor
Importing your AVI video is a very simple process. Just click on the “Film Clip” icon.
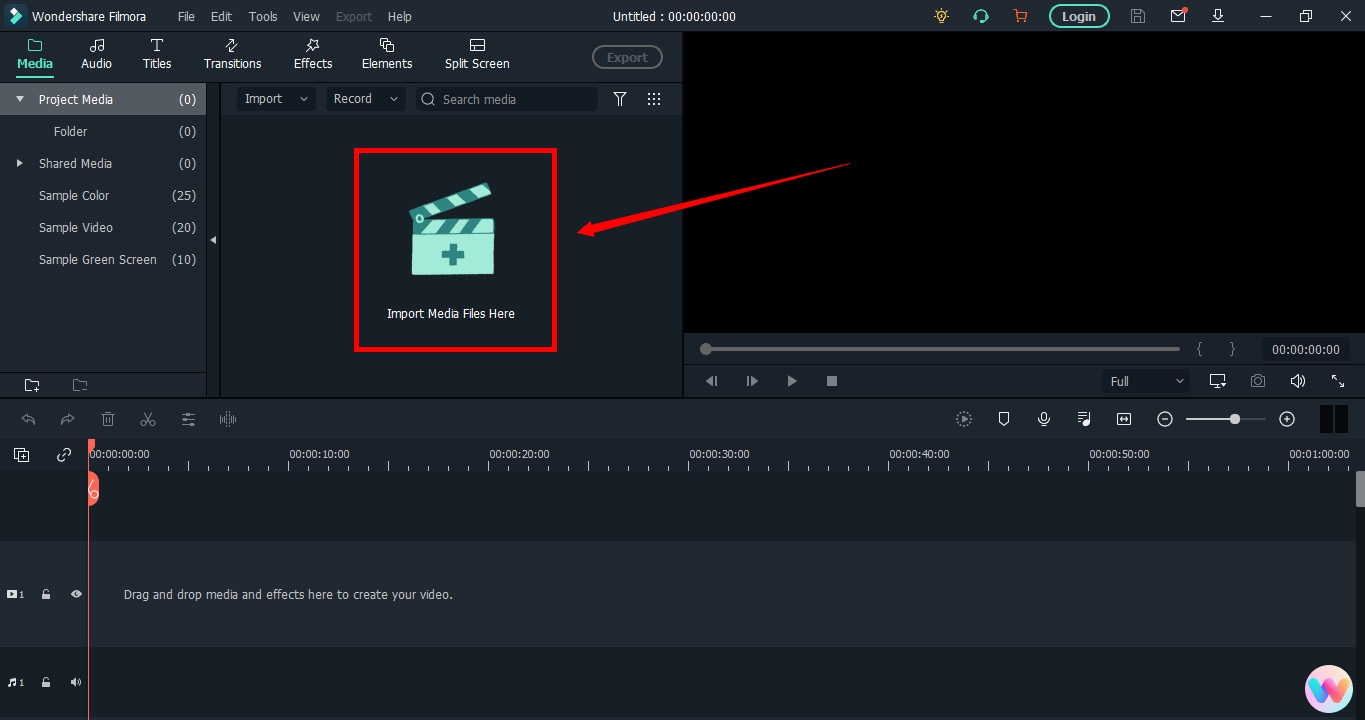
It will open a new window screen on your computer to select the video from the directory. Find the clip you want to import and cut. Use your mouse to select it and click the “Open” button.
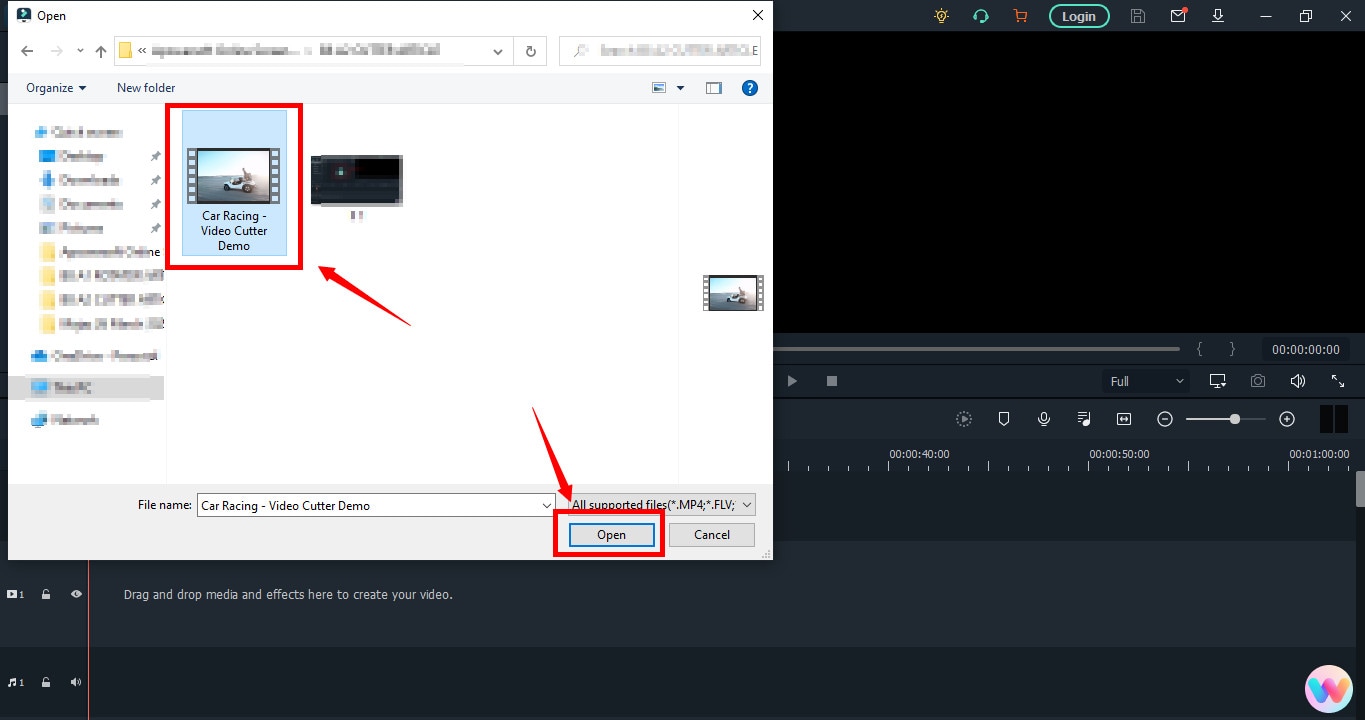
The video will be loaded in the “Media” folder of Filmora. The clip’s thumbnail should be visible to assure you have done everything correctly.
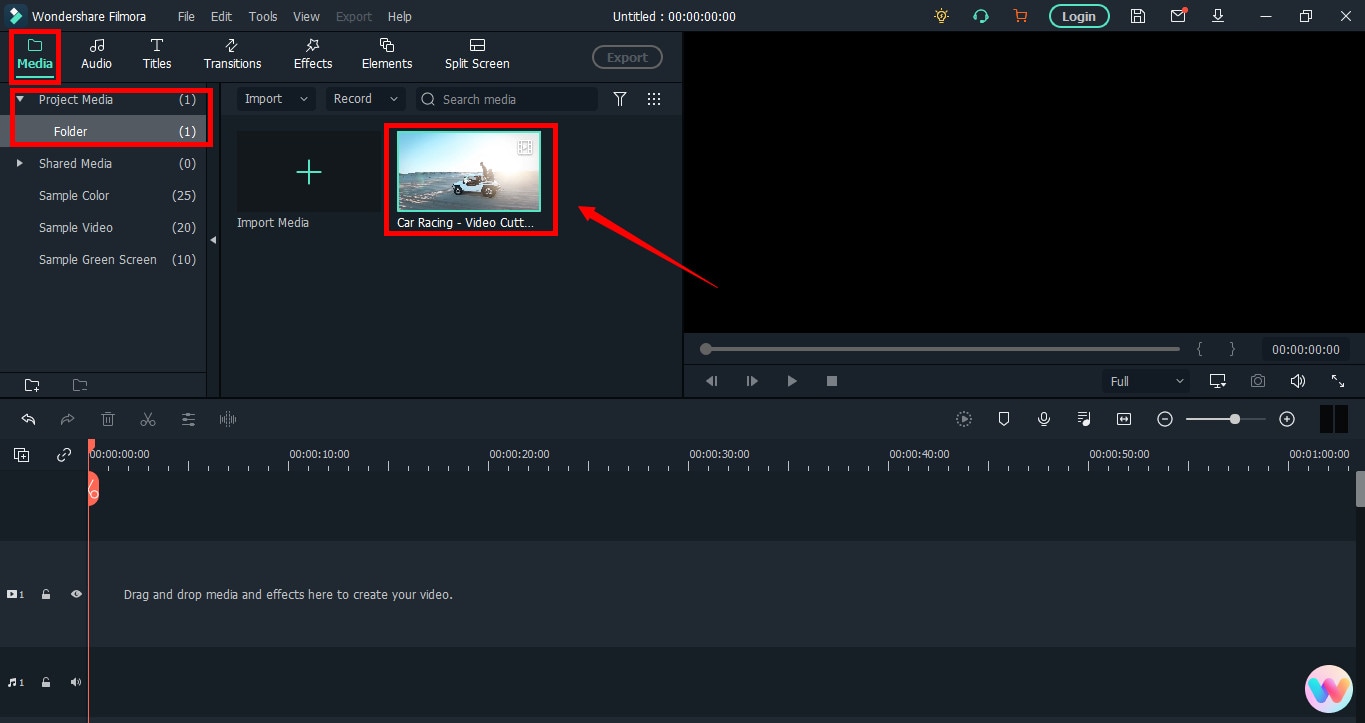
If you can see that, let’s go to the next step.
Step 3: Drag and Drop Video to Filmora’s Timeline
Select the video in the media folder by clicking over it once. Now, without leaving the hold of the left button of your mouse, slide the video down to the track in the timeline.
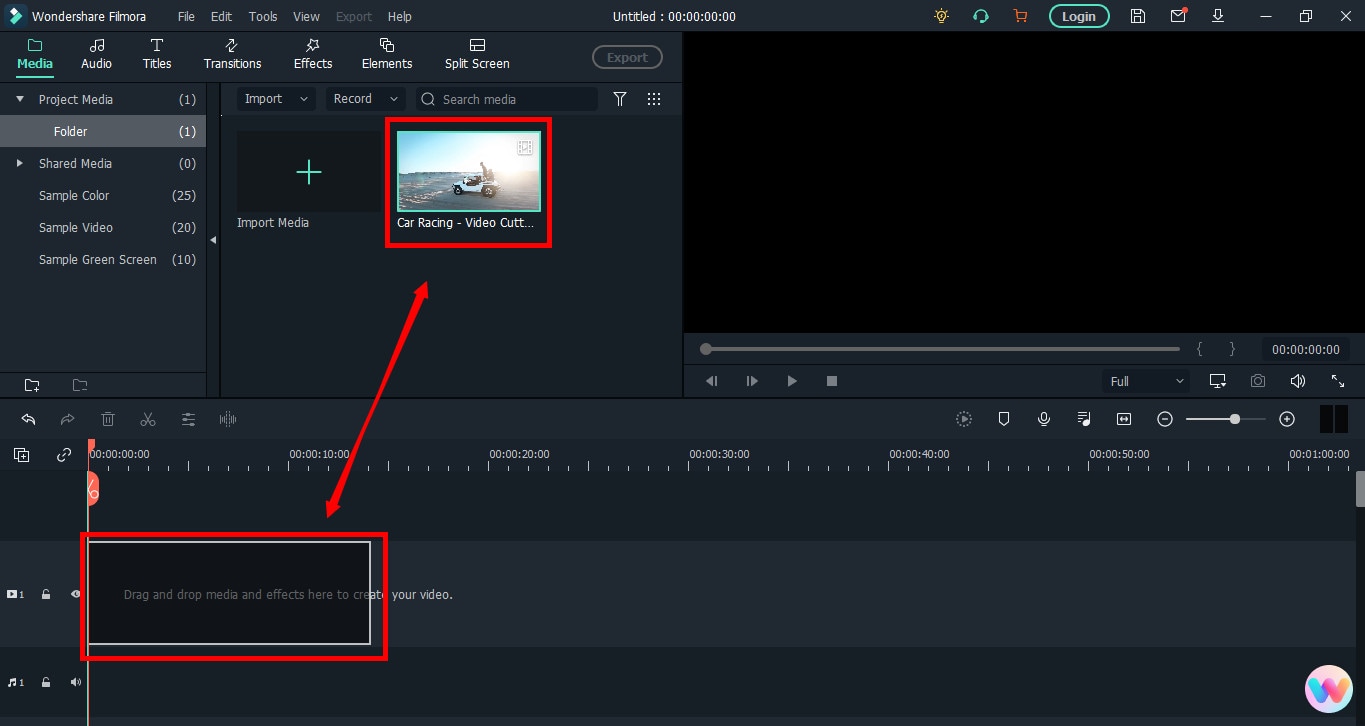
After that, a message will pop up, asking about your preference for the project settings. It is recommended to choose the “Match to Media” option unless you’re an experienced video editor who knows how to play with the resolution and frame rates.
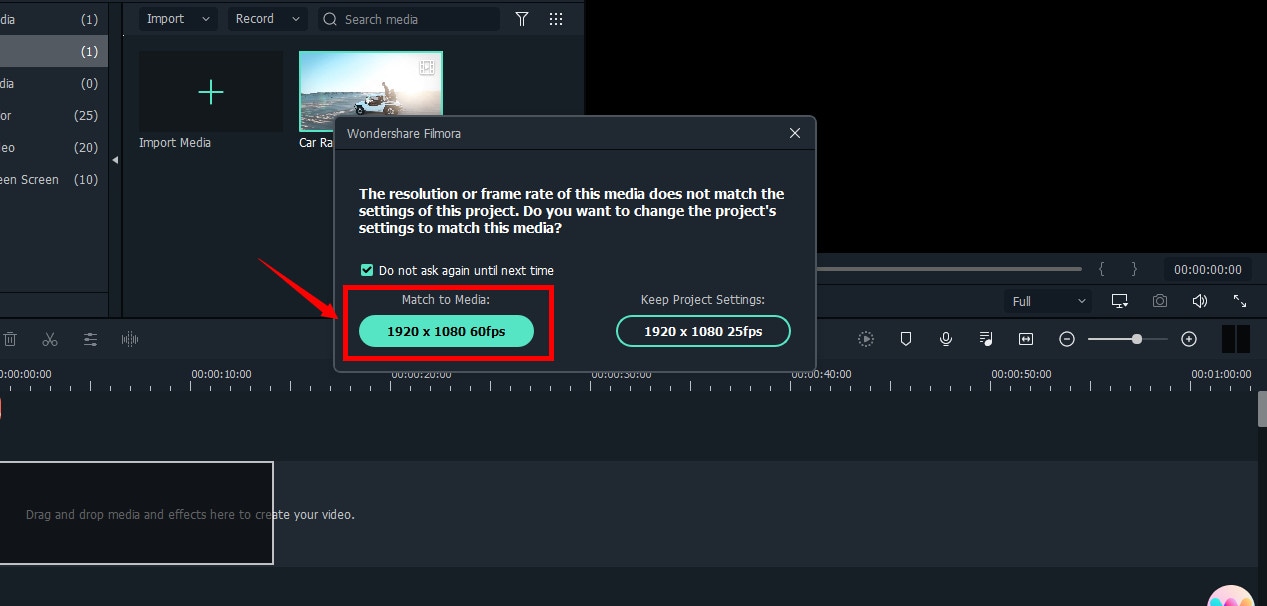
You will see the video on the timeline with its preview on the “Preview Screen” on the right side of the interface.
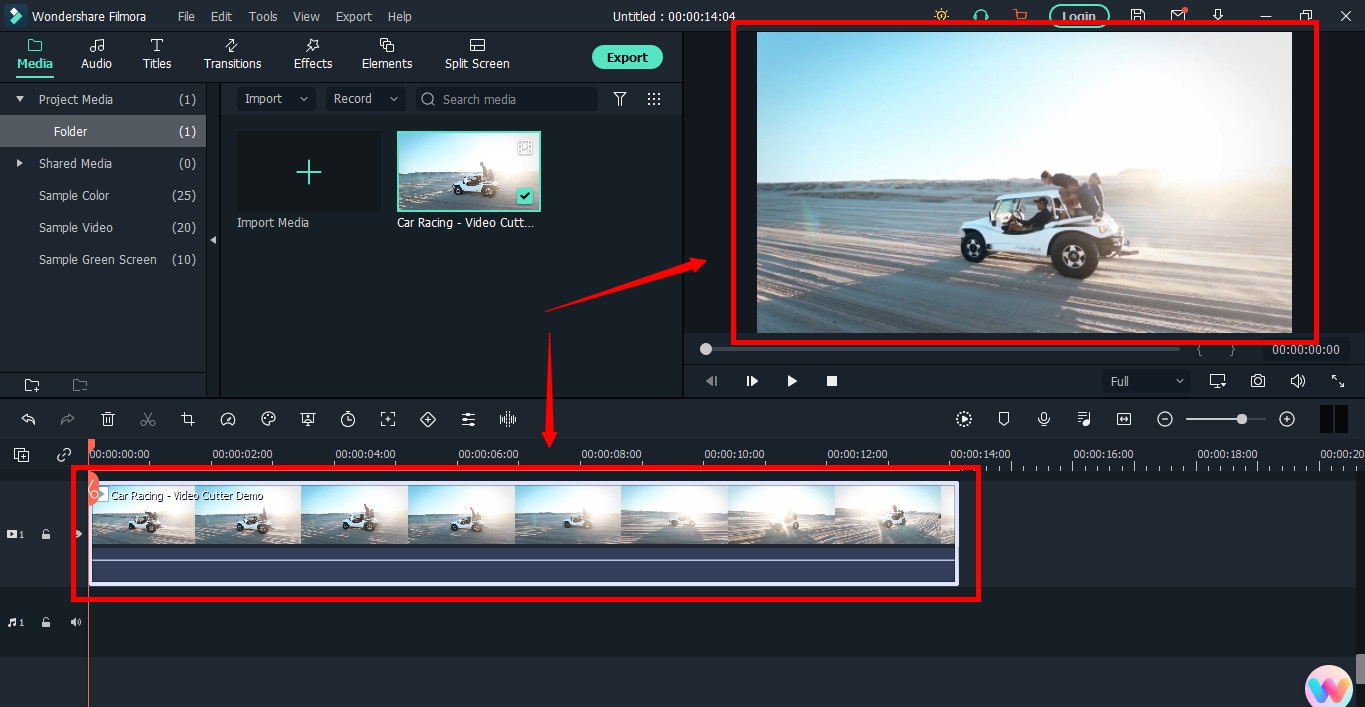
Step 4: Cutting Your Video in Filmora
Here comes the core step you have been waiting for. But before you go any further, you need to know about the “Playhead.”
Playhead is an orange-reddish marker you can find on the timeline.
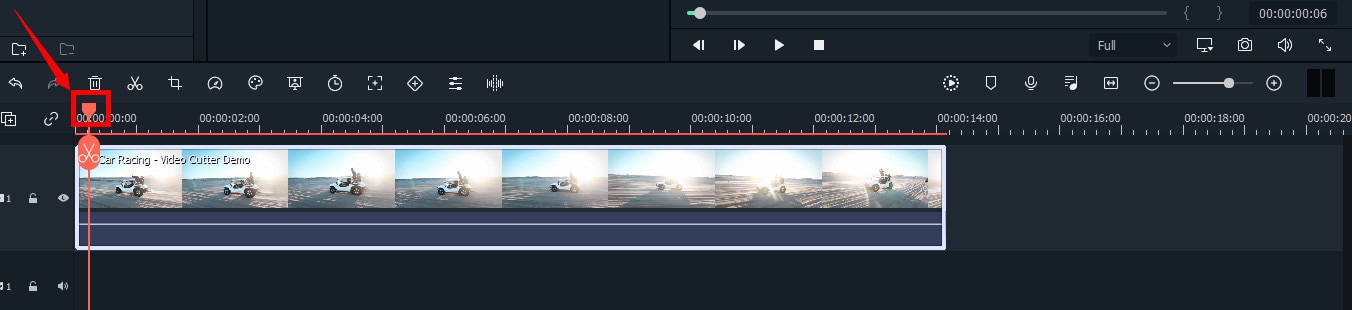
It has an important role in cutting your videos.
So, move the playhead to your desired frame and click on the “scissor” icon to make the “starting” cut.
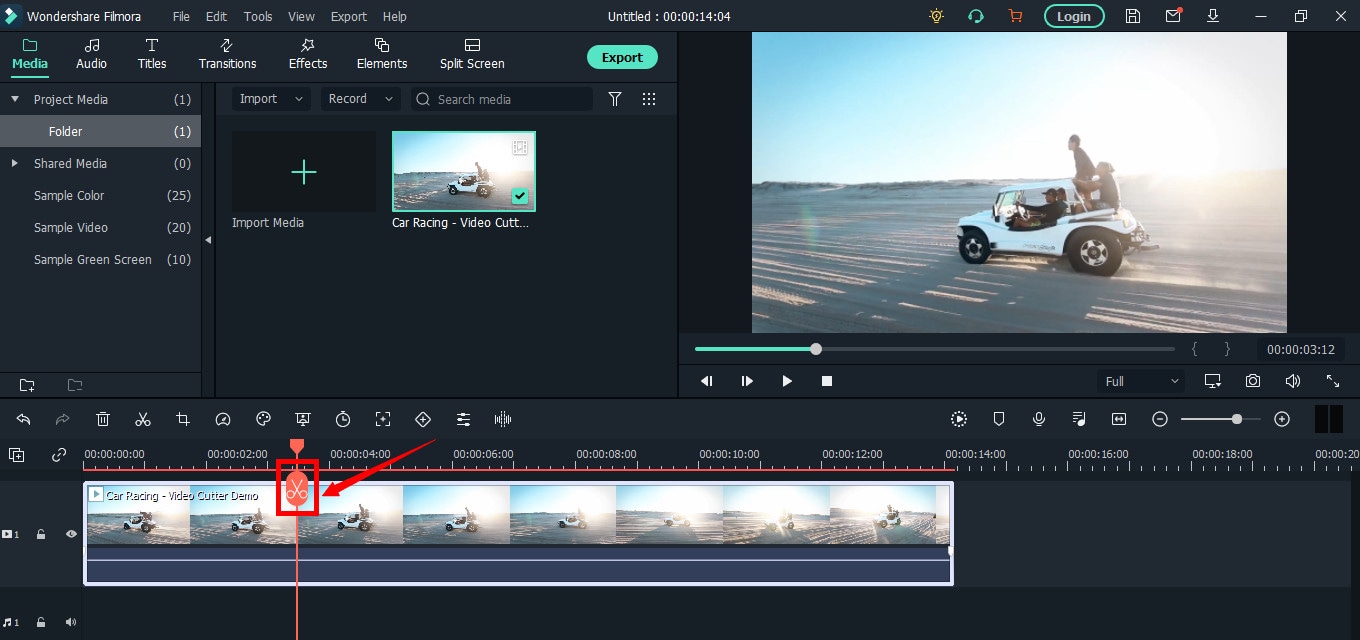
As soon as you do it, you will see that the single clip is now divided into two parts similar to this image.
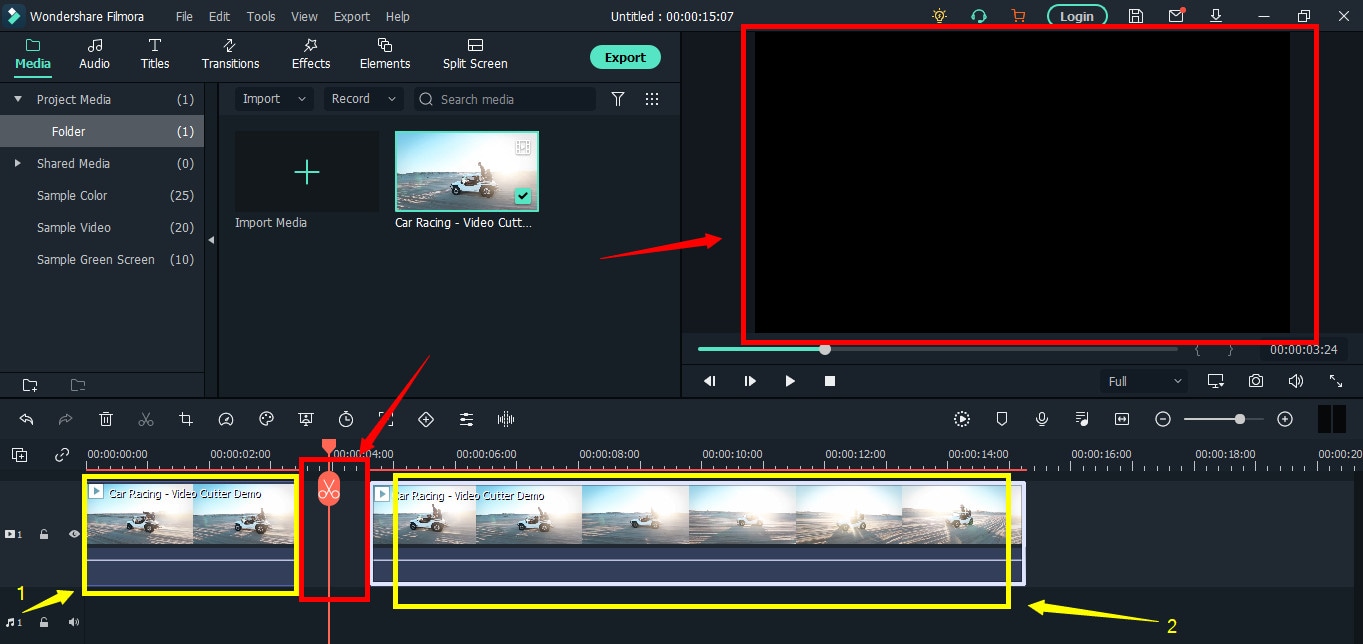
The “Red” marked area in the above screenshot ensures a gap between the clips on the timeline. The “Yellow” arrows confirm two separate clips of the same video.
Place the two clips together as seen in this “Green” area.
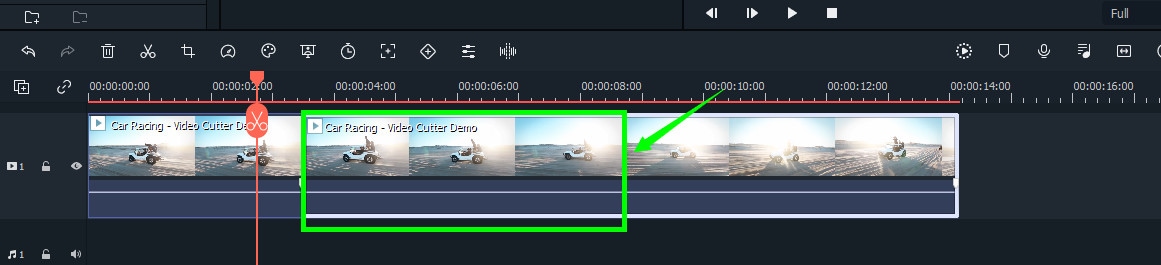
And place the playhead anywhere on the clip. And click on the “scissor” icon once again to make the “ending” cut (second cut).
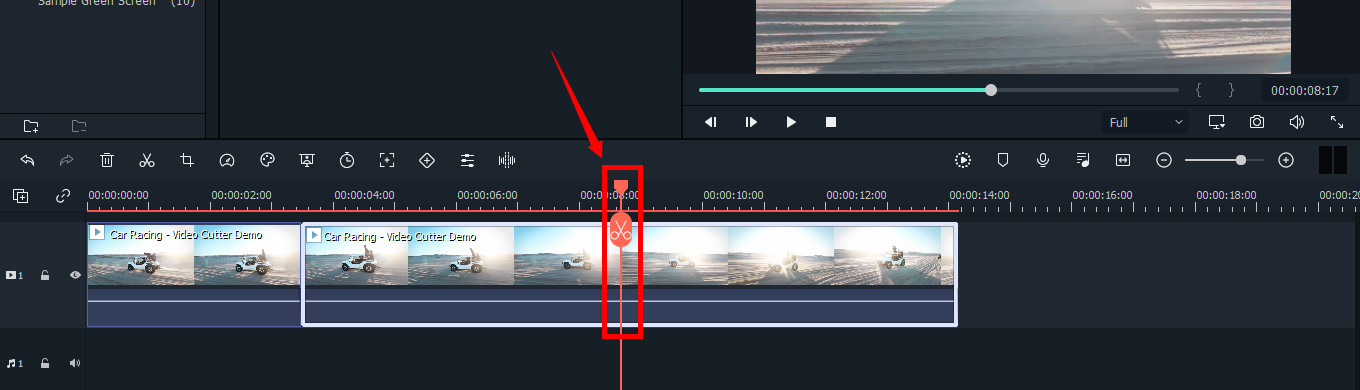
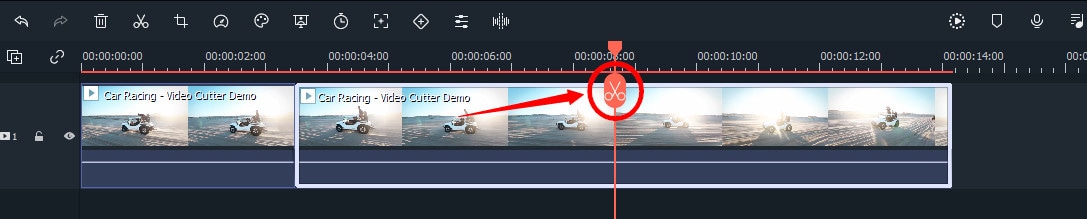
If done correctly, there should be three clips now of the same video, as you can observe in this screenshot.
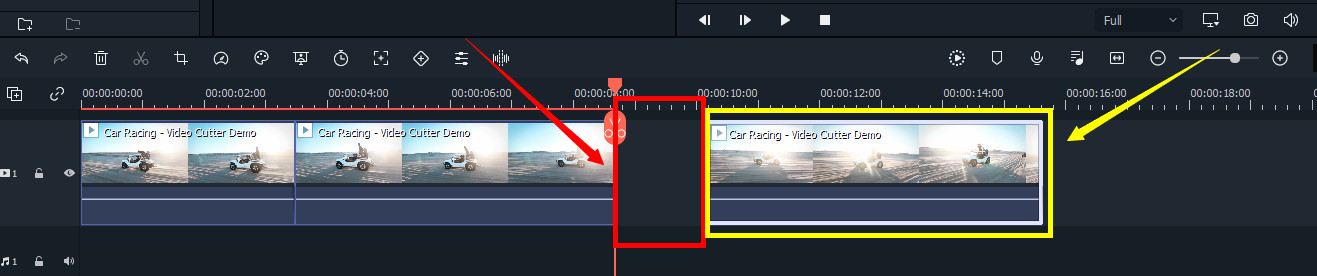
Again, the “Red” area in the above photo indicates the gap, and the “Yellow” area ensures a third segment of the video.
Note: The gaps you can see in the divided clips are made intentionally for understanding. Practically, Filmora doesn’t move the clip or make gaps in between after you have made the cuts.
Keep in mind that there are three clips on the timeline. Now, if you want to remove the second clip from the video, you need to select that portion first by clicking on it.
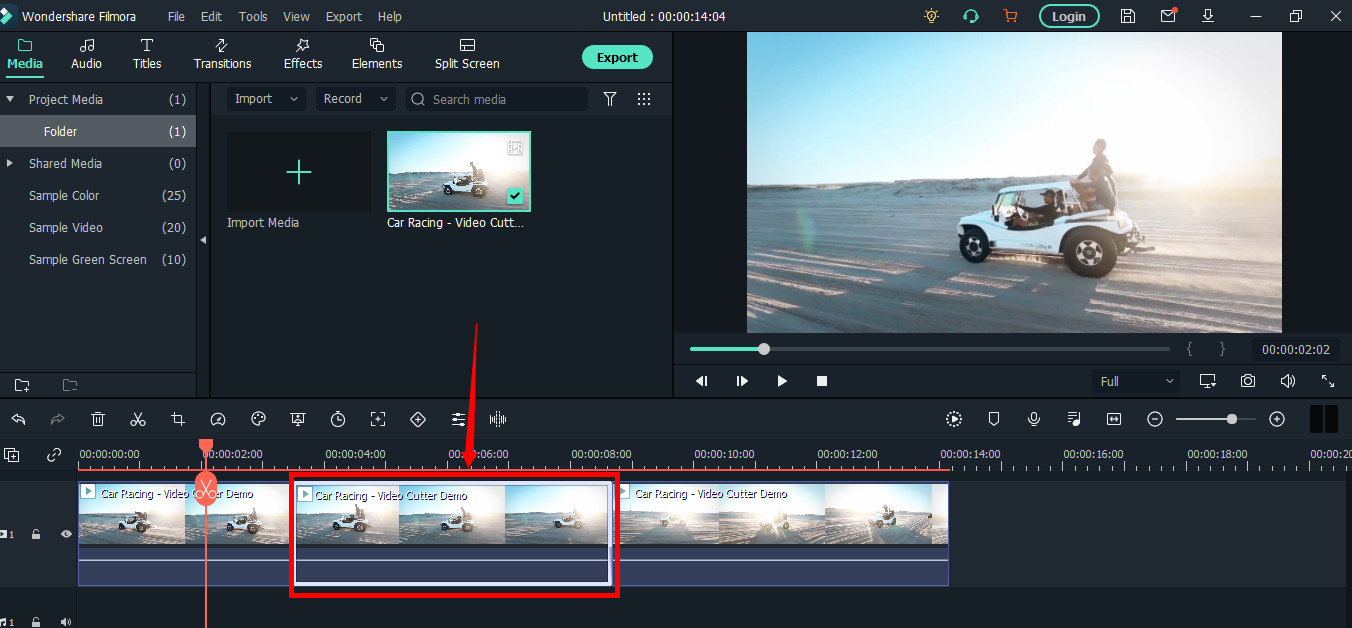
Then, right-click on the mouse and choose “Cut” from the menu.
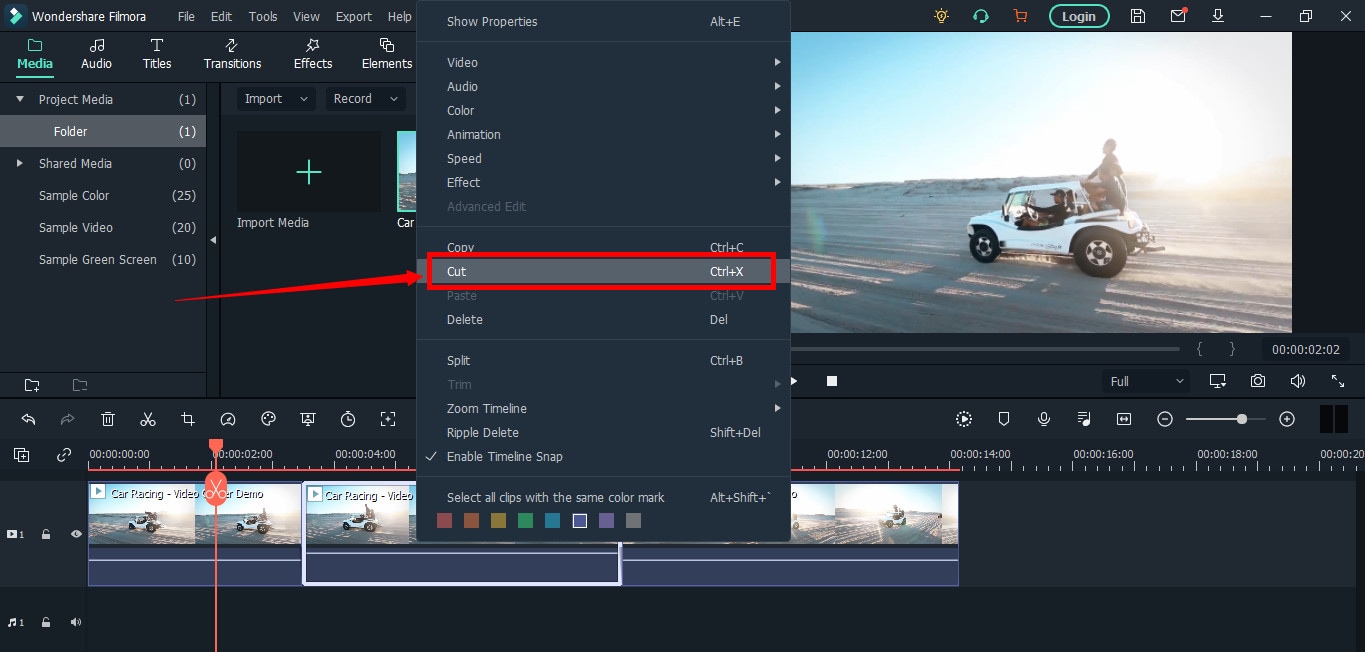
Within a semi-second, the selected portion will be removed from the timeline. And you will be able to see the remaining parts of the video. Now, pull the second clip using your mouse and place it at the end of the first clip without leaving a gap in between.
Then, click the “Play” button under the preview screen to see the results.
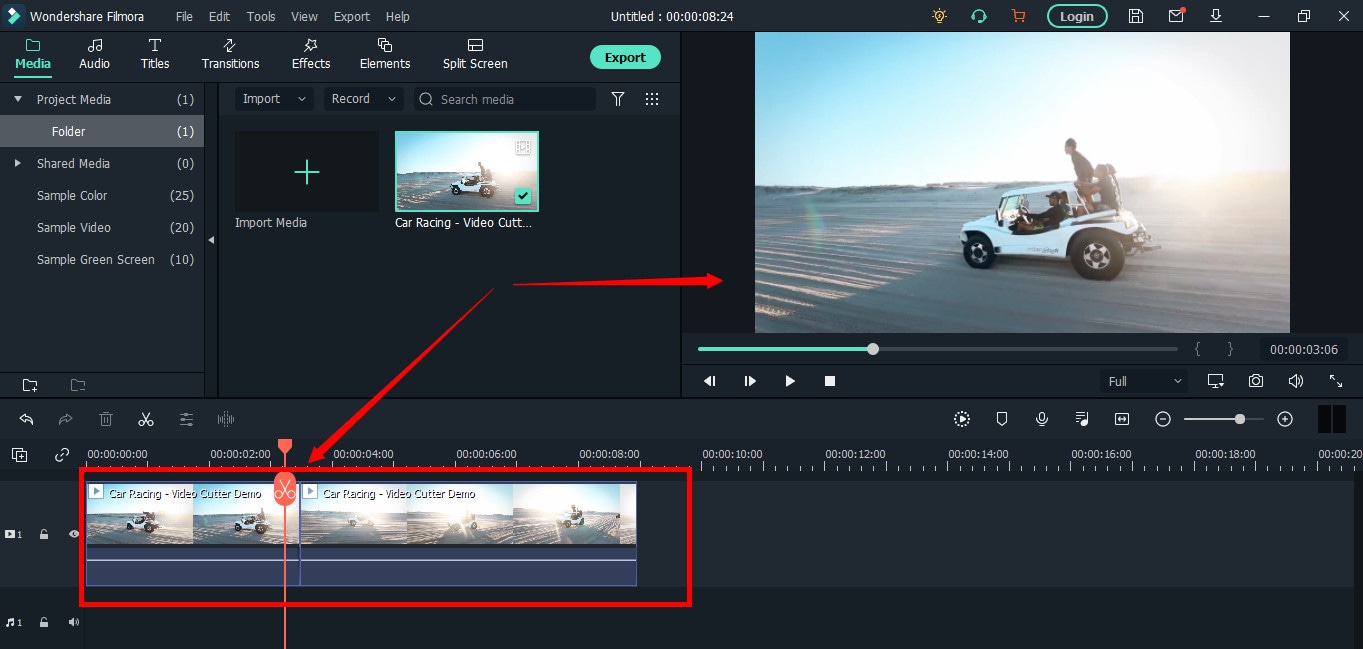
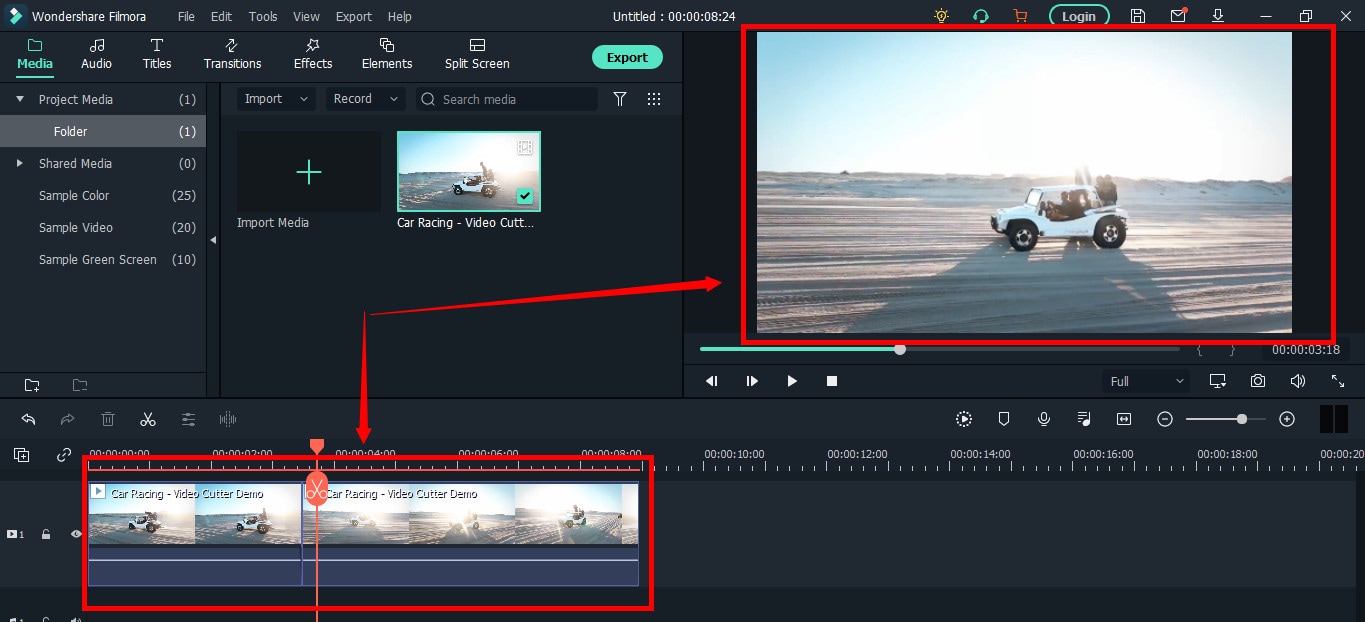
You can see in the above two screenshots that there’s a jump between the scenes due to cuts, confirming that video has been cut significantly.
Step 5: Trimming Your Video in Filmora
Remember that cutting and trimming in Filmora are two different things. Trimming allows you to remove a particular video part from visibility without deleting the portion.
So feel free to skip this step if you’re happy learning the cutting technique. But if you’re interested in trimming, here’s how you do it.
Take your mouse cursor at the beginning or end of the clip you want to trim. Keep holding the clip’s corner and slide the mouse back or front to trim the part
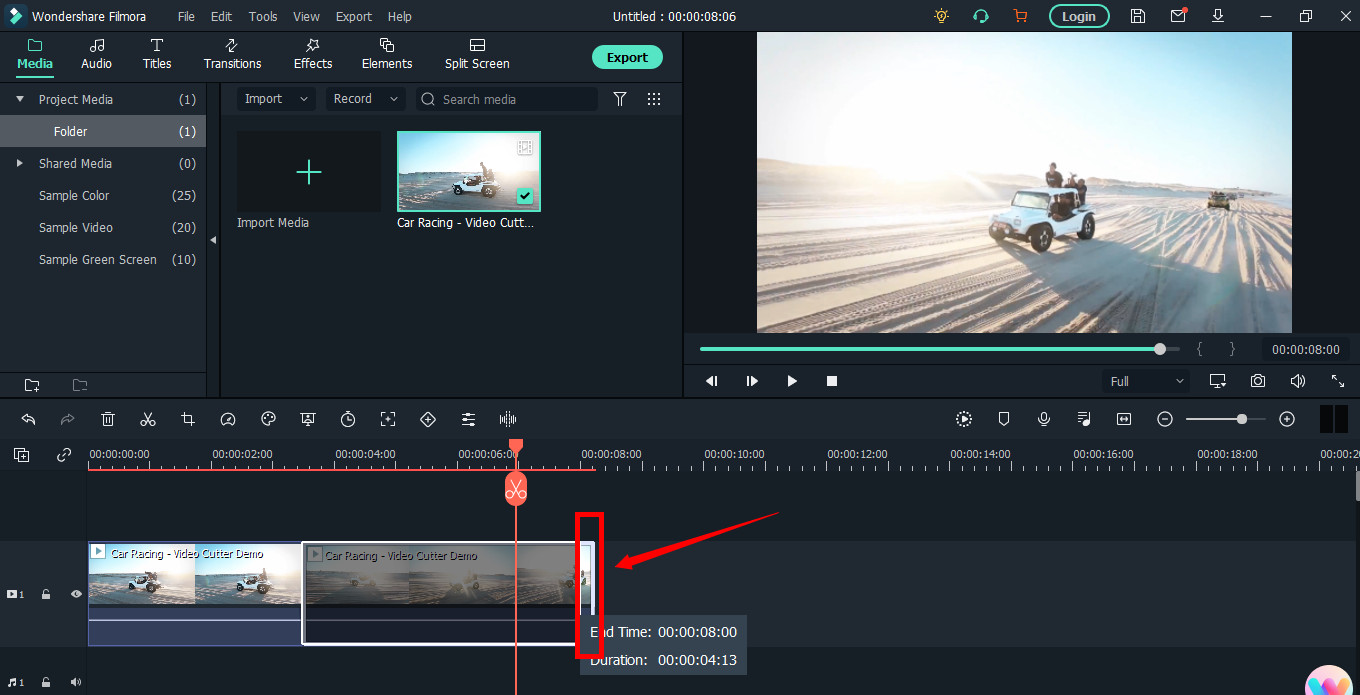
Note: Since the trim tool doesn’t delete the video, the final project based on trimming will be of a larger size. Therefore, it is advised to cut videos rather than trimming for fast rendering, better results, and small video size.
Step 6: Save Project and Export Your Cut/Trimmed AVI Video
Choose “Save Project” from the “File” menu.
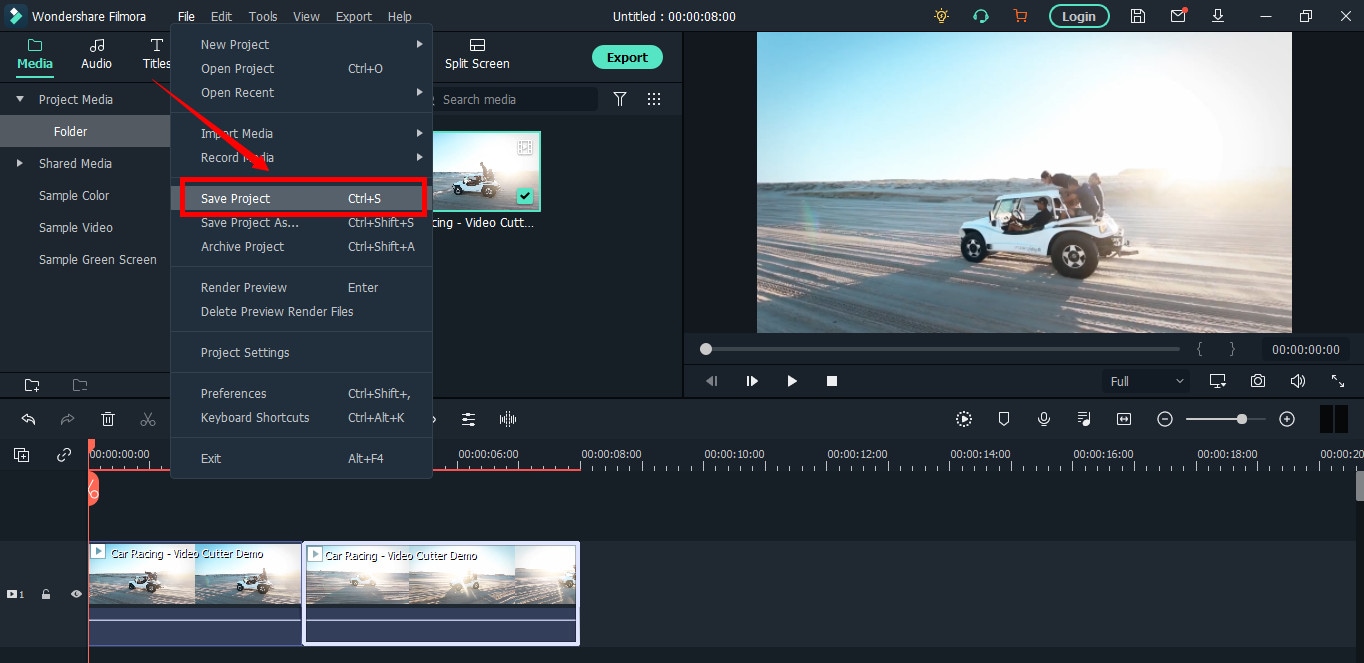
Select the directory to save the project, rename the new video, and click the “Save” button.

Click on the “Export” button to save the video in AVI or any other video format of your choice on your computer.
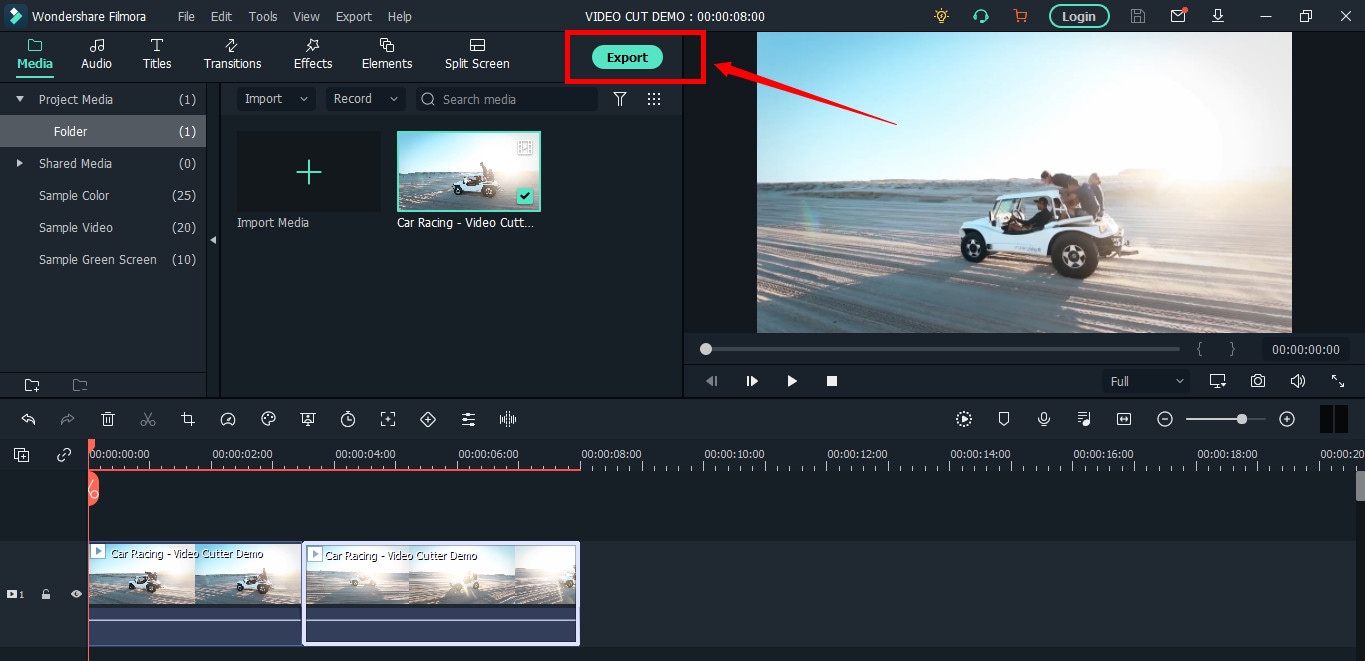
Part 2: Top 3 Free AVI Video Cutter on Windows
As a Windows user, finding an excellent video cutter is relatively easy. However, not all software permits importing AVI videos. In the same way, some video trimmers come at a price. So if you really don’t want to pay and enjoy cutting your AVI files, try using these three video cutting tools.
Microsoft Photos (Windows 10)
Microsoft Photos or Photo App is a free photo viewer and editor with your Windows 10. It offers incredible photo editing and enhancement along with different tools for organizing and editing videos in a very friendly way. Likewise, you can create drawings over the videos and add 3D effects and background music to your clips.
You can also trim AVI videos with Microsoft Photos quickly. All you need to do is open your clip with the Photo App, choose the “Trim” option, select a portion of the video you want to trim, and go ahead.
That’s it!
Features
- Quick video trimming
- Cool text effects
- 3D library and effects
- It has a clear interface
- You can find and tag people’s faces
- The program has 15+ filters for editing
- Motion tracking option for drawing on videos
- Allows you to view and organize your files easily
Pros
- Microsoft Photos is free for Windows users
- It automatically creates albums
- The program has a touch-friendly interface
- You can integrate your OneDrive with the software
Cons
- Lacks before and after view
- Not included in older Windows versions
- It doesn’t support selective focus or panorama stitching
Handbrake
Handbrake is best-known for its video transcoding traits. Unlike typical video editors, this open-source tool includes limited options to rip Blu-rays and DVDs. Moreover, you can mix the 5.1 soundtracks and convert them to stereo to make the audio compatible with your TV speakers.
But the exciting thing about Handbrake is that you can use this software on your macOS 10.13 or later versions to cut AVI videos for free. However, it’s a bit technical process, as there’s no timeline to help you trim or make cuts on the clips directly with the help of your mouse.
You are required to mention a time range (seconds, minutes, or hours) to keep a specific part of the video while the software removes the non-ranged parts of the clip. For instance, you have a video of 10 seconds. You start the range from 5 seconds and end it at 10 seconds. So, the first four seconds of the video will be cut from the entire clip.
Features
- Video cutting, cropping, and resizing
- Low-quality and old video restoration
- Video conversion from any format to MKV or MP4
Pros
- Handbrake is free
- You can convert batch videos with ease
- It supports MAC, Windows, and Linux OS
- Allows you to import video files in all major formats
- The software comes with various video conversion presets
Cons
- Handbrake is not a user-friendly tool
- The video file output is limited to two formats (MKV and MP4) only
Gihosoft Video Cutter
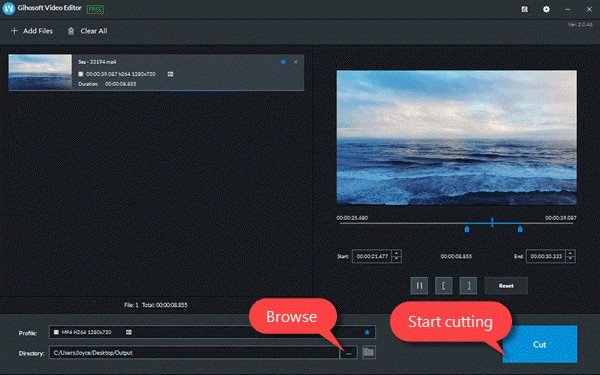
Gihosoft is a clean, free, lossless video cutter on your Windows PC. It’s a simple tool that helps you cut video files into various output formats. So be it AVI, MPEG, or any other file, with Gihosoft, everything becomes handy.
Another fascinating fact about this software is that it allows you to cut videos in three simple steps without losing the quality. So right after installing the program, you simply need to import your file, choose the start and end time, and click the “Cut” button to remove the part of the video.
Features
- Fast video and audio cutting
- Easy drag and drop audio/video files
- It supports most audio and video formats
Pros
- Free for both Windows and MAC operating systems
- The cutter saves video in original quality
Cons
- It does not include basic video editing features
Part 3: Top 3 Free AVI Video Cutter on MAC
Are you looking for a great AVI video cutter for your MAC? Sadly, you have limited product choices as compared to Windows users. But to ensure you don’t waste time looking for a suitable tool, here’s a list of three AVI video cutting programs you can use on your Macintosh.
iMovie
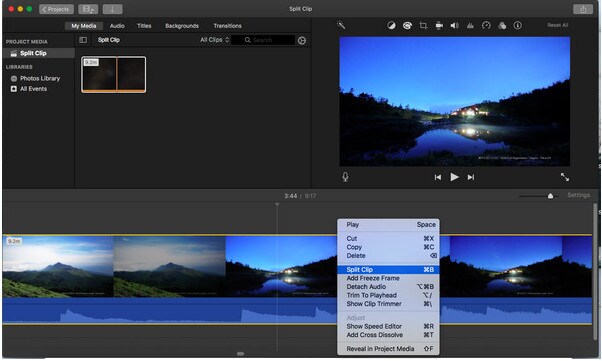
The first and foremost recommended software for free video cutting on MAC is Apple’s own tool, iMovie . It is a built-in program that comes with your system, so there is no need to spend extra on a video editor. iMovie allows you to browse and import most video files, including AVI, right from your computer. Also, this tool is equipped with multiple functions, such as audio editing, video quality enhancement, and much more.
This MAC’s video editor is ideal for beginners. Many home users and small business owners find this tool extremely simple, as they don’t like to be confused with complex features. So, if you want to make cuts to your video clips, start working on iMovie. And within a few clicks, you can trim or cut your videos for free.
Features
- Video cutting and trimming
- Cropping and rotation
- Effects and transitions
- Built-in themes
- HD and 4K video support
- Movie sharing
- Audio adjustments
- Chroma screen controls
- Character tracking
Pros
- Free to use for MAC users
- Clean timeline
- One-click video cutting and trimming
- Easy-to-remember keyboard shortcuts
- Direct share projects to your social media, like YouTube
Cons
- It takes a lot of time to export videos
- iMovie needs high HDD storage space
VideoPad by NCH

VideoPad by NCH is a beginner-level video editor with all the basic features. The software is specifically designed for home movie makers. That is why VideoPad is easy to understand and use.
VideoPad is entirely free of cost for non-commercial purposes, but it has limited features. On the other hand, if you want to enjoy full traits, you can purchase the tool.
VideoPad supports video files, including AVI, WMV, MPEG, MOV, MP4, ASF, and XviD. Likewise, you can also burn movies to Blu-ray, DVD, HD-DVD, or CD. And most importantly, you can easily cut or trim AVI videos on your MAC, as the software is available on both MAC and Windows systems.
Features
- Audio tools
- Video rotation
- Video sharing
- Visual effects
- Video transitions
- 3D Video editing
- Color correction
- Overlays and texts
- Video optimization
- Great plugin support
- Direct video uploading
- Multiple video resolutions
- Video cutting and trimming
- Files exportation to various devices
- Stereoscopic conversion from 2D to 3D
Pros
- You can use the basic tools for free
- Allows 360-degree video production
- It supports a wide range of video formats
- Compatible with MAC and Windows computers
Cons
- The auto speech feature performs poorly
- The free version has annoying notifications
Xilisoft Video Cutter
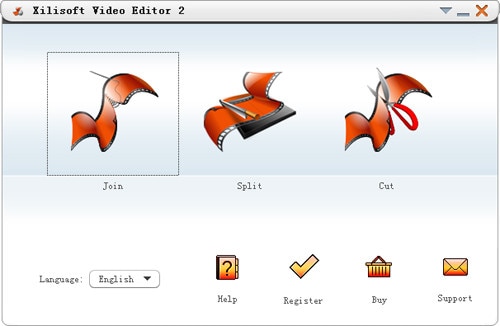
Xilisoft Video Cutter is the simplest tool to cut videos on MAC. This software has a straightforward option to cut the clip after importing it to the timeline. The program is fast and has a user-friendly interface.
Moreover, you can polish your videos by merging multiple clips or increasing the video quality once you’re done with the cutting process. At the same time, this video cutter allows you to import all video formats, including XviD, DivX, MOV, FLV, MP4, MPEG-4/, MKV, MPEG, WMV, and AVI.
Features
- Video joining
- Support multiple output video formats, including HD
Pros
- Easy video cutting and merging
- It doesn’t require a large storage space
- Extremely uncomplicated interface
- Real-time preview to make better cuts
- Available on both MAC and Windows systems
Cons
- The trial version is free to use but limits you from enjoying extra features
Part 4: Top 3 Free AVI Video Cutter on Android
After capturing nice videos with your Android mobile phone, you may need to cut unnecessary scenes to make your clips look professional. While there are numerous Android cutters, not all support the AVI format. So below, you will find the 3 best AVI video cutters for Android, which are free to use.
Quick – Video Editor & Maker
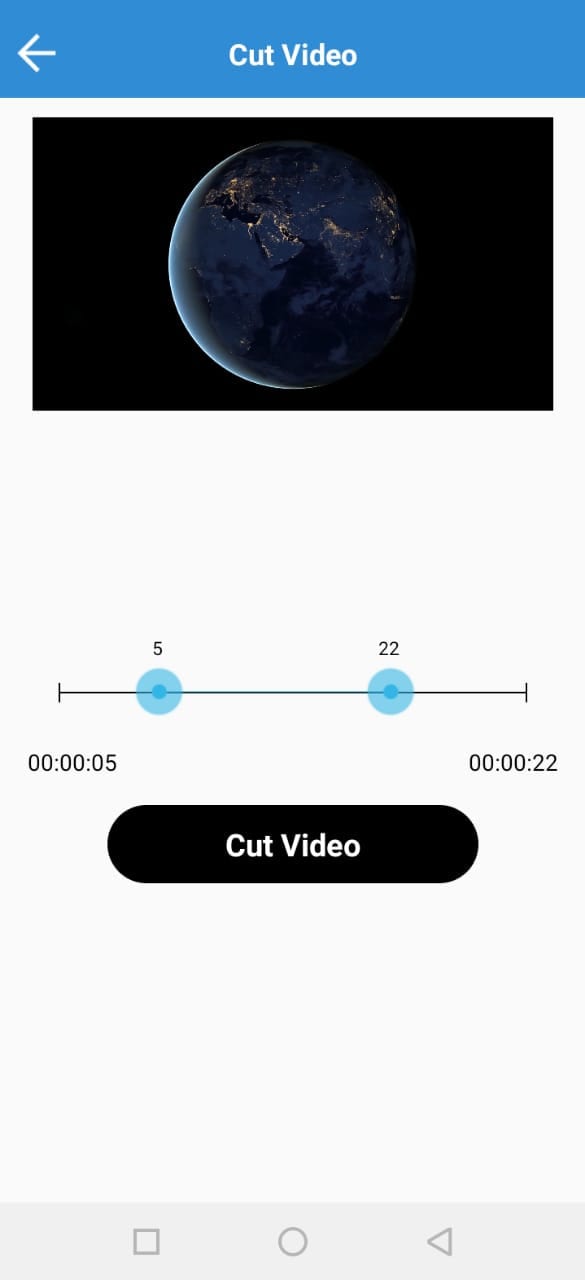
Quick – Video Editor & Maker is a free video editor with PRO results. Many photographers and vloggers love using this app to cut clips immediately. Furthermore, the application offers a wide range of options to assure you don’t have to look to any other tool to rotate or compress video. Quick – Video Editor & Maker lets you import videos in all major formats, including AVI, MPEG, WMA, and more.
Features
- Video cutting, fading, and rotation
- Speed control tools
- Conversion from video to GIF
Pros
- Free app
- Simple interface
Cons
- Lack of updates
- Some users complain about app crash
Funimate Video Editor & Maker
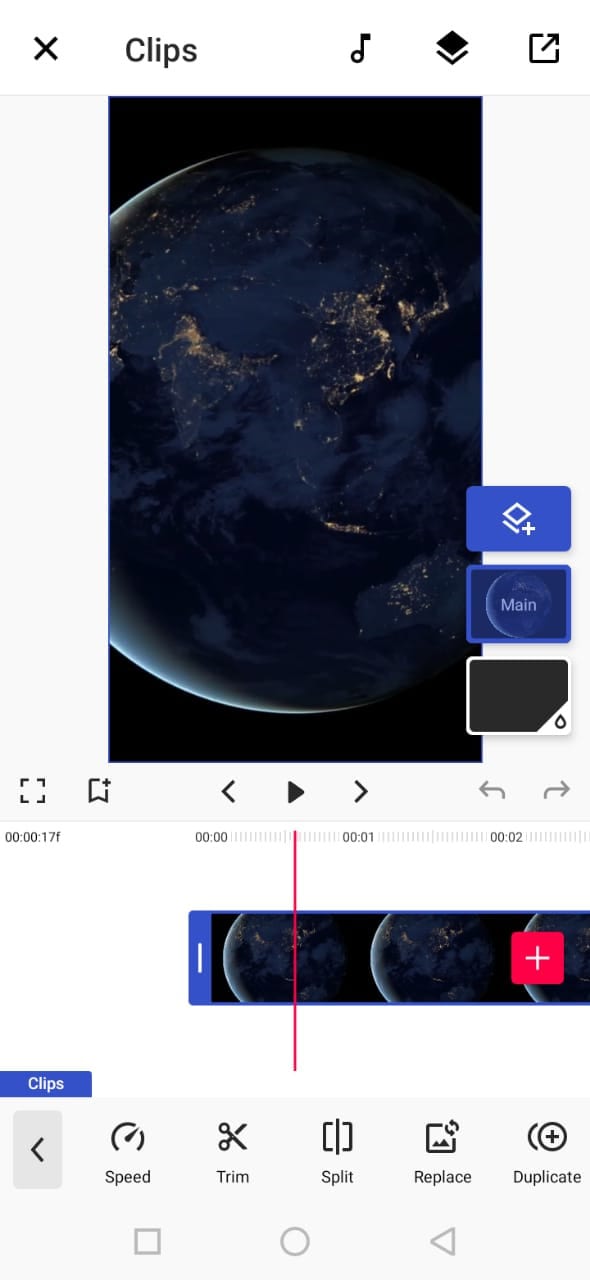
If you want to make some professional-grade video edits quickly, you are welcome to download and use Funimate Video Editor & Maker on your Android device. It’s a free tool to cut videos. It has an easy procedure, and you can cut AVI videos in a few seconds.
Plus, you can use the app to add custom animations, effects, and many other exciting elements. You can share your makes on social media like TikTok, Instagram, and other platforms. Contrarily, the app itself is a community with millions of Funimate-users who share their creations daily. You can also join or watch videos from other creators to learn more about new techniques and trends in video editing.
Features
- Video trimming and splitting
- Animation and cropping
- Filters and AI effects
- Speed adjustment
- Keyframing and video merging
Pros
- Free Android application with several editing tools
- Easy trimming, splitting, and cropping
- Aspect ratio, border, and color customization
- Direct social media sharing
Cons
- Free users cannot use templates
- The free version stamps watermarks on each project
Part 5: Top 3 Free AVI Video Cutter on iPhone
No wonder iPhone’s camera captures high-quality videos. But the problem begins when there’s no free app to cut AVI videos. So if you’re recording great spots, but deep inside, you really want to remove some parts, then these 3 free AVI video cutters will work smoothly on your iPhone.
Cut, Trim, Split Video Editor
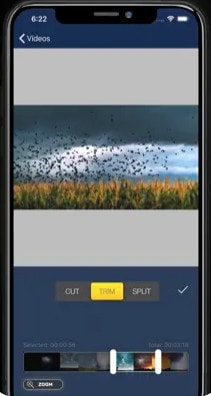
Download Cut, Trim, Split Video Editor on your iPhone to delete/cut unwanted portions of your video clips. The tool is also best for trimming iPhone-recorded clips without messing with the frames. Or, if you just want to split the video into multiple parts for your next WhatsApp status, this iPhone app can do that job for you.
The app supports multiple video file types, including MOV, MP4, AVI, MPEG, MPEG-2, and 3GPP
Features
- Easy trimming and cutting video clips
- Splitting big-sized videos into two smaller clips
- Import video from file-sharing platforms, like iCloud, using Wi-Fi
Pros
- Free app for fast video cutting and sharing
- Simple UI interface
Cons
- The free version shows advertisements
Splice - Video Editor & Maker
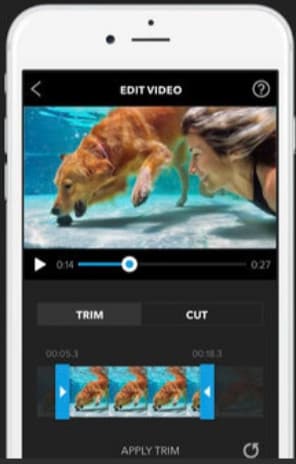
Splice is an extraordinary video editor that makes it easy to make fully customized and professional videos from your iPhone. The app is also best for video cutting. Besides, it has many interesting features, which you can use from your device.
Features
- Cutting, trimming, and cropping your videos
- Exposure, saturation, and exposure adjustment
- Slow and fast motion with speed ramping option
- Video masking and overlay
- Color correction and text overlays
Pros
- Free basic features, such as video cutting
- iTunes integration
- Supports AVI video input
- User-friendly application
- Access to the music library
- Quick and simple social sharing
Cons
- Output videos require high mobile storage space
Part 6: Top 3 Free AVI Video Cutter Online
Don’t want to install video cutters on your MAC, Windows, smartphone, or any other device? No problem! You can use online video cutters and trimmers to split, cut, or trim your clips for free.
However, the problem still exists in online tools, as not all web-based editors allow importing AVI files. So to save your time and energy, you can directly go to the following online AVI cutters to complete your tasks.
Kapwing
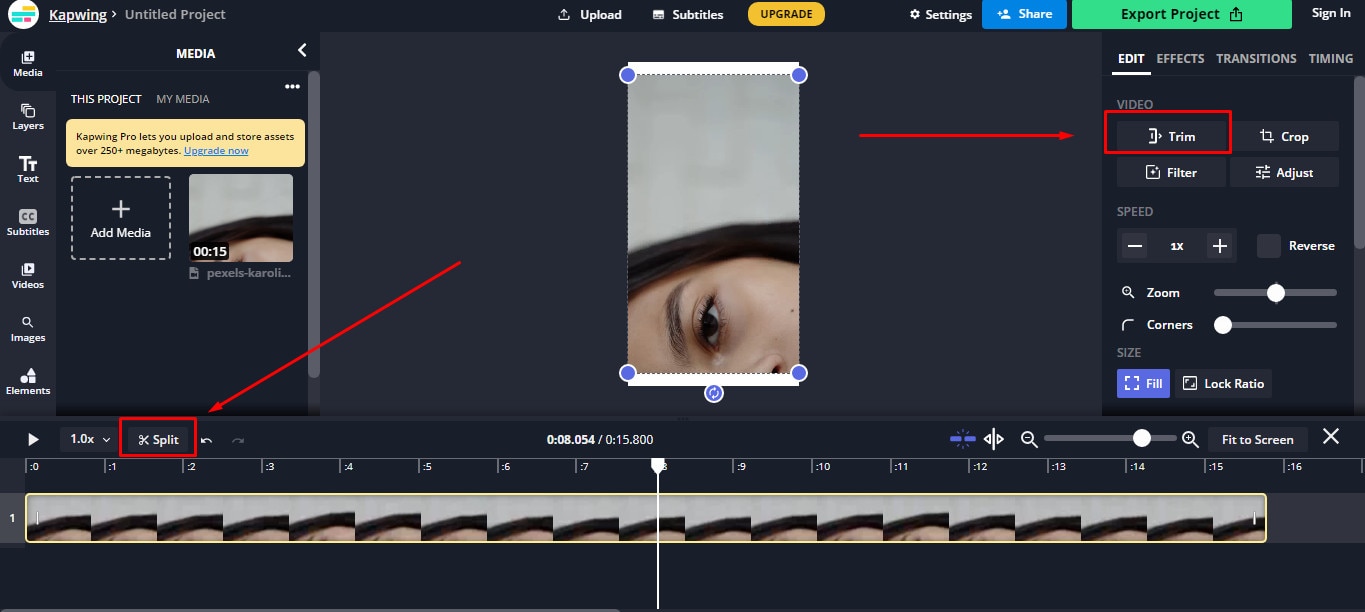
Kapwing is an online video editor best for casual creatives, such as Vloggers and YouTubers. You can use this web-based platform to cut your videos. Gladly, Kapwing supports all AVI incomings. You can upload your AVI video files to this platform and use its trim or split feature. To do that, you need to upload your AVI video and choose the “Trim” or “Split” tool to see the magic. Once done with the trimming process, you can explore Kapwing’s other incredible traits and apply them to your project.
Features
- Video splitting, trimming, and merging
- Audio capturing
- Speed adjustment
- Image and video library
- Text editing and overlay
- Auto-generated subtitles
- Several collaboration tools
- Video creation from scratch
- Templates, shapes, and emojis
- Simple drag-and-drop interface
- Video transitions, plugins, and elements
Pros
- Free online video trimmer
- User-friendly interface
- You can export 30-minutes long projects
- Allows you to export unlimited videos with a watermark
- One watermark-free video export is available each month
Cons
- Cannot export long videos with a free account
- Only 10 minutes transcription limit is available for free users
- You need to purchase a monthly or annual subscription to remove the watermark from multiple videos
Clideo
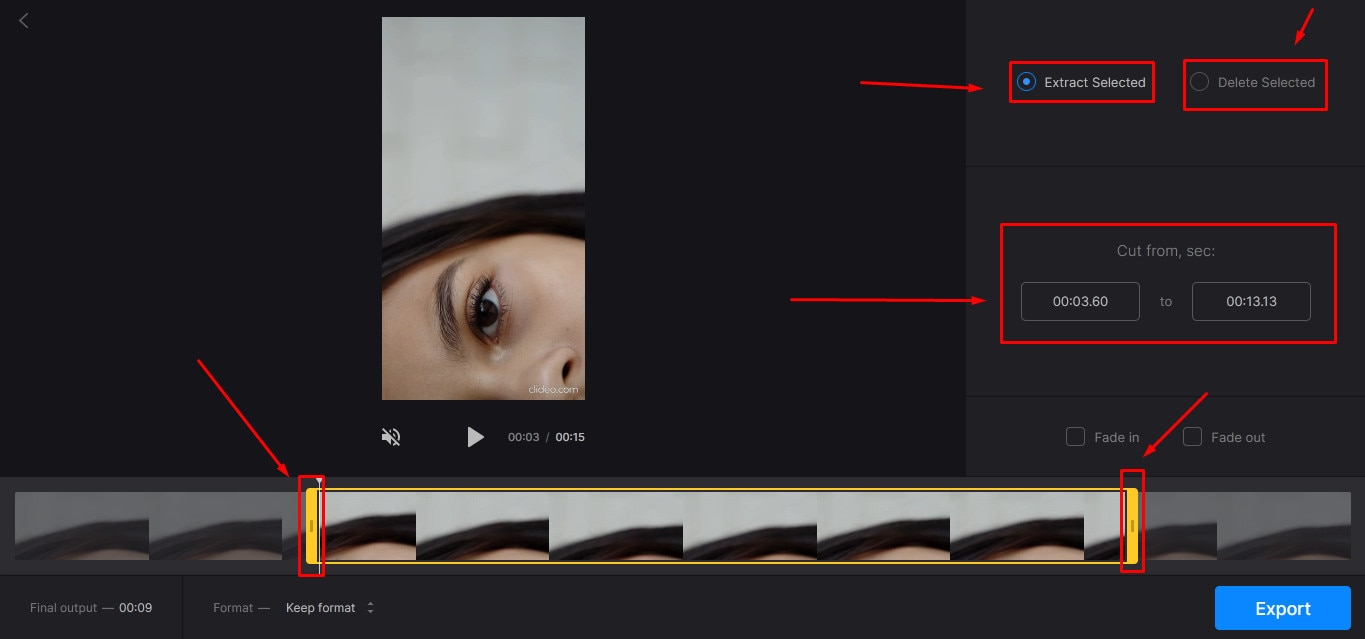
Clideo is not just a video cutter but an online solution to all your video editing problems. The tool is super popular, with 4 million+ users a month. And why not? This is one of those web-based platforms that allow AVI video files to be imported and exported without converting them into any other formats.
Nevertheless, if you’re only looking for video cutting options, this tool makes your life easy. Simply upload your video, and select the portion of it by setting start and end times. Choose whether you want to delete or extract the selected part from the clip, and hit the “Export” button.
And within a few moments, you can enjoy a trimmed video clip. And if you plan to be more creative, you can look for other Clideo features to make videos more fascinating.
Features
- Video combining and cutting
- Resize and crop clips
- Compress your videos
- Add text and subtitles
- Add music to your video files
- Filters and color correction tools
- Audio mute, cutting, and muting
- Video rotation, flipping, and speed adjustment
Pros
- Basic tools can be used for free
- Best for beginners and intermediate users
- Ideal for AVI videos and also supports other video formats
Cons
- You cannot use the free version regularly
Aspose
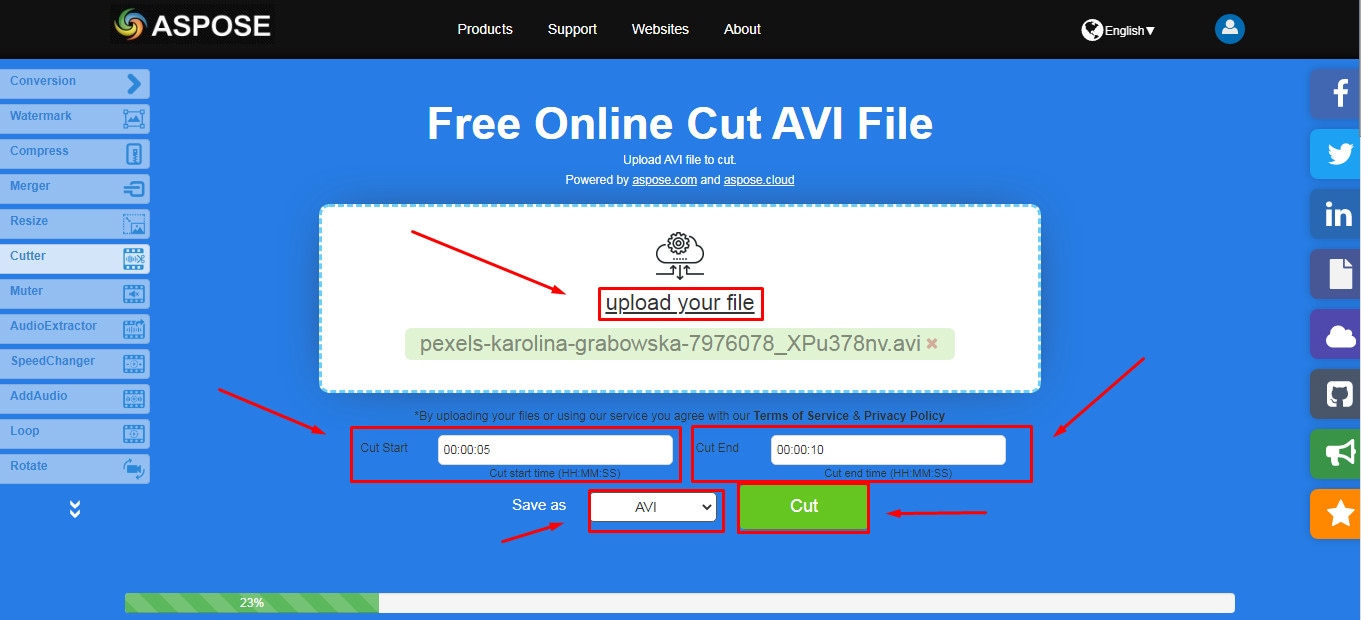
Aspose is a free web-based application to cut clips. You can use this tool on any operating system. It supports all major video file formats, including AVI, MKV, MOV, MP4, FLV, WMV, WEBM, and GIF. Additionally, you can use Aspose for various other reasons, such as audio extraction, video resizing, and more.
Features
- Video cutting and compressing
- Looping, rotation, and video merging
- Adding watermarks on videos
- Sound muting
- Speed change and audio addition
Pros
- Aspose is a free online tool
- It offers straightforward options to cut and edit videos
Cons
- No color correction option
- Slow video cutting process
- Lacks timeline and other valuable features
Part 7: Bottom Line
Tired of finding AVI cutters? Relax and try these top 16 AVI video cutters for Windows, MAC, iPhone, Android, and online. Almost all these tools are free to use and are extremely handy. On the other hand, if you want to cut and trim videos professionally, download Filmora and follow the step-by-step guide in this article for making clean cuts.
Part 8: FAQs
Q1. How do I trim an AVI video?
To trim an AVI video file, ensure that the software or tool you use supports AVI input. Generally, you need to upload or import a clip on the program, select the portion of the video, and apply the cut/trim feature to make it happen.
Q2. Which is the best online video cutter?
Kapwing and Clideo are the two best online video cutters you can use for free. Both web-based tools also allow you to cut your AVI videos.
Q3. Which is the best video cutter and joiner software?
Filmora, iMovie, and Kapwing are some of the best video cutters and joiner tools. These video editors are also free to use and come with different features.
Q4. How do I trim an AVI file in Windows 10?
Trimming an AVI video file in Windows 10 is very simple. Launch the Microsoft Photos (Photo App) application on your computer, add clip, and select the “Trim” tool to trim a specific video part.
Q5. How can I cut a video on my computer for free?
MAC and Windows users can download Filmora to cut videos for free. Filmora also offers a wide range of other features to make your clips exciting. Contrarily, Windows users can use the built-in Photo App in Windows 10 or download Gihosoft or Handbrake software to cut clips. Likewise, MAC users can download VideoPad, Xilisoft Video Cutter, or iMovie for free.
With the growing fame of video-sharing and social media applications like Twitter, Instagram, and TikTok, the demand for simple and fast video cutting and trimming tools has dramatically increased. Nowadays, you don’t have to play with complex video editing tools to produce high-quality videos.
Thanks to several user-friendly editing software to make things easy for everybody. However, finding the right programs to trim/cut videos is still challenging, especially in AVI format.
But, guess what? These top 16 AVI video cutters for Windows, MAC, Android, iPhone, and online will make video cutting and trimming fun, especially when you learn to do it using Filmora.
In this Article
Part 1: Best AVI Video Cutter to Trim/Cut AVI Video on Windows and MAC – Filmora Video Cutter [with steps}
Part 2: Top 3 Free AVI Video Cutter on Windows
Part 3: Top 3 Free AVI Video Cutter on MAC
Part 4: Top 3 Free AVI Video Cutter on Android
Part 5: Top 3 Free AVI Video Cutter on iPhone
Part 6: Top 3 Free AVI Video Cutter Online
Part 7: Bottom Line
Part 8: FAQs
Part 1: Best AVI Video Cutter to Trim/Cut AVI Video on Windows and MAC – Filmora Video Cutter [with steps]
Filmora by Wondershare is a star video editor with outstanding outcomes. Whether you have a MAC or Windows PC, you can download Filmora regardless of your operating system. The program best serves those who intend to make high-quality videos. The software provides editing support for all video formats, including AVI.
Although Filmora is an affordable editor with tons of audio and video editing options, you can still download the software for free and create projects if watermarks don’t bother you. Moreover, you can count this tool’s capabilities in cropping, resizing, and Chroma screen support. But that’s not the only sweet fruit.
In fact, Filmora is equipped with many jaw-dropping features, including preset templates, auto beat sync, split-screen, speed ramping, motion tracking, keyframing, creative transitions, titles, filters, and much more. And the best part is, you can learn and understand Filmora in no time. That’s why the program is loved and supported by all types of users.
So does Filmora helps cut and trim AVI videos? Yes! It does if you follow these steps correctly.
Step 1: Download Filmora Video Editor
First, download Filmora Video Editor by choosing your operating system, as seen in the screenshot below.
Run the setup and let it finish without any pause or break.
Step 2: Import Your Video to Filmora Video Editor
Importing your AVI video is a very simple process. Just click on the “Film Clip” icon.
It will open a new window screen on your computer to select the video from the directory. Find the clip you want to import and cut. Use your mouse to select it and click the “Open” button.
The video will be loaded in the “Media” folder of Filmora. The clip’s thumbnail should be visible to assure you have done everything correctly.
If you can see that, let’s go to the next step.
Step 3: Drag and Drop Video to Filmora’s Timeline
Select the video in the media folder by clicking over it once. Now, without leaving the hold of the left button of your mouse, slide the video down to the track in the timeline.
After that, a message will pop up, asking about your preference for the project settings. It is recommended to choose the “Match to Media” option unless you’re an experienced video editor who knows how to play with the resolution and frame rates.
You will see the video on the timeline with its preview on the “Preview Screen” on the right side of the interface.
Step 4: Cutting Your Video in Filmora
Here comes the core step you have been waiting for. But before you go any further, you need to know about the “Playhead.”
Playhead is an orange-reddish marker you can find on the timeline.
It has an important role in cutting your videos.
So, move the playhead to your desired frame and click on the “scissor” icon to make the “starting” cut.
As soon as you do it, you will see that the single clip is now divided into two parts similar to this image.
The “Red” marked area in the above screenshot ensures a gap between the clips on the timeline. The “Yellow” arrows confirm two separate clips of the same video.
Place the two clips together as seen in this “Green” area.
And place the playhead anywhere on the clip. And click on the “scissor” icon once again to make the “ending” cut (second cut).
If done correctly, there should be three clips now of the same video, as you can observe in this screenshot.
Again, the “Red” area in the above photo indicates the gap, and the “Yellow” area ensures a third segment of the video.
Note: The gaps you can see in the divided clips are made intentionally for understanding. Practically, Filmora doesn’t move the clip or make gaps in between after you have made the cuts.
Keep in mind that there are three clips on the timeline. Now, if you want to remove the second clip from the video, you need to select that portion first by clicking on it.
Then, right-click on the mouse and choose “Cut” from the menu.
Within a semi-second, the selected portion will be removed from the timeline. And you will be able to see the remaining parts of the video. Now, pull the second clip using your mouse and place it at the end of the first clip without leaving a gap in between.
Then, click the “Play” button under the preview screen to see the results.
You can see in the above two screenshots that there’s a jump between the scenes due to cuts, confirming that video has been cut significantly.
Step 5: Trimming Your Video in Filmora
Remember that cutting and trimming in Filmora are two different things. Trimming allows you to remove a particular video part from visibility without deleting the portion.
So feel free to skip this step if you’re happy learning the cutting technique. But if you’re interested in trimming, here’s how you do it.
Take your mouse cursor at the beginning or end of the clip you want to trim. Keep holding the clip’s corner and slide the mouse back or front to trim the part
Note: Since the trim tool doesn’t delete the video, the final project based on trimming will be of a larger size. Therefore, it is advised to cut videos rather than trimming for fast rendering, better results, and small video size.
Step 6: Save Project and Export Your Cut/Trimmed AVI Video
Choose “Save Project” from the “File” menu.
Select the directory to save the project, rename the new video, and click the “Save” button.
Click on the “Export” button to save the video in AVI or any other video format of your choice on your computer.
Part 2: Top 3 Free AVI Video Cutter on Windows
As a Windows user, finding an excellent video cutter is relatively easy. However, not all software permits importing AVI videos. In the same way, some video trimmers come at a price. So if you really don’t want to pay and enjoy cutting your AVI files, try using these three video cutting tools.
Microsoft Photos (Windows 10)
Microsoft Photos or Photo App is a free photo viewer and editor with your Windows 10. It offers incredible photo editing and enhancement along with different tools for organizing and editing videos in a very friendly way. Likewise, you can create drawings over the videos and add 3D effects and background music to your clips.
You can also trim AVI videos with Microsoft Photos quickly. All you need to do is open your clip with the Photo App, choose the “Trim” option, select a portion of the video you want to trim, and go ahead.
That’s it!
Features
- Quick video trimming
- Cool text effects
- 3D library and effects
- It has a clear interface
- You can find and tag people’s faces
- The program has 15+ filters for editing
- Motion tracking option for drawing on videos
- Allows you to view and organize your files easily
Pros
- Microsoft Photos is free for Windows users
- It automatically creates albums
- The program has a touch-friendly interface
- You can integrate your OneDrive with the software
Cons
- Lacks before and after view
- Not included in older Windows versions
- It doesn’t support selective focus or panorama stitching
Handbrake
Handbrake is best-known for its video transcoding traits. Unlike typical video editors, this open-source tool includes limited options to rip Blu-rays and DVDs. Moreover, you can mix the 5.1 soundtracks and convert them to stereo to make the audio compatible with your TV speakers.
But the exciting thing about Handbrake is that you can use this software on your macOS 10.13 or later versions to cut AVI videos for free. However, it’s a bit technical process, as there’s no timeline to help you trim or make cuts on the clips directly with the help of your mouse.
You are required to mention a time range (seconds, minutes, or hours) to keep a specific part of the video while the software removes the non-ranged parts of the clip. For instance, you have a video of 10 seconds. You start the range from 5 seconds and end it at 10 seconds. So, the first four seconds of the video will be cut from the entire clip.
Features
- Video cutting, cropping, and resizing
- Low-quality and old video restoration
- Video conversion from any format to MKV or MP4
Pros
- Handbrake is free
- You can convert batch videos with ease
- It supports MAC, Windows, and Linux OS
- Allows you to import video files in all major formats
- The software comes with various video conversion presets
Cons
- Handbrake is not a user-friendly tool
- The video file output is limited to two formats (MKV and MP4) only
Gihosoft Video Cutter
Gihosoft is a clean, free, lossless video cutter on your Windows PC. It’s a simple tool that helps you cut video files into various output formats. So be it AVI, MPEG, or any other file, with Gihosoft, everything becomes handy.
Another fascinating fact about this software is that it allows you to cut videos in three simple steps without losing the quality. So right after installing the program, you simply need to import your file, choose the start and end time, and click the “Cut” button to remove the part of the video.
Features
- Fast video and audio cutting
- Easy drag and drop audio/video files
- It supports most audio and video formats
Pros
- Free for both Windows and MAC operating systems
- The cutter saves video in original quality
Cons
- It does not include basic video editing features
Part 3: Top 3 Free AVI Video Cutter on MAC
Are you looking for a great AVI video cutter for your MAC? Sadly, you have limited product choices as compared to Windows users. But to ensure you don’t waste time looking for a suitable tool, here’s a list of three AVI video cutting programs you can use on your Macintosh.
iMovie
The first and foremost recommended software for free video cutting on MAC is Apple’s own tool, iMovie . It is a built-in program that comes with your system, so there is no need to spend extra on a video editor. iMovie allows you to browse and import most video files, including AVI, right from your computer. Also, this tool is equipped with multiple functions, such as audio editing, video quality enhancement, and much more.
This MAC’s video editor is ideal for beginners. Many home users and small business owners find this tool extremely simple, as they don’t like to be confused with complex features. So, if you want to make cuts to your video clips, start working on iMovie. And within a few clicks, you can trim or cut your videos for free.
Features
- Video cutting and trimming
- Cropping and rotation
- Effects and transitions
- Built-in themes
- HD and 4K video support
- Movie sharing
- Audio adjustments
- Chroma screen controls
- Character tracking
Pros
- Free to use for MAC users
- Clean timeline
- One-click video cutting and trimming
- Easy-to-remember keyboard shortcuts
- Direct share projects to your social media, like YouTube
Cons
- It takes a lot of time to export videos
- iMovie needs high HDD storage space
VideoPad by NCH
VideoPad by NCH is a beginner-level video editor with all the basic features. The software is specifically designed for home movie makers. That is why VideoPad is easy to understand and use.
VideoPad is entirely free of cost for non-commercial purposes, but it has limited features. On the other hand, if you want to enjoy full traits, you can purchase the tool.
VideoPad supports video files, including AVI, WMV, MPEG, MOV, MP4, ASF, and XviD. Likewise, you can also burn movies to Blu-ray, DVD, HD-DVD, or CD. And most importantly, you can easily cut or trim AVI videos on your MAC, as the software is available on both MAC and Windows systems.
Features
- Audio tools
- Video rotation
- Video sharing
- Visual effects
- Video transitions
- 3D Video editing
- Color correction
- Overlays and texts
- Video optimization
- Great plugin support
- Direct video uploading
- Multiple video resolutions
- Video cutting and trimming
- Files exportation to various devices
- Stereoscopic conversion from 2D to 3D
Pros
- You can use the basic tools for free
- Allows 360-degree video production
- It supports a wide range of video formats
- Compatible with MAC and Windows computers
Cons
- The auto speech feature performs poorly
- The free version has annoying notifications
Xilisoft Video Cutter
Xilisoft Video Cutter is the simplest tool to cut videos on MAC. This software has a straightforward option to cut the clip after importing it to the timeline. The program is fast and has a user-friendly interface.
Moreover, you can polish your videos by merging multiple clips or increasing the video quality once you’re done with the cutting process. At the same time, this video cutter allows you to import all video formats, including XviD, DivX, MOV, FLV, MP4, MPEG-4/, MKV, MPEG, WMV, and AVI.
Features
- Video joining
- Support multiple output video formats, including HD
Pros
- Easy video cutting and merging
- It doesn’t require a large storage space
- Extremely uncomplicated interface
- Real-time preview to make better cuts
- Available on both MAC and Windows systems
Cons
- The trial version is free to use but limits you from enjoying extra features
Part 4: Top 3 Free AVI Video Cutter on Android
After capturing nice videos with your Android mobile phone, you may need to cut unnecessary scenes to make your clips look professional. While there are numerous Android cutters, not all support the AVI format. So below, you will find the 3 best AVI video cutters for Android, which are free to use.
Quick – Video Editor & Maker
Quick – Video Editor & Maker is a free video editor with PRO results. Many photographers and vloggers love using this app to cut clips immediately. Furthermore, the application offers a wide range of options to assure you don’t have to look to any other tool to rotate or compress video. Quick – Video Editor & Maker lets you import videos in all major formats, including AVI, MPEG, WMA, and more.
Features
- Video cutting, fading, and rotation
- Speed control tools
- Conversion from video to GIF
Pros
- Free app
- Simple interface
Cons
- Lack of updates
- Some users complain about app crash
Funimate Video Editor & Maker
If you want to make some professional-grade video edits quickly, you are welcome to download and use Funimate Video Editor & Maker on your Android device. It’s a free tool to cut videos. It has an easy procedure, and you can cut AVI videos in a few seconds.
Plus, you can use the app to add custom animations, effects, and many other exciting elements. You can share your makes on social media like TikTok, Instagram, and other platforms. Contrarily, the app itself is a community with millions of Funimate-users who share their creations daily. You can also join or watch videos from other creators to learn more about new techniques and trends in video editing.
Features
- Video trimming and splitting
- Animation and cropping
- Filters and AI effects
- Speed adjustment
- Keyframing and video merging
Pros
- Free Android application with several editing tools
- Easy trimming, splitting, and cropping
- Aspect ratio, border, and color customization
- Direct social media sharing
Cons
- Free users cannot use templates
- The free version stamps watermarks on each project
Part 5: Top 3 Free AVI Video Cutter on iPhone
No wonder iPhone’s camera captures high-quality videos. But the problem begins when there’s no free app to cut AVI videos. So if you’re recording great spots, but deep inside, you really want to remove some parts, then these 3 free AVI video cutters will work smoothly on your iPhone.
Cut, Trim, Split Video Editor
Download Cut, Trim, Split Video Editor on your iPhone to delete/cut unwanted portions of your video clips. The tool is also best for trimming iPhone-recorded clips without messing with the frames. Or, if you just want to split the video into multiple parts for your next WhatsApp status, this iPhone app can do that job for you.
The app supports multiple video file types, including MOV, MP4, AVI, MPEG, MPEG-2, and 3GPP
Features
- Easy trimming and cutting video clips
- Splitting big-sized videos into two smaller clips
- Import video from file-sharing platforms, like iCloud, using Wi-Fi
Pros
- Free app for fast video cutting and sharing
- Simple UI interface
Cons
- The free version shows advertisements
Splice - Video Editor & Maker
Splice is an extraordinary video editor that makes it easy to make fully customized and professional videos from your iPhone. The app is also best for video cutting. Besides, it has many interesting features, which you can use from your device.
Features
- Cutting, trimming, and cropping your videos
- Exposure, saturation, and exposure adjustment
- Slow and fast motion with speed ramping option
- Video masking and overlay
- Color correction and text overlays
Pros
- Free basic features, such as video cutting
- iTunes integration
- Supports AVI video input
- User-friendly application
- Access to the music library
- Quick and simple social sharing
Cons
- Output videos require high mobile storage space
Part 6: Top 3 Free AVI Video Cutter Online
Don’t want to install video cutters on your MAC, Windows, smartphone, or any other device? No problem! You can use online video cutters and trimmers to split, cut, or trim your clips for free.
However, the problem still exists in online tools, as not all web-based editors allow importing AVI files. So to save your time and energy, you can directly go to the following online AVI cutters to complete your tasks.
Kapwing
Kapwing is an online video editor best for casual creatives, such as Vloggers and YouTubers. You can use this web-based platform to cut your videos. Gladly, Kapwing supports all AVI incomings. You can upload your AVI video files to this platform and use its trim or split feature. To do that, you need to upload your AVI video and choose the “Trim” or “Split” tool to see the magic. Once done with the trimming process, you can explore Kapwing’s other incredible traits and apply them to your project.
Features
- Video splitting, trimming, and merging
- Audio capturing
- Speed adjustment
- Image and video library
- Text editing and overlay
- Auto-generated subtitles
- Several collaboration tools
- Video creation from scratch
- Templates, shapes, and emojis
- Simple drag-and-drop interface
- Video transitions, plugins, and elements
Pros
- Free online video trimmer
- User-friendly interface
- You can export 30-minutes long projects
- Allows you to export unlimited videos with a watermark
- One watermark-free video export is available each month
Cons
- Cannot export long videos with a free account
- Only 10 minutes transcription limit is available for free users
- You need to purchase a monthly or annual subscription to remove the watermark from multiple videos
Clideo
Clideo is not just a video cutter but an online solution to all your video editing problems. The tool is super popular, with 4 million+ users a month. And why not? This is one of those web-based platforms that allow AVI video files to be imported and exported without converting them into any other formats.
Nevertheless, if you’re only looking for video cutting options, this tool makes your life easy. Simply upload your video, and select the portion of it by setting start and end times. Choose whether you want to delete or extract the selected part from the clip, and hit the “Export” button.
And within a few moments, you can enjoy a trimmed video clip. And if you plan to be more creative, you can look for other Clideo features to make videos more fascinating.
Features
- Video combining and cutting
- Resize and crop clips
- Compress your videos
- Add text and subtitles
- Add music to your video files
- Filters and color correction tools
- Audio mute, cutting, and muting
- Video rotation, flipping, and speed adjustment
Pros
- Basic tools can be used for free
- Best for beginners and intermediate users
- Ideal for AVI videos and also supports other video formats
Cons
- You cannot use the free version regularly
Aspose
Aspose is a free web-based application to cut clips. You can use this tool on any operating system. It supports all major video file formats, including AVI, MKV, MOV, MP4, FLV, WMV, WEBM, and GIF. Additionally, you can use Aspose for various other reasons, such as audio extraction, video resizing, and more.
Features
- Video cutting and compressing
- Looping, rotation, and video merging
- Adding watermarks on videos
- Sound muting
- Speed change and audio addition
Pros
- Aspose is a free online tool
- It offers straightforward options to cut and edit videos
Cons
- No color correction option
- Slow video cutting process
- Lacks timeline and other valuable features
Part 7: Bottom Line
Tired of finding AVI cutters? Relax and try these top 16 AVI video cutters for Windows, MAC, iPhone, Android, and online. Almost all these tools are free to use and are extremely handy. On the other hand, if you want to cut and trim videos professionally, download Filmora and follow the step-by-step guide in this article for making clean cuts.
Part 8: FAQs
Q1. How do I trim an AVI video?
To trim an AVI video file, ensure that the software or tool you use supports AVI input. Generally, you need to upload or import a clip on the program, select the portion of the video, and apply the cut/trim feature to make it happen.
Q2. Which is the best online video cutter?
Kapwing and Clideo are the two best online video cutters you can use for free. Both web-based tools also allow you to cut your AVI videos.
Q3. Which is the best video cutter and joiner software?
Filmora, iMovie, and Kapwing are some of the best video cutters and joiner tools. These video editors are also free to use and come with different features.
Q4. How do I trim an AVI file in Windows 10?
Trimming an AVI video file in Windows 10 is very simple. Launch the Microsoft Photos (Photo App) application on your computer, add clip, and select the “Trim” tool to trim a specific video part.
Q5. How can I cut a video on my computer for free?
MAC and Windows users can download Filmora to cut videos for free. Filmora also offers a wide range of other features to make your clips exciting. Contrarily, Windows users can use the built-in Photo App in Windows 10 or download Gihosoft or Handbrake software to cut clips. Likewise, MAC users can download VideoPad, Xilisoft Video Cutter, or iMovie for free.
Also read:
- Face Blur Mastery Expert Video Editing Techniques
- Download Filmora 13 Video Editor Free No Watermark for 2024
- Updated Discover the Perfect Twitter Video Size for Your Content
- How to Get Filmora for Free without Crack (100 Truthful) for 2024
- 2024 Approved Fade In, Fade Out Exploring Two Essential Audio Techniques in Final Cut Pro
- 2024 Approved Brighten Up Your Videos Best Editing Software for PC and Online
- The Ultimate Guide to 4K/8K Video Editing Top Software
- Bring Your Videos to Life Top 5 iPhone Video Editing Apps for 2024
- In 2024, Free Video Cutting Tools for Windows 10 A Comprehensive Review
- Edit Like a Pro Top-Rated Free 4K Video Editing Software for 2024
- Online Gaming Intro Generators Our Top 10 Picks
- 2024 Approved PS4 Screenshot Sharing 101 Tips and Tricks
- 2024 Approved Elevate Your Storytelling How to Create Stunning, Hollywood-Style Videos
- 2024 Approved Essential FCPX Plugins Free and Paid Favorites
- Updated From LOL to OMG The Best Meme Generator Apps
- In 2024, Best Stop Motion Apps for iOS and Android
- Updated Chromebooks Best Android Video Editors for Seamless Editing
- In 2024, Cut MKV Files for Free Top 10 Tools You Need
- New Edit Like a Pro 10 Free Video Editing Apps for Chromebook Users
- Transform Your Photos Into Engaging Mac Slideshows with Ezvid
- In 2024, Best Time-Lapse Apps for iPhone and Android Devices
- 2024 Approved FCPX Plugin Roundup Top 10 Free and Paid Tools to Elevate Your Edits
- 2024 Approved Cut, Trim, and Edit Videos for Free on Windows 10 Top Software Picks
- New Convert Soundcloud to MP3 with Ease Essential Tips and Techniques
- In 2024, Best Neon Sign Makers Online Top Picks for DIY Designers
- AVI Video Rotation Made Easy 16 Free Solutions for Windows, MAC, Android, iPhone, and Online Users for 2024
- Top 4 Ways to Trace Motorola Moto G73 5G Location | Dr.fone
- In 2024, How to Bypass iCloud Lock on Apple iPhone 14 Pro Max
- A Detailed VPNa Fake GPS Location Free Review On ZTE Nubia Flip 5G | Dr.fone
- In 2024, Reset iTunes Backup Password Of iPhone 13 Prevention & Solution | Dr.fone
- In 2024, How to get the dragon scale and evolution-enabled pokemon On Oppo F25 Pro 5G? | Dr.fone
- Gmail Not Working on Nokia 105 Classic 7 Common Problems & Fixes | Dr.fone
- In 2024, What is the best Pokemon for pokemon pvp ranking On Honor 100? | Dr.fone
- 4 Ways to Fix Android Blue Screen of Death On Samsung Galaxy A25 5G | Dr.fone
- How to Rescue Lost Contacts from Realme Narzo 60 5G?
- How to Erase an Apple iPhone 7 Plus without Apple ID?
- In 2024, How to Unlock Poco X6 Phone without Google Account?
- Is GSM Flasher ADB Legit? Full Review To Bypass Your Infinix Smart 7 Phone FRP Lock
- Top 9 Free TV Streaming Services or Sites To Use for 2024
- In 2024, How To Bypass the Required Apple Store Verification For iPhone 13 Pro Max | Dr.fone
- 4 Ways to Fix Android Blue Screen of Death On Oppo Find X7 Ultra | Dr.fone
- How To Erase Private Data From Apple iPhone XR | Dr.fone
- Hassle-Free Ways to Remove FRP Lock on Vivo Y100Awith/without a PC
- Title: 2024 Approved Top 8 Video Editing Apps for 4K Proxy Video Editing
- Author: Giselle
- Created at : 2024-05-19 07:45:52
- Updated at : 2024-05-20 07:45:52
- Link: https://ai-vdieo-software.techidaily.com/1714076431173-2024-approved-top-8-video-editing-apps-for-4k-proxy-video-editing/
- License: This work is licensed under CC BY-NC-SA 4.0.
